Table of Contents
Advertisement
Quick Links
Quick Guide – RetroSign GRX
Getting started
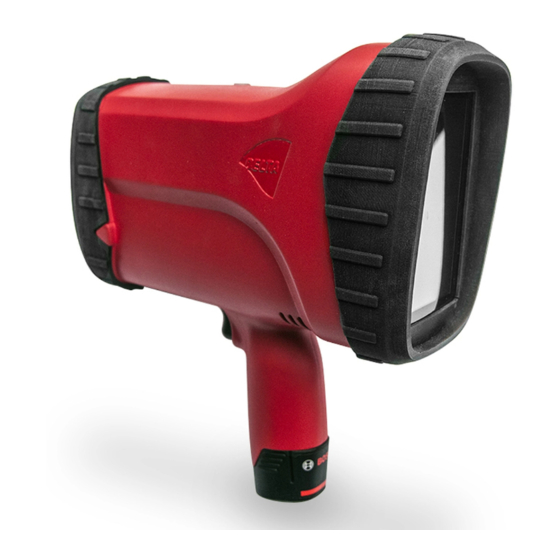
The GRX is operated by a touch screen, where you can use these movements: tap,
swipe, and pinch. Alternatively, use the GRX trigger button.
Turn on the instrument: Press the red power button underneath the GRX housing.
The instrument turns on in less than a minute and in 1-2 seconds from stand-by mode.
Stand-by: To activate stand-by press the red power button shortly.
Switching off: Press the red power button for a couple of seconds until 'Power off' is written on the
touch screen. Then tap the screen to turn off the instrument completely.
Day-to-day operation
To start preparing a measurement press
swipe the screen from left to right) to access the main menu
Follow the steps below in your daily workflow routine and follow the instructions on the GRX screen:
→
Calibration
1.
Calibrate: Calibrate the instrument daily before conducting any measurements. Use the
calibration target
retroreflectometer. Calibration values can either be typed in by hand or scanned from the
barcode. Follow the instruction on the display.
2.
Users: Create or select a user who performs the measurement.
3.
Template: Create or select a template which specifies the data fields to be captured
during an inspection (retroreflection of background and legend colors). Choose between
single or multiple (2-10) shots per element, taking a photo of the object and data fields picked
from predefined fields or typed new. If single shot is chosen it will still be possible to enter
data fields but not to activate "Take picture" or automatically note if it is a background or
legend measurement. Single shot is made for fast measurements.
4.
Series: Create or select an existing series based on a template. Your inspections are
automatically stored. Series is where data is stored and organized and the individual
measurements can be confirmed.
5.
Measure: Conduct the measurements on-site. Press the trigger button to initiate an
inspection. For multiple shots the first step will be to confirm the series information (or modify
if required). If "Take picture" has been chosen this will be the next step followed by the
retroreflection measurements. During measurement follow the instruction on the display. For
single shots you will go directly to measure without the option of modifying entered data.
GRX Quick Guide V1.0
at the top left corner of the GRX touch screen (or
→
Users
Templates
(at the back of the angle adaptor) for verification and calibration of the
→
→
Series
Power button
Measurements
Advertisement
Table of Contents

Related Manuals for Delta RetroSign GRX


Summary of Contents for Delta RetroSign GRX
- Page 1 Quick Guide – RetroSign GRX Getting started The GRX is operated by a touch screen, where you can use these movements: tap, swipe, and pinch. Alternatively, use the GRX trigger button. Turn on the instrument: Press the red power button underneath the GRX housing.
-
Page 2: Safety Precautions
If errors are detected during a measurement or calibration sequence, a message will be displayed on the screen. Please refer to the GRX user manual for further details. DELTA recommends re-calibrating or changing the calibration target bi-annually. If damaged or dirty beyond cleaning the calibration target has to be changed immediate to ensure correct measurement results.
Need help?
Do you have a question about the RetroSign GRX and is the answer not in the manual?
Questions and answers