Table of Contents
Advertisement
Advertisement
Table of Contents

Subscribe to Our Youtube Channel
Related Manuals for Technogym MB430


Summary of Contents for Technogym MB430
- Page 1 Dual Adjustable Pulley User manual...
-
Page 2: Table Of Contents
Contents Important safety instructions .................3 Personal safety ......................4 Identification of the manufacturer and the equipment ........6 Description of the equipment ..................7 Technical data ......................8 Accessories........................9 Place of installation ....................10 Assembling the equipment ..................11 Assembling the barbell supports .................18 Adjusting the equipment ..................19 Lifting and handling the equipment .............. -
Page 3: Important Safety Instructions
The product must be installed and used in a place in which access and supervision are specifically controlled by the owner. The product Dual Adjustable Pulley is intended for commercial use. Do not use any accessories other than those recommended by Technogym. Keep your hands away from moving parts. -
Page 4: Personal Safety
Completely assemble the unit before using it. Check the equipment before each use, and check that the cable is correctly routed inside the races of all the pulleys and the state of wear of the cable. If there are signs of wear, contact the Technogym Technical Support service. Do not continue to operate the unit when it is not working properly. - Page 5 Personal safety The instruction label must be applied on the equipment. Technogym declines all responsibility in the event of the equipment being used before affixing the instruction label. The equipment is designed and constructed in compliance with the requirements for user safety and health; however, there are some areas that may give rise to risks that are not plainly evident.
-
Page 6: Identification Of The Manufacturer And The Equipment
Identification of the manufacturer and the equipment The identification plate of the equipment and manufacturer gives the following details: A Name and address of the manufacturer B CE Mark C Serial number D Cautions and maximum user weight E Equipment classification CABLE STATIONS CB350C0 - ALK0GGGK Controllare periodicamente lo stato di usura... -
Page 7: Description Of The Equipment
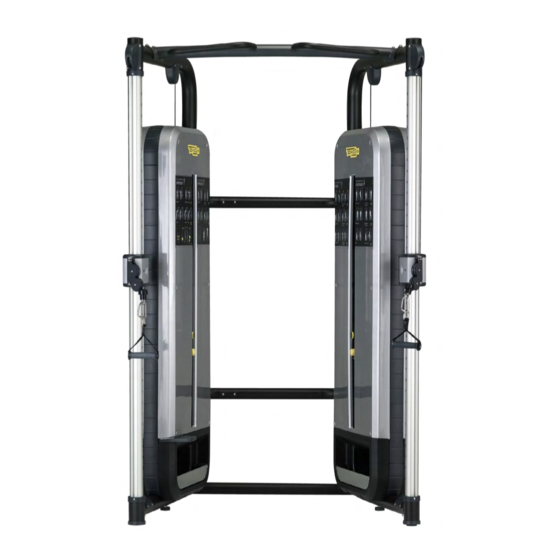
Description of the equipment Frames (A): the load-bearing structure of the equipment. Crosspieces (B): elements that join the two frames. Upper handgrips (C): held by the user to perform certain exercises. Adjustable output cable (D): their position can be adjusted in height with the handles (E). -
Page 8: Technical Data
Technical data 1196 mm 1450 mm (47") (57") 2324 mm (91") MB430 513 kg (1140 lb) 2 x 140 kg (2 x 309 lb) MB436 2 x 200 kg (2 x 441 lb) 648 kg (1430 lb) Dual Adjustable Pulley... -
Page 9: Accessories
Accessories The equipment’s standard outfit comprises: A0000510 user manual A0000511 warranty certificate A0000515 two handles A0000510 two handles A0000511 one ankle strap A0000515 The following are optional: A0000514 A0000513 belt A0000514 thigh strap A0000513 barbell with relative supports A0000516 bar A0000517. A0000516 A0000517 Dual Adjustable Pulley... -
Page 10: Place Of Installation
Place of installation To guarantee safe, comfortable and effective use of the equipment, the place of installation must comply with certain specific requirements; in particular, before choosing where to install the equipment it is recommended to check the following: temperature between +10°C and +25°C; sufficient ventilation to maintain a humidity level between 20% and 90%, when the equipment is in use;... -
Page 11: Assembling The Equipment
Assembling the equipment WARNING Given the weight of the equipment, we recommend that more than one person be involved in lifting and moving the modules. Unscrew the screws (A) to remove the upper and rear brackets, that join the two modules in the packing. Dual Adjustable Pulley... - Page 12 Assembling the equipment Move one module at the time to the installation location, with normal lifting and moving equipment. To facilitate going through narrow doors, lift the equipment as shown in the figure. Dual Adjustable Pulley...
- Page 13 Assembling the equipment Place the modules in a diverging position and firstly secure the upper crosspiece (B), then the M10x30 IX crosspiece (C), with the 16 screws (D), without tightening them. 10.5x17.5x2.2 WARNING There are coloured indications on the crosspieces for their correct positioning. 10x25x3 IX Dual Adjustable Pulley...
- Page 14 Assembling the equipment Lower the adjustable feet (E) until they rest on the floor. Unscrew the 6 screws (F) to remove the lower brackets. Dual Adjustable Pulley...
- Page 15 Assembling the equipment Secure the lower crosspiece (G) with the 4 screws (I); then M10x30 IX M10x90 IX the crosspiece (H), with the 8 screws (D). 10.5x17.5x2.2 10x25x3 IX Tighten all the screws. 10x25x3 IX M10 Z Dual Adjustable Pulley...
- Page 16 Assembling the equipment Remove the packing materials from the weight stack and check the correct operation of the equipment. Dual Adjustable Pulley...
- Page 17 Assembling the equipment Assemble the protection panels for the weight stack (L) with the 6 screws (M). Assemble the tray cover (N) with the 5 screws (M). M6x30 IX 6.4x12x1.6 M6 T163 Dual Adjustable Pulley...
-
Page 18: Assembling The Barbell Supports
Assembling the barbell supports Unscrew the screws (A) on the crosspieces (B) and (C). Position the 2 supports (D) for the barbell and secure them with the screws (A). Dual Adjustable Pulley... -
Page 19: Adjusting The Equipment
Adjusting the equipment Once the equipment is assembled, check that it is level. The feet (A) are adjustable for this purpose: loosen the lock nut (B) then screw or unscrew the foot (A) until the equipment is stable; once the adjustment is complete tighten the lock nut (B). -
Page 20: Lifting And Handling The Equipment
Lifting and handling the equipment Before moving the equipment, firstly release it from the floor-mounting and disassemble it. Follow the instructions described in the assembly section in reverse order. WARNING The equipment must be moved with great care, due to the risk of it tipping over. Lift the equipment, as shown in the figure. -
Page 21: Securing The Equipment
It is mandatory to secure the equipment to the floor with the specific fixing screws. Technogym cannot be held liable for any damage caused by failure to secure the equipment. To secure the equipment, use anchor screws which strictly comply with the following minimum requirement: minimum guaranteed load of 50 kg. -
Page 22: Routine Maintenance
For maintenance actions not described in this manual, call in the Technogym Technical Service. Dual Adjustable Pulley... -
Page 23: Replacing The Spring Hook
When replacing, always use a spring hook supplied directly by Technogym. If it is impossible to obtain an original part, use a spring hook that strictly meets the following minimum requirements: materials used: AISI 316 stainless steel;... -
Page 24: Technical Service
When contacting the Technogym Technical Support Service, please specify the following details: equipment model, date of purchase, serial number, precise description of the problem. WARNING Any operations on the equipment carried out by persons not authorized by Technogym will invalidate the warranty. Dual Adjustable Pulley... -
Page 25: Storage
Storage If the equipment will not be used for a prolonged period, it is recommended to store it: in a clean and dry place, covered with a cloth to protect it from dust; in an environment with a temperature between +10°C and +25°C and a humidity between 20% and 90%. For correct storage, use the original packing materials. -
Page 26: Using The Equipment
Using the equipment Pay particular attention to the parts of the equipment with labels indicating the “DANGER OF SQUASHING”. Handle Handle Only some of the many examples of how the accessories can be installed and only some of the exercises that can be performed with Dual Adjustable Pulley are described below. - Page 27 Open the QR code reader on your device and point the camera of the device at the code on the product. In this way, the personal device will connect to the Technogym cloud. To connect using the QR code, you must have installed the Technogym application on your personal device. Dual Adjustable Pulley...
- Page 28 Using the equipment Chest press Hook the handles at shoulder height. Select the load with the pins, the same for both arms. Spread your legs slightly and, for greater stability, put one in front of the other. Grip the handles with your arms bent and your palms facing your chest; legs slightly bent and cables in tension.
- Page 29 Using the equipment Chest press with forward lunge and alternating arms Hook the handles at shoulder height. Select the workload with the pins, the same for both arms. Spread your legs slightly. Grip the handles with your arms bent and your palms facing your chest; legs slightly bent and cables in tension.
- Page 30 Using the equipment High row Bring the cable output fully to the top and hook the handles. Select the workload with the pins, the same for both arms. Spread your legs slightly and, for greater stability, put one in front of the other. Grip the handles with your arms bent and your palms facing your chest;...
- Page 31 Using the equipment Alternated high row with backward lunge Bring the cable output fully to the top and hook the handles. Select the workload with the pins, the same for both arms. Spread your legs slightly. Grip the handles with your arms slightly bent and your palms facing your chest; legs slightly bent and cables in tension.
- Page 32 Using the equipment Shoulder press standing Bring the cable output fully to the bottom and hook the handles. Select the workload with the pins, the same for both arms. Spread your legs slightly and, for greater stability, put one in front of the other. Grip the handles with your arms bent;...
- Page 33 Using the equipment Alternating shoulder press, from squat to standing Bring the cable output fully to the bottom and hook the handles. Select the workload with the pins, the same for both arms. Spread your legs slightly . Grip the handles with your arms bent; legs slightly bent and cables in tension. Keeping your trunk still, straighten one arm upwards and simultaneously straighten your legs.
- Page 34 Using the equipment Low row Bring the cable output fully to the bottom and hook the handles. Select the workload with the pins, the same for both arms. Spread your legs slightly and, for greater stability, put one in front of the other. Grip the handles with your arms slightly bent and the palm of your hands inwards;...
- Page 35 Using the equipment Alternating low row with backward lunge Bring the cable output fully to the bottom and hook the handles. Select the workload with the pins, the same for both arms. Spread your legs slightly. Grip the handles with your arms slightly bent and the palm of your hands inwards; legs slightly bent and chest slightly bent forwards.
- Page 36 Using the equipment Hip abduction standing Bring the cable output fully to the bottom and hook the ankle strap. Select the workload with the pin. Stand with the side to be exercised away from the weight stack, put on the ankle strap. Swing your leg outward without making contralateral movements with your torso.
- Page 37 Using the equipment Hip abduction standing Bring the cable output fully to the bottom and hook the ankle strap. Select the workload with the pin. Stand with the side to be exercised toward the weight stack, put on the ankle strap. Standing, hold your leg outstretched and slightly raised.
- Page 38 Using the equipment Squat Bring the cable output fully to the bottom and hook the handles. Select the workload with the pins, the same for both arms. Spread your legs, so that your feet are in line with your hips, and your toes slightly spread. Grip the handles, with the cables in tension.
- Page 39 Using the equipment Abdominal crunch Bring the cable output fully to the top and hook the handles. Select the workload with the pins, the same for both arms. Spread your legs slightly. Grip the handles with your arms bent to your chest; legs slightly bent and cables in tension. Curl your torso forward and try to bring your breastbone down to your pelvis.
- Page 40 Using the equipment Trunk extensions Bring the cable output fully to the bottom and hook the handles. Select the workload with the pins, the same for both arms. Spread your legs slightly and, for greater stability, put one in front of the other. Grip the handles with your trunk bent forwards;...
- Page 41 Using the equipment Chin-up Place your left foot on the foothold to help you get on. Grip the handgrips. Bend your arms to lift your body keeping your back straight; then return to the start position. During the exercise make sure that you don’t bend your back. Dual Adjustable Pulley...
- Page 42 Dual Adjustable Pulley_en_AF 0SM00936...
Need help?
Do you have a question about the MB430 and is the answer not in the manual?
Questions and answers