Renishaw OMI-2 Installation Manuals
Optical machine interface
Hide thumbs
Also See for OMI-2:
- Quick start manual (94 pages) ,
- Installation and user manual (33 pages) ,
- User manual (2 pages)
Table of Contents
Advertisement
Advertisement
Table of Contents

Related Manuals for Renishaw OMI-2


Summary of Contents for Renishaw OMI-2
- Page 1 Installation guide H-5191-8504-03-A OMI-2 optical machine interface...
- Page 1 Installation guide H-5191-8504-02-A OMI-2 optical machine interface...
- Page 2 © 2015–2019 Renishaw plc. All rights reserved. This document may not be copied or reproduced in whole or in part, or transferred to any other media or language, by any means, without the prior written permission of Renishaw. The publication of material within this document does not imply freedom from the patent rights of Renishaw plc.
- Page 2 © 2015–2018 Renishaw plc. All rights reserved. This document may not be copied or reproduced in whole or in part, or transferred to any other media or language, by any means, without the prior written permission of Renishaw plc. The publication of material within this document does not imply freedom from the patent rights of Renishaw plc.
-
Page 3: Table Of Contents
OMI-2 visual diagnostics ........ -
Page 3: Table Of Contents
OMI-2 visual diagnostics ........ - Page 4 Removing the OMI-2 window ........
- Page 4 Removing the OMI-2 window ........
-
Page 5: Before You Begin
CNC machine tools must always be operated by fully trained personnel in accordance with the manufacturer’s instructions. Care of the interface Keep system components clean and treat with care. Do not apply labels to the front of the OMI-2 or otherwise obstruct the window. -
Page 5: Before You Begin
Trade marks • neglected, mishandled or inappropriately used; RENISHAW and the probe symbol used in the RENISHAW logo are registered trade marks of • modified or altered in any way except with the Renishaw plc in the United Kingdom and other prior written agreement of Renishaw. -
Page 6: Patents
OMI-2 installation guide Patents None applicable. -
Page 6: Patents
OMI-2 installation guide Patents Features of OMI-2 (and features of similar products) are the subject of one or more of the following patents and/or patent applications: EP 0974208 JP 4294101 EP 1503524 US 6,839,563... -
Page 7: Ec Declaration Of Conformity
This device complies with part 15 of the FCC Renishaw plc declares under its sole responsibility Rules. Operation is subject to the following two that the OMI-2 is in conformity with all relevant conditions: Union legislation. This device may not cause harmful... -
Page 8: Safety
Equipment operation tools or CMMs, eye protection is recommended. If this equipment is used in a manner not specified The OMI-2 has a glass window. Handle with care by the manufacturer, the protection provided by if broken to avoid injury. -
Page 8: Safety
Equipment operation tools or CMMs, eye protection is recommended. If this equipment is used in a manner not specified The OMI-2 has a glass window. Handle with care by the manufacturer, the protection provided by if broken to avoid injury. -
Page 9: Omi-2 Basics
Power supply The OMI-2 can draw its supply from the CNC machine’s nominal 12 Vdc to 30 Vdc supply. The maximum supply current is 100 mA when the OMI-2 is transmitting and 40 mA when the OMI-2 is receiving. -
Page 9: Omi-2 Basics
‘Modulated’ mode. Power supply The OMI-2 can draw its supply from the CNC machine’s nominal 12 Vdc to 30 Vdc supply. The maximum supply current is 100 mA when the OMI-2 is transmitting and 40 mA when the OMI-2 is receiving. -
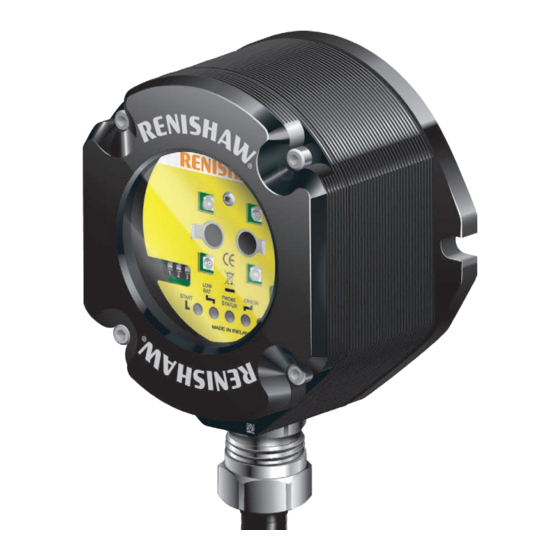
Page 10: Omi-2 Visual Diagnostics
OMI-2 installation guide OMI-2 visual diagnostics Magnetic label A summary of OMI-2 LED activity is provided on A visual indication of system status is provided by a magnetic label. The label may be placed on any LEDs. Indication is provided for: machine flat metal surface. -
Page 11: Start Signal Led (Yellow)
Interference or a weak probe signal PROBE STATUS LED (green, red) has caused the trigger instant to be delayed. This bicolour LED is lit when the OMI-2 is powered. NOTE: If the ERROR LED is activated because Green – Probe is seated. -
Page 11: Start Signal Led (Yellow)
PROBE STATUS LED (green, red) has caused the trigger instant to be delayed. This bicolour LED is lit when the OMI-2 is powered. NOTE: If the ERROR LED is activated because the blue or yellow condition causes the loss of a Green –... -
Page 12: Omi-2 Inputs
Open to closed 100 µs max. Output • Closed to open 25 µs max. Ensure the output from the OMI-2 does not exceed the specified current ratings. Probe status 2a, (5 V isolated driven skip): • Load current 50 mA max. -
Page 12: Omi-2 Inputs
(green/yellow); or the red and black wires (power supply); as this could result All outputs can be inverted by using switches in permanent damage to the OMI-2 and/or the SW1 and SW2, (see “Switches SW1 and SW2” on customer power supply. -
Page 13: Omi-2 Output Waveforms
OMI-2 output waveforms NOTE: Outputs can be inverted by using switches SW1 and SW2 (see “Switches SW1 and SW2” on page 2.6). Probe Seated Triggered Seated OMI-2 Error Probe Probe SSR/driven Probe Probe Error e.g. low switch switch trigger reseat... -
Page 13: Omi-2 Output Waveforms
OMI-2 output waveforms NOTE: Outputs can be inverted by switches (see “Switches SW1 and SW2” on page 2.6). Probe Triggered Seated Seated OMI-2 Error Probe Probe Probe Probe Error SSR/driven e.g. low switch switch trigger reseat clear battery signal outputs... -
Page 14: Switches Sw1 And Sw2
OMI-2 installation guide Switches SW1 and SW2 NOTE: To gain access to the switches, remove the window (see “Removing the OMI-2 window” in Section 4, “Maintenance”). Switch SW1 output configuration Switch SW2 output configuration PROBE ERROR PROBE MACHINE START START... -
Page 14: Switches Sw1 And Sw2
OMI-2 installation guide Switches SW1 and SW2 NOTE: To gain access to the switches, remove the window (see “Removing the OMI-2 window” in Section 4, “Maintenance”). Switch SW1 output configuration Switch SW2 output configuration PROBE MACHINE START START PROBE ERROR... -
Page 15: Switch On / Switch Off
OTS. Start-up times In normal operation the start-up time for a modulated probe (as reported by the OMI-2 error signal) is 410 ms max. for kinematic probes and 1 second max. for strain gauge probes. When turning the probe off and back on, allow... -
Page 15: Switch On / Switch Off
Switch on / switch off Switch on / switch off method The OMI-2 operates using either optical on / optical off as the switch on / switch off method or Auto start. Optical on / optical off is available with all Renishaw’s OMP range of spindle probes and... -
Page 16: Omi-2 Dimensions
OMI-2 installation guide OMI-2 dimensions 84 (3.30) 46.7 (1.84) 40 (1.57) 40 (1.57) 16 (0.63) Dimensions given in mm (in) -
Page 16: Omi-2 Dimensions
OMI-2 installation guide OMI-2 dimensions 46.7 (1.84) 84 (3.30) 40 (1.57) 40 (1.57) 16 (0.63) Dimensions given in mm (in) -
Page 17: Omi-2 Specification
OMP600 and OTS Operating range Up to 6 m (19.7 ft) Weight OMI-2 including 8 m (26.2 ft) of cable = 926 g (32.66 oz) OMI-2 including 15 m (49.2 ft) of cable = 1457 g (51.39 oz) Supply voltage 12 Vdc to 30 Vdc (see “Wiring diagram” in Section 3, “System installation”) -
Page 17: Omi-2 Specification
OMP600 and OTS Operating range Up to 6 m (19.7 ft) Weight OMI-2 including 8 m (26.2 ft) of cable = 926 g (32.66 oz) OMI-2 including 15 m (49.2 ft) of cable = 1457 g (51.39 oz) Supply voltage 12 Vdc to 30 Vdc (see “Wiring diagram” in Section 3, “System installation”) - Page 18 OMI-2 installation guide 2.10 This page is intentionally left blank.
- Page 18 OMI-2 installation guide 2.10 This page is intentionally left blank.
-
Page 19: System Installation
System installation Mounting bracket (optional) NOTE: Install OMI-2 with cable exiting from lower side for good coolant run off. (0.98) (0.98) 3 holes Ø6.4 (0.25) 3 grip protrusions 100.5 (3.95) 3 pairs of holes Ø5.3 (0.20) permit OMI-2 mounting in... -
Page 19: System Installation
System installation Mounting bracket (optional) NOTE: Install OMI-2 with cable exiting from lower side for good coolant run off. (0.98) (0.98) 3 holes Ø6.4 (0.25) 3 grip protrusions 100.5 (3.95) 3 pairs of holes Ø5.3 (0.20) permit OMI-2 mounting in... -
Page 20: Wiring Diagram (With Output Groupings Shown)
Any one of the probe status outputs can be used to drive an external audible indicator when set to On machines where the OMI-2 is to be integrated pulsed (see “OMI-2 outputs” on page 2.4). with a tool setting probe input, and only one probe... -
Page 20: Wiring Diagram (With Output Groupings Shown)
Any one of the probe status outputs can be used to drive an external audible indicator when set to On machines where the OMI-2 is to be integrated pulsed (see “OMI-2 outputs” on page 2.4). with a tool setting probe input, and only one probe... -
Page 21: Omi-2 Cable
A ferrule should be crimped onto each cable wire for a more positive connection at the terminal box. Standard cable variants The OMI-2 standard polyurethane cables are 8 m (26 ft) and 15 m (49.2 ft) long. Please contact Renishaw for other cable lengths. -
Page 21: Omi-2 Cable
Cable sealing Conduit termination piece Coolant and dirt are prevented from entering the OMI-2 by the cable sealing gland. The OMI-2 cable can be protected against physical damage Cable Plastic olive by fitting a flexible conduit if required. A recommended flexible conduit is Anamet ™... -
Page 22: Screw Torque Values
OMI-2 installation guide Screw torque values Nm (lbf.ft) × 2 3.0 mm A/F 2 Nm (1.47 lbf. ft) × 2 4.0 mm A/F 8.0 mm A/F 5 Nm (3.68 lbf. ft) HOLD 22.0 mm (7/8 in A/F) 22 Nm (16.22 lbf. ft) -
Page 22: Screw Torque Values
OMI-2 installation guide Screw torque values Nm (lbf.ft) 3.0 mm A/F 2 Nm (1.47 lbf. ft) × 2 8.0 mm A/F 5 Nm 4.0 mm A/F (3.68 lbf. ft) × 2 HOLD 22.0 mm (7/8 in A/F) 22 Nm (16.22 lbf. ft) -
Page 23: Maintenance
Further dismantling and repair of Renishaw equipment is a highly specialised operation, which must be carried out at an authorised Renishaw Service Centre. Equipment requiring repair, overhaul or attention under warranty should be returned to your supplier. -
Page 23: Maintenance
Further dismantling and repair of Renishaw transmission. equipment is a highly specialised operation, which must be carried out at authorised Renishaw Service Centres. Equipment requiring repair, overhaul or attention under warranty should be returned to your supplier. -
Page 24: Removing The Omi-2 Window
OMI-2 installation guide Removing the OMI-2 window Fitting the OMI-2 window It is not necessary to remove the OMI-2 from the Before fitting the window, check for any machine when adjusting the switch or installing damage to screws or scratch marks which replacement parts. -
Page 25: Fault-Finding
Change the CNC program to bring off when in Optical Stop range. the probe within the start range mode. of the OMI-2 and ensure that the appropriate start range is selected. The transmission beam is Clean the OMI-2 window and obstructed. -
Page 25: Fault-Finding
Change the CNC program to bring off when in Optical Stop range. the probe within the start range mode. of the OMI-2 and ensure that the appropriate start range is selected. The transmission beam is Clean the OMI-2 window and obstructed. - Page 26 Remove the obstruction. mid-cycle. obstructed. Optical interference. Remove the source of interference An unexpected error or reposition the OMI-2 such that occurs during a interfering light does not shine into probing cycle. the OMI-2 window. An unexpected trigger Intermittent wiring fault.
- Page 26 Remove the obstruction. mid-cycle. obstructed. Optical interference. Remove the source of interference An unexpected error or reposition the OMI-2 such that occurs during a interfering light does not shine into probing cycle. the OMI-2 window. An unexpected trigger Intermittent wiring fault.
- Page 27 CNC program. A signal is being received from Change the adjacent probe to low a probe on an adjacent machine power mode or change the OMI-2 tool. reception range to 50%, if this range is acceptable. Probe triggers but the...
- Page 27 CNC program. A signal is being received Change the adjacent probe to low from a probe on an adjacent power mode or change the OMI-2 machine tool. reception range to 50%, if this range is acceptable. Probe triggers but the...
- Page 28 OMI-2 installation guide This page is intentionally left blank.
- Page 28 OMI-2 installation guide This page is intentionally left blank.
-
Page 29: Parts List
Quick-start guide: for rapid set-up of the OMP600 optical machine probe. H-5401-8500 Quick-start guide: for rapid set-up of the OTS optical tool setting probe. NOTE: The serial number of each OMI-2 unit is found at the bottom of the housing. -
Page 29: Parts List
(includes CD with installation guides). A-5401-8500 Quick-start guide: for rapid set-up of the OTS optical tool setting probe (includes CD with installation guides). NOTE: The serial number of each OMI-2 unit is found at the bottom of the housing. - Page 30 Renishaw plc +44 (0)1453 524524 +44 (0)1453 524901 New Mills, Wotton-under-Edge uk@renishaw.com Gloucestershire, GL12 8JR United Kingdom www.renishaw.com For worldwide contact details, visit www.renishaw.com/contact *H-5514-8504-03* Issued: 02.2019 Part no. H-2000-8504-03 © 2015–2019 Renishaw plc...
- Page 30 Renishaw plc +44 (0)1453 524524 +44 (0)1453 524901 New Mills, Wotton-under-Edge, uk@renishaw.com Gloucestershire, GL12 8JR United Kingdom www.renishaw.com For worldwide contact details, visit www.renishaw.com/contact *H-5191-8504-02* Issued: 08: 2018 Part no. H-5191-8504-02-A © 2015–2018 Renishaw plc...
Need help?
Do you have a question about the OMI-2 and is the answer not in the manual?
Questions and answers