
Related Manuals for Stahls Hotronix Fusion


Summary of Contents for Stahls Hotronix Fusion
- Page 1 Hotronix ® 40x50 cm O P E R A T O R ’ S M A N U A L www.stahls.eu...
-
Page 2: Table Of Contents
Hotronix Fusion ® Table of Contents Safety Instructions Machine View Connect the Hotronix Fusion ® Hotronix Fusion Operating Instructions 5-14 ® Touch Screen Guide Start Up / Shut Down Operation Screen Main Menu Passwords Auto On / Off Setup 10-11 Presets Setup Adjusting Time, Date and Temperature Printing / Pressing... - Page 3 Hotronix Fusion ® Safety Instructions Important Safety Instructions WHEN USING YOUR HEAT PRESS, BASIC PRECAUTIONS SHOULD ALWAYS BE FOLLOWED, INCLUDING THE FOLLOWING: Read all instructions. Use heat press only for its intended use. To reduce the risk of electric shock, do not immerse the heat press in water or other liquids. Never pull cord to disconnect from outlet, instead grasp plug and pull to disconnect.
-
Page 4: Touch Screen Guide
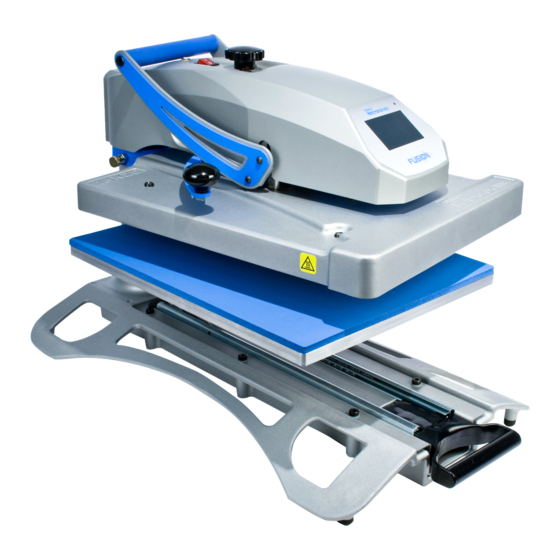
Hotronix Fusion ® Machine View Over-the-Centre Pressure Adjustment Knob Touch Screen Swing Handle IEC Inlet Heat Platen Circuit Breaker Power ON/OFF Switch Lift Handle Lower Platen Swing Lock Pull Handle Base... - Page 5 Hotronix Fusion ® Operation Instructions The Hotronix Fusion Operating Instructions are designed with the user in mind. ® Carefully read and follow the step-by-step instructions for best results. Work carefully and avoid contact to the hot heat plate, since this may cause serious burnings. During closing of the press, keep hands away from the hot plates (danger of bruises and burnings).
- Page 6 3/19/10 1:22 PM 3/19/10 1:22 PM and next menu selections. (Fig.1) Fig.1 Control Bar Each screen has a control bar display at the bottom. This bar displays the current Date, Time and the Stahls’ Hotronix Logo. ® ENTER PASSWORD ENTER PASSWORD Editing...
- Page 7 Hotronix Fusion ® Operating Instructions Start Up 2. To start up your Fusion™ Press: Flip the Power switch to the “On” position. (The power switch is located on the top of the control housing). (2.1) During the startup, a splash screen is shown for approximately 3 seconds.
-
Page 8: Operation Screen
Hotronix Fusion ® Operating Instructions Operation Screen 4. The Operation Screen is the first screen displayed after the splash screen and start up has completed. This screen provides all the printing functions. Presets Saved Presets are displayed at the top of the Operation screen. New Preset 1 : 8s, 10s, 330F, 5PR Presets can be selected using the Left and/or Right arrow keys at the top left and right corners of the screen. -
Page 9: Auto On / Off Setup
Hotronix Fusion ® Operating Instructions Main Menu 5. The Main Menu provides access functions of the Fusion™ product. The available menus are: Shutdown, Setup, About, and Operation. Main Menu Main Menu New Preset 1 : 8s, 10s, 330F, 5PR New Preset 1 : 8s, 10s, 330F, 5PR Select the “Operation”... -
Page 10: Passwords
Hotronix Fusion ® Operating Instructions Passwords 6. A password is required to access the Setup Menu and configure certain functions of the Hotronix Fusion™. ® Main Menu Main Menu In the Main Menu, press the Shutdown Shutdown “Setup” Menu. (6.1) ENTER PASSWORD Setup Setup... - Page 11 Hotronix Fusion ® Operating Instructions Display Setup 7. The Hotronix Fusion™ functions and features can be configured using the Setup menu. ® These features include: Presets, Display, Auto On/Off, and Main Menu. After your password is entered in the setup menu, scroll down and Display Setup Display Setup Units...
- Page 12 Hotronix Fusion ® Operating Instructions Display Setup Date and Time To set the Date and Time, select the individual numeric display for the Month, Day and Year. A numeric Keyboard/Keypad will be displayed. (7.5) Change the numeric value using the Keypad, then press “Enter” to <...
-
Page 13: Presets Setup
Hotronix Fusion ® Operating Instructions Presets Setup 9. Presets are configured using the Preset Setup screen. A Preset can have 1 - 4 Timer values, 2 Temperature values, 1 Platen Pressure setting, and a descriptive Name. In the Setup Menu, Select the Setup Menu Setup Menu Preset Setup... - Page 14 Hotronix Fusion ® Operating Instructions Presets Setup Timer Timers can be set using values 0 – 999 seconds. Entering a value of 0 seconds disables a Timer and it will not be used or displayed in the Preset selection on the Operation screen. Select the “Timer”...
- Page 15 Hotronix Fusion ® Operating Instructions Printing / Pressing 10. PREPARE TO PRINT To begin Printing / Pressing, go to the Main Menu and select “Operation” to enter the Operation screen. (10.1) Note: Be sure you have the correct Preset selected for your application. You may also manually adjust Main Menu Main Menu...
- Page 16 Hotronix Fusion ® Replacement Part List Item # Part Name Part # Qty. Base Assembly 4-1175 Rubber Foot 1-2199 Right Upper Link Kit 3-6929 3-1011-245 Stop Collar 1-2203 Hex Nut 2-1006-93 Hand Retractable Plunger 1-2206 Steel Pin 1-2204 Upper Casting 2-1664 Washer 2-1006-21...
- Page 17 Hotronix Fusion ® Parts Location Guide...
- Page 18 Hotronix Fusion ® Electrical Schematic...
- Page 19 STAHLS’ Europe GmbH will have the logo/brand of STAHLS’ Hotronix clearly marked upon them. Contact: STAHLS’ Europe GmbH, Dieselstraße 62, 66763 Dillingen, Germany Telefon: +49 (0) 68 31/97 33-0, Fax: +49 (0) 68 31/97 33 45, www.stahls.de, info@stahls.de...
- Page 20 Any exchanged parts will be the property of STAHLS’ Europe GmbH. No charge will be made for any labour or components for any claim under the warranty. STAHLS’ Europe GmbH operates a “bring in”...
Need help?
Do you have a question about the Hotronix Fusion and is the answer not in the manual?
Questions and answers
price on slide rails part no 1-1749