Table of Contents
Advertisement
Quick Links
Advertisement
Table of Contents

Subscribe to Our Youtube Channel
Related Manuals for Stahls A2Z


Summary of Contents for Stahls A2Z
- Page 1 OPERATING MANUAL...
-
Page 2: Table Of Contents
CONTENT DETAIL PICTURE OPERATING INSTRUCTIONS GETTING STARTED ADJUSTING TEMPERATURE, TIME & PRESSURE PRINTING / PRESSING CHANGING LOWER PLATEN ELECTRICAL SCHEMATIC REPLACEMENT PART LIST EXPLODED VIEW CONTACT... -
Page 3: Detail Picture
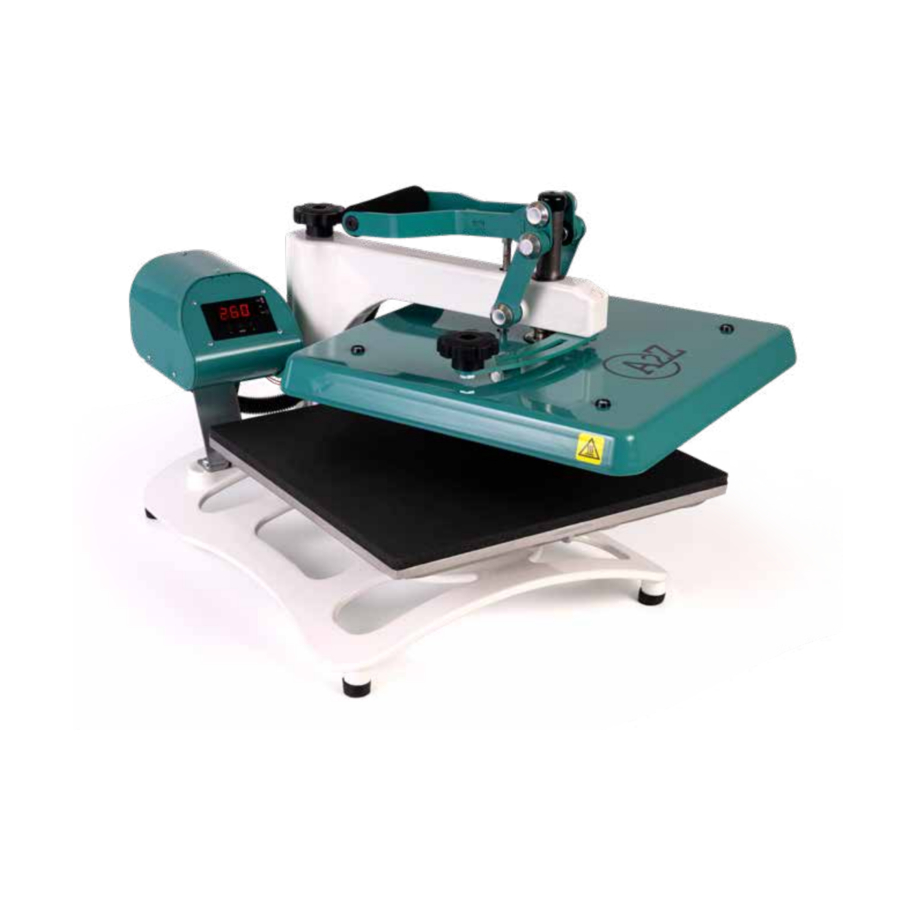
DETAIL PICTURE Print Handle Pressure Adjustment Knob Upper Platen Swing Handle Lower Platen Base Control Panel & LED Power ON/OFF Switch Circuit Breaker Cable Conduit Power Supply Rear view of heat press... -
Page 4: Operating Instructions
OPERATING INSTRUCTIONS Initial Setup Carefully follow the step-by-step instructions for best results: • To avoid burns, do not touch the heated upper platen during use. • Keep hands clear of the upper platen during platen lock down as the pressure may cause injury. -
Page 5: Getting Started
GETTING STARTED Getting Started: Temperature, Time, and Pressure Recommended settings vary based on the garment material and type of transfer. It’s important to review the application instructions included with your transfers for the recommended settings. Lasting, durable prints can be easily achieved when observing these three essential specifications. Temperature must be high enough to melt the transfer adhesive or cure the ink but not so high that it scorches, marks or otherwise damages garments. -
Page 6: Adjusting Temperature, Time & Pressure
ADJUSTING TEMPERATURE, TIME & PRESSURE With the print handle in the raised position, Lower the print handle into the locked position rotate the knob to adjust PRESSURE. to test your PRESSURE and adjust as needed until the desired level is achieved. Flip the power switch on the back of the cont- While no LEDs are illuminated, the controller roller to turn on the heat press. -
Page 7: Printing / Pressing
PRINTING / PRESSING Using the swing handle, move the upper platen Position the garment on the lower platen, cen- to access the lower platen. While heating, the tering the transfer area on the platen. print handle should remain raised to extend the life of the silicone pad. - Page 8 PRINTING / PRESSING Lower the print handle fully until the upper Using the swing handle, move the upper pla- platen locks into the press position. After the ten to access the garment. Depending on the required time has elapsed, lift the print handle. transfer, peel the carrier hot or cold.
-
Page 9: Changing Lower Platen
CHANGING LOWER PLATEN Swing away the upper platen using the swing Loosen and completely remove the platen knob handle to access the lower platen. located underneath the base. Lift the 38 cm x 38 cm lower platen off the Place the new platen onto the base, taking care to heat press and set aside. -
Page 10: Electrical Schematic
ELECTRICAL SCHEMATIC... -
Page 11: Replacement Part List
REPLACEMENT PART LIST DESCRIPTION PART # DESCRIPTION PART # A2Z Lower Platen, 15" X 15" 3-1384 36 3/8-16" x 3/4" HHCS ZINC 3-1011-41 Skinny Adapter Plate 3-1336-1 Knob with Cap, 3/8"-16 Thread 1-2621 Silicone Pad 15" x 15" Black 1-2622 Washer, Split Lock 1/4"... -
Page 12: Exploded View
EXPLODED VIEW = Wear Parts... -
Page 13: Contact
CONTACT STAHLS’ Europe GmbH Dieselstraße 62 66763 Dillingen Germany Technical Support & Customer Service +49 (0) 68 31/97 33 0 E-Mail info@stahls.de stahls.de...
Need help?
Do you have a question about the A2Z and is the answer not in the manual?
Questions and answers