
Related Manuals for Oliver MODEL 777-N


Summary of Contents for Oliver MODEL 777-N
- Page 1 Grand Rapids, Michigan, U.S.A. 49504-5298 USER’S OPERATING AND INSTRUCTION MANUAL MODEL 777-N VARIETY SLICER 0777S20000-CV3...
-
Page 2: Table Of Contents
INDEX Section Description Document No. Page No. SAFETY INSTRUCTIONS ------------------------------- 0777S20008 --------------------- 1-1 DESCRIPTION/SPECIFICATIONS -------------------- 0777S20009---------------------- 2-1 Description -------------------------------------------------------------------------------------- 2-1 Specifications----------------------------------------------------------------------------------- 2-1 INSTALLATION INSTRUCTIONS --------------------- 0777S20010 --------------------- 3-1 Removing the Slicer from the Shipping Platform ------------------------------------- 3-1 Installing the Rubber Feet ------------------------------------------------------------------ 3-2 Installing Optional Casters ----------------------------------------------------------------- 3-2 OPERATING INSTRUCTIONS ------------------------- 0777S20011 --------------------- 4-1 TROUBLESHOOTING ------------------------------------ 0777S20012 --------------------- 5-1... -
Page 3: Section Description Document No
INDEX (Continued) Section Description Document No. Page No. ELECTRICAL SINGLE PHASE ------------------------ 0777S20017 -------------------- 10-1 Wiring Diagram (Single Phase) ---------------------------------------------------------- 10-1 Assembly Drawing (Single Phase) ------------------------------------------------------ 10-1 Parts List 1/2 HP, 115 VAC, 60 Hertz, 1 Phase -------------------------------------- 10-2 Parts List 1/2 HP, 230 VAC, 60 Hertz, 1 Phase -------------------------------------- 10-2 Parts List 1/2 HP, 220 VAC, 50 Hertz, 1 Phase -------------------------------------- 10-2 WARRANTY ----------------------------------------------------------------------------- GEN 040225 WARRANTY PROCEDURE --------------------------------------------------------- GEN 040226... -
Page 4: Safety Instructions
SAFETY INSTRUCTIONS WARNING VARIOUS SAFETY DEVICES AND METHODS OF GUARDING HAVE BEEN PROVIDED ON THIS MACHINE. IT IS ESSENTIAL HOWEVER THAT THE MACHINE OPERATORS AND MAINTENANCE PERSONNEL OBSERVE THE FOLLOWING SAFETY PRECAUTIONS. IMPROPER INSTALLATION, MAINTENANCE, OR OPERATION OF THIS EQUIPMENT COULD CAUSE SERIOUS INJURY OR DEATH. 1. -
Page 5: Description/Specifications
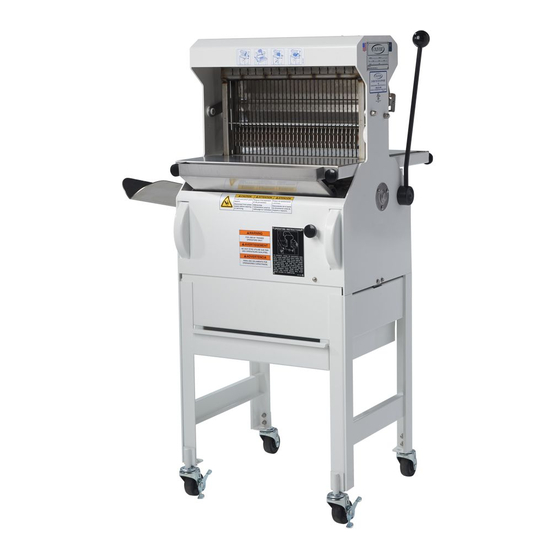
DESCRIPTION/SPECIFICATIONS Description The Oliver Variety Slicer is a compact, sturdy, time tested design, which has been used in bakeries world wide for many years. It is easy to operate and allows the slicing of virtually all varieties of bread, quickly and cleanly, with a spring fed pusher that gently moves the product through the knives followed by a automatic shut off. - Page 6 Product Capacities: Up to 16” long, 10-1/2” wide and from 3-1/2 to 6” high. Electrical Options Available: 1 phase, 60 hz, 115VAC, 7 Amps. 1 phase, 60 hz, 230VAC, 3.5 Amps. Others Available consult factory. Standard Slice Spacings 7/16, 1/2, 9/16 Optional Slice Spacings (At additional cost) 1/4, 5/16, 3/8, 5/8, 3/4, 7/8, 1”...
-
Page 7: Installation Instructions
INSTALLATION INSTRUCTIONS CAUTION THE SLICER IS HEAVY, USE PROPER TECHNIQUE WHEN LIFTING. KEEP BACK STRAIGHT, KNEES BENT, AND LIFT WITH LEGS. USE GLOVES TO PROTECT HANDS. Removing the Slicer from the Shipping Platform Lift the slicer off the shipping platform with one person on each side of the slicer. Set the slicer down on a level floor. -
Page 8: Installing The Rubber Feet
Installing the Rubber Feet Remove the rubber feet from the accessory package and insert the plugs into the holes in the leg bottoms, see below. Carefully restore the machine to the upright position. Installing Optional Casters Remove the casters, caster brackets and hardware from the accessory package. Insert the studs of the brackets, see figure below, through the holes provided on the base of the slicer. -
Page 9: Operating Instructions
OPERATING INSTRUCTIONS CAUTION ALWAYS USE CARE WHENEVER WORKING NEAR THE CUTTING KNIVES. To operate the slicer, stand on the discharge side, grasp the lever with the right hand, see below, pull it down as far as it will go and hold it there. With the left hand place the loaf of bread in front of the pusher. - Page 10 CAUTION THE KNIVES ARE EXTREMELY SHARP. DO NOT TOUCH MOVING OR STATIONARY KNIVES. The motor and slicer knives will stop automatically when the pusher comes to its full forward position. Remove the loaf from the table and bag or wrap the product. Use the same procedure for each loaf.
-
Page 11: Troubleshooting
TROUBLESHOOTING WARNING ALWAYS DISCONNECT THE SLICER FROM THE POWER SUPPLY BEFORE ATTEMPTING ANY TYPE OF MAINTENANCE TASK, INCLUDING TROUBLESHOOTING. The Slicer Will Not Start (Motor Is Not Humming) • The machine is not plugged in. • There is no power at the outlet. (Check by plugging in a small working appliance, like a lamp. -
Page 12: The Slicer Will Not Start (Motor Is Humming)
The Slicer Will Not Start (Motor Is Humming) CAUTION DO NOT ALLOW THE MOTOR TO HUM WITHOUT STARTING. THE MOTOR CAN BE PERMANENTLY DAMAGED BY OVERHEATING. • The motor has failed. (Have it checked by a qualified electrician.) NOTE A SPECIAL NON-VENTILATED MOTOR MUST BE USED WITH THIS SLICER. •... -
Page 13: The Blade Frames Are Knocking
The Blade Frames Are Knocking • The blade frames are out of adjustment. (See the “Maintenance” section of this manual under “Adjusting the Clearance Between the Blade Frames” on how to perform this adjustment.) 0777S20012... -
Page 14: Maintenance
MAINTENANCE WARNING ALWAYS DISCONNECT THE SLICER FROM THE POWER SUPPLY BEFORE ATTEMPTING ANY TYPE OF MAINTENANCE TASK. Cleaning Use a mild detergent solution to clean all exterior surfaces and empty the crumb tray daily or more often if necessary. Periodically remove both tables and the crumb chute and then brush, blow, (if compressed air is available), or wipe all foreign material from all surfaces, especially from moving parts. - Page 15 Removing the Blade Frames (Continued) Always start by removing the discharge side blade frame first. Both blade frames should be removed from the discharge side of the machine. You should remove the discharge side blade frame completely from the machine before starting on the infeed side blade frame.
- Page 16 CAUTION THE BLADES ARE EXTREMELY SHARP. ALWAYS HANDLE BLADE FRAMES WITH CARE. The blade frame can now be carefully lifted from the slicer. See below. The remaining blade frame can be removed in the same manner. 0777S20013...
-
Page 17: Replacing The Blade Frames
Replacing the Blade Frames Replacement of the blade frames is done by reversing the removal procedures. Ensure That the feet of the blade frames rest snuggly on the swing shafts and that you have included the belleville washers with the eye bolts. NOTE WHEN INSTALLING THE BELLEVILLE WASHERS, THEY MUST BE PLACED SO THAT THE CROWN IS UP AS SHOWN IN THE ILLUSTRATION BELOW. -
Page 18: Changing The Blades
Changing the Blades CAUTION THE BLADES ARE EXTREMELY SHARP. ALWAYS HANDLE THEM WITH CARE. NOTE DO NOT INTERCHANGE THE TWO BLADE FRAMES. REPLACE THE BLADE FRAME TO THE SAME SIDE OF THE MACHINE AS IT WAS TAKEN FROM NOTE WHEN CHAINGING BLADES FIRST NOTE THE DIRECTION THE SHARPENED EDGES ARE FACING ON THE BLADE FRAME. - Page 19 Changing the Blades (Continued) The new knife can be installed by reversing the removal procedure. A paper clip can be used to hold the knife in position on the lower pin to ease installation. See the illustration below. NOTE WHEN REPLACING ALL THE KNIVES, ALWAYS REMOVE THE CENTER KNIVES FIRST AND WORK TOWARD THE ENDS.
-
Page 20: Tightening The Belt
Tightening the Belt CAUTION OVER-TIGHTENING THE DRIVE BELT MAY CAUSE BEARING OR MOTOR FAILURE. Remove the crumb tray from the slicer. Locate the adjustment nut at the lower end of the motor mounting plate, see below. Turn the adjustment nut clockwise with a wrench to increase tension on the drive belt. -
Page 21: Replacing The Belt
Replacing the Belt Remove the infeed table, crumb chute, and discharge table. First remove the four black knobs securing the tables, (see the illustration below). In addition to the knobs the infeed and discharge tables are held in place by friction so pull the infeed table straight out and hard to separate them. -
Page 22: Adjusting The Blade Frames When Slices Vary In Thickness
Adjusting the Blade Frames When Slices Vary in Thickness Remove the discharge table from the slicer. Loosen, but, do not remove the two locking cams which secure the blade frame to the swing shaft. Remove the plastic plug over the set screw in the fixed collar, see below. - Page 23 To adjust the eccentric, once the lock nut is loosened, rotate the pin using the wrench used to hold the pin. Rotate the pin, (it is possible that both pins will need adjustment at the same time), until the knives of the machine are in line within a 1/32 of an inch, (alternating blades should not appear be in front of or behind each other when viewed from the side).
-
Page 24: Recommended Spare Parts
Bearing-Driven Pulley 0797-0058-019 Stud-Driven Pulley 6904-6001 Gasket-Driven Pulley 0797-0071-4 Rod-Connecting 0797-0057-219 Stud-Swing 5220-4040 Bearing-Rocker Shaft 5220-0020 Bearing-Swing Shaft 6301-3609* Motor-1/2 HP, 1-60-115/230 5757-8140 Switch-Limit *For Other Electrics Contact the Factory For Service Parts Call Oliver Products @ 800-253-3893 Rev. 1/20/09 0777S20014... -
Page 25: Assembly Drawing (Mechanical Parts)
ASSEMBLY DRAWING (MECHANICAL PARTS) MODEL 777-N Variety Slicer REV. 2/9/04 0777S20015... - Page 26 Bearing-Dr. Pulley (With Snap Ring) 5220-5001 Bearing-Dr. Pulley 5220-5040 Cap-Dr. Pulley 4090-0244-0005 Collar 4130-0132-0204 Screw-Hex Hd. 3/8-24 X ¾ 5842-1802 Gasket-Dr. Pulley 6904-6001 Tray-Bagger 0797-2048-003 Cap-Clamp 0730-0023 Yoke-Swing 0777-0078-001 Pin-Yoke 0777-0033-001 For Service Parts Call Oliver Products @ 800-253-3893 (Continued) Rev. 3/09/09 0777S20016...
- Page 27 Arm-Front Powder Coat 0777-0082-003 Arm-Rear Powder Coat 0777-0083-003 Washer-Delrin 0777-0920 Spring 7025-5102 Frame-Rocker 0777-0047-101 Shaft-Swing 0797-0060-001 Collar 0797-0031-002 Collar-Fixed 0797-0031-003 Bearing-Swing Shaft 5220-0020 Cap-Ball Bearing 4090-0232-0018 Bolt-Eye 0777-0970 0777-0971 Rev. 4/11/18 For Service Parts Call Oliver Products @ 800-253-3893 (Continued) 0777S20016...
- Page 28 Washer-Horseshoe 0793-0084 7012-3002 Spring 7012-3103 Spring Bushing-Rubber 5902-0100 Knob 5911-7000 Plate-Switch 0777-0898-001 Chute-Crumb 0777-0073-1 Table-Infeed 0777-0074-001 Frame-Holddown 0777-0975-1 Bushing-Holddown 0777-0065 Bushing-Frame 0777-0066 Screw-Pivot 0777-0068-001 Stud-Pivot 0777-0067-01 Pulley-Driven 0730-0005-001 Rev. 4/23/18 For Service Parts Call Oliver Products @ 800-253-3893 (Continued) 0777S20016...
- Page 29 Bar-Pusher (above 3/8” slice) 0777-0979 Bar-Pusher (3/8” slice & below) 0777-0979-001 Roller 0777-0982 Axle 0777-0983 Pin- STST Metric Blade Frame 0797-0059-019 Tool-Blade Changing 0797-0183 Base 0777-0950 * Specify Slice Thickness For Service Parts Call Oliver Products @ 800-253-3893 (Continued) Rev. 3/09/09 0777S20016...
- Page 30 ITEM NO PART DESCRIPTION PART NUMBER Slide-Drawer 0777-0948 Tray-Extra Cap. Crumb 0777-0949 Holder-Base 0777-0046-101 Foot-Rubber 5902-0001 801** Bracket-Caster 0777-0947-001 804** Caster-Swivel 5902-2347 805** Caster-Swivel W/Brake 5902-2348 ** Optional Components For Service Parts Call Oliver Products @ 800-253-3893 REV. 3/09/09 0777S20016...
- Page 31 ELECTRICAL SINGLE PHASE Wiring Diagram (Single Phase) Assembly Drawing (Single Phase Electrics) 0777S20017 10-1...
- Page 32 Motor-1/2 HP 6301-3940 Pulley-Motor 4575-7104-2004 Belt-V 4L290 5601-1120 Switch-Starter 5709-1137 Heater-Overload 5708-2425 Cover-Switch 0797-2131 Boot-Switch 5757-4515 Cord-Power W/Plug 0777-0980 Switch-Limit 5757-8140 Fitting-Offset Nipple 5766-7702 Fitting-90 Deg. Elbow 5766-7720 For Service Parts Call Oliver Products @ 800-253-3893 Rev 10-13-04 0777S20017 10-2...
- Page 33 THIS PAGE WAS INTENTIONALLY LEFT BLANK. GEN020319...
- Page 34 Oliver) proves to be defective (as defined below) within two years after shipment, and if Buyer returns the defective part to Oliver within two years, Freight Prepaid to Oliver’s plant in Grand Rapids, MI, then Oliver, shall, at Oliver’s option, either repair or replace the defective part, at Oliver’s expense.
- Page 35 THIS PAGE WAS INTENTIONALLY LEFT BLANK. GEN020319...
- Page 36 4. The service dealer will then complete an invoice and send it to the Customer Service Department at Oliver Products Company. 5. The Customer Service Manager of Oliver Products Company will review the invoice and returned parts, if applicable, and approve for payment.
- Page 37 THIS PAGE WAS INTENTIONALLY LEFT BLANK. GEN020319...
- Page 38 This policy applies to all parts returned to the factory whether for warranted credit, replacement, repair or re-stocking. Oliver Products Company requires that the customer obtain a Return Material Authorization (RMA) number before returning any part. This number should appear on the shipping label and inside the shipping carton as well.
Need help?
Do you have a question about the MODEL 777-N and is the answer not in the manual?
Questions and answers