Advertisement
Quick Links
Important:
Please read these instructions carefully prior to installation.
Please refer to your fi tting instruction to ensure that the roof racks are installed in the correct locations.
Check the contents of kit before commencing fi tment and report any discrepancies.
Place these instructions in the vehicle's glove box after installation is complete.
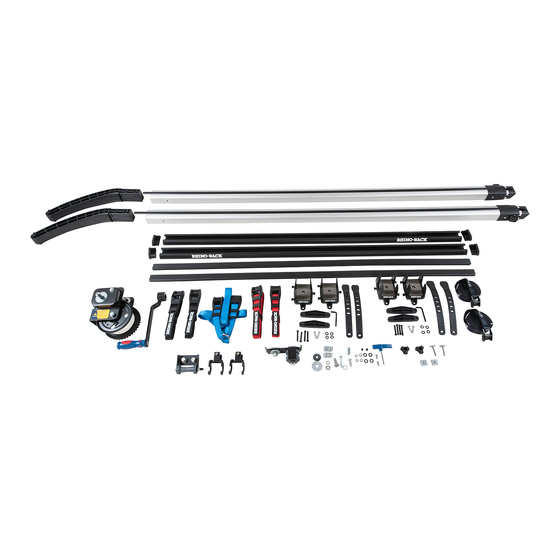
Layout
Maximum carrying capacity: 80kg (176lbs)
Please refer to your vehicle manufacturers handbook for maximum carrying capacity of your roof racks. Always use the lower of
the two fi gures. Load must be evenly distributed over the crossbars.
Do not attempt to fi t the NKL to your vehicle unless you fully understand this fi tting instructions. Please direct any questions
regarding fi tting to the dealer from where the NKL was purchased. Use only non-stretch fastening ropes or straps.
Recommendations:
It is essential that all bolt connections be checked after driving a short distance when you fi rst install your roof racks and NKL. Bolt
connections should be checked again at regular intervals (once a week is enough, depending on road conditions, usage, loads
and distances travelled). You should also check the roof racks and NKL each time they are re-fi tted. Always make sure to fasten
your load securely. Please also ensure that all loads are evenly distributed and that the centre of gravity is kept as low as possible.
Long loads (e.g. canoes and kayaks) must be secured front and rear with non-stretch fastening ropes or straps.
Roof racks must be removed when putting vehicle through an automatic car wash.
Caution: The handling characteristics of the vehicle changes when you transport a load on the roof. For safety reasons we
recommend you exercise extreme care when transporting wind-resistant loads. Special consideration must be taken into account
when cornering and braking.
Note for Dealers and Fitters:
It is your responsibility to ensure these fi tting instructions are given to the end user or client.
Rhino-Rack
3 Pike Street, Rydalmere,
NSW 2116, Australia.
(Ph) (02) 9638 4744
(Fax) (02) 9638 4822
These instructions remain the property of Rhino-Rack Australia Pty Ltd and may not be used or changed for any other purpose than intended.
Rhino-Rack Nautic Kayak Loader (NKL)
Important Information
Document No: R356
Prepared By: Andy Wana
Authorised By: Chris Murty
CONTROLLED
Fit Time: 1.5 Hours
Issue No: 07
Issue Date: 20/01/2016
Page 1 of 16
Advertisement

Subscribe to Our Youtube Channel
Related Manuals for Rhino-Rack NKL


Summary of Contents for Rhino-Rack NKL
- Page 1 Recommendations: It is essential that all bolt connections be checked after driving a short distance when you fi rst install your roof racks and NKL. Bolt connections should be checked again at regular intervals (once a week is enough, depending on road conditions, usage, loads and distances travelled).
- Page 2 Prior to commencing installtion, please check the following requirements. Roof Rack compatibility: The NKL is not suitable for fi tment to a clamp in the door style roof rack system as large forces are exerted on the roof rack system during the winching process.
-
Page 3: Parts List
Rhino-Rack Nautic Kayak Loader (NKL) Parts List Item Component Name Part No Item Component Name Part No Ramp Curved Piece M226 M6 X 12 Security Screw B148 1/2 x 10G Pan Phillips S/T Screw B045 M6 Spring Washer W004 Lower Internal Ramp 1250mm... -
Page 4: Tools Needed
Rhino-Rack Nautic Kayak Loader (NKL) 3, 4, 5, 6 Tools needed: Tools supplied with kit: Measuring tape, Spanner (for M8 and Torque Key (Short) M10 hex bolt), Power drill (for crossbars), 3mm pilot drill bit (optional), 6.5mm drill bit, Scissors or Knife (to cut the rubber strips) - Page 5 Rhino-Rack Nautic Kayak Loader (NKL) Assembly A Assembly B Assembly C Assembly E Assembly D Page 5 of 16...
- Page 6 Rhino-Rack Nautic Kayak Loader (NKL) Cut the Half Crossbars as shown FRONT OF VEHICLE TOP VIEW 100mm 100mm Pre-drilled hole FRONT OF CAR 1. One end of the half crossbar has a hole positioned Drill 6.5mm hole 100mm from the end. Locate this.
- Page 7 Rhino-Rack Nautic Kayak Loader (NKL) 1. Take the vertical roller apart to feed the line and asymmetrical hook from the hand winch through. TO REEL IN OR LIFT LOAD. This winch is designed to lift a load (reel in) by turning the hand crank in a clockwise direction.
- Page 8 Rhino-Rack Nautic Kayak Loader (NKL) Assemble B, C, D, E, F and G as shown See below for detail Note: If fi tting HD Crossbars, use NKL-FK1 Position hook bracket on the crossbar. Assembly for items 30, 31, Using hole in hook bracket as a guide, 32 and 33.
- Page 9 Rhino-Rack Nautic Kayak Loader (NKL) Assembly J Cut rubber strips as shown. Insert the 4 RMPH units near the crossbar with the winch. These will be used to store the ramps when they are not in use. Note: If fi tting HD...
- Page 10 Rhino-Rack Nautic Kayak Loader (NKL) Rotate up to insert the ramp onto the hook Rotate down to lock the ramp in place Adjust the ramp feet to ensure that the ramps are level and contacting the ground at a low angle.
- Page 11 Rhino-Rack Nautic Kayak Loader (NKL) Assembly K and N Find the balanced point on the kayak. This may not be directly in the middle due to uneven weight distribution. Use a pipe object to fi nd the point and mark it on the kayak with a pencil for easy reference in the future.
- Page 12 Line up the centre of the ring of the NKL tiedown (36) with the centre mark that you made earlier. Tighten the tiedowns in place as shown. Now the kayak is ready to be lifted onto the roof racks.
- Page 13 Rhino-Rack Nautic Kayak Loader (NKL) Attach the snap hook onto the ring on the NKL tiedown as shown. The snap hook should be facing upso that it will not catch or get hooked on the roller as it passes over the top Rotate the winch to raise the kayak onto the ramp.
- Page 14 Rhino-Rack Nautic Kayak Loader (NKL) Store the ramps on the RMPH units as shown. For each unit, fold the strap over and hook it onto the location spigot on the opposing side. Page 14 of 16...
- Page 15 Rhino-Rack Nautic Kayak Loader (NKL) RBAS Anchor Straps (sold as separate) can be used as well. Page 15 of 16...
- Page 16 Rhino-Rack Nautic Kayak Loader (NKL) When the Kayak is fi xed in place on the NKL remove the winch hand as shown. Store in an accessible place. Unscrew the hardware to remove the handle. This will prevent possible contact with the vehicle door.
Need help?
Do you have a question about the NKL and is the answer not in the manual?
Questions and answers