Table of Contents
Advertisement
Advertisement
Chapters
Table of Contents

Related Manuals for Hytera RD982


Summary of Contents for Hytera RD982
- Page 1 OWNER’S MANUAL 使 用 说 明 书 DIGITAL REPEATER 数 字 中 转 台...
- Page 2 Preface Thanks for your favor in our product. To derive optimum performance from the product, please read this manual and the supplied Safety Information Booklet carefully before use. This manual is applicable to the following model: RD98X (X may indicate 2, 5, 6 or 8)
- Page 3 All the specifications that all radio communication products should meet the Hytera is the trademark or registered trademark of and designs are subject to change without notice due requirements set forth in the above standards before Hytera Communications Co., Ltd.
- Page 4 Operational Instructions and Training Guidelines To ensure optimal performance and compliance with the occupational/controlled environment RF energy exposure limits in the above standards and guidelines, users should always adhere to the followings: Gain of antenna must not exceed 6.5dBi. ● ●...
-
Page 5: Table Of Contents
Contents Troubleshooting ------------------------------------------------------------------------- 8 Care and Cleaning ---------------------------------------------------------------------- 9 Optional Accessories ------------------------------------------------------------------ 10 Checking Items in the Package ---------------------------------------------------- 2 Product Overview ----------------------------------------------------------------------- 2 Front Panel ------------------------------------------------------------------------- 2 Programmable Keys * ------------------------------------------------------------ 2 Rear Panel -------------------------------------------------------------------------- 2 Internal Parts ------------------------------------------------------------------------ 2 Installation Guide ----------------------------------------------------------------------- 3 Installation Requirements ------------------------------------------------------- 3 Before Installation ----------------------------------------------------------------- 3... -
Page 6: Checking Items In The Package
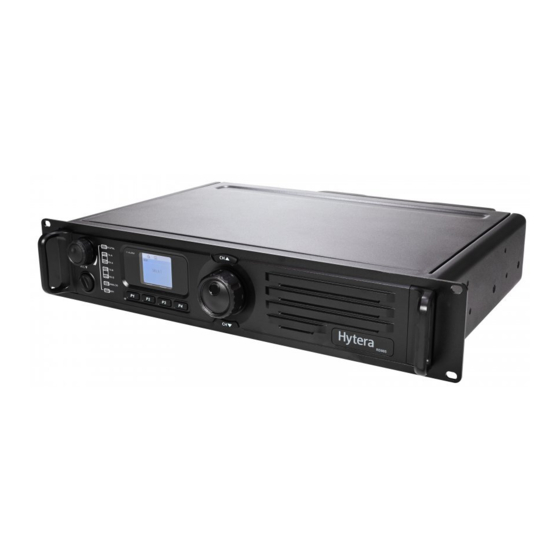
Checking Items in the Package Product Overview Rear Panel Front Panel Please unpack carefully and check that all items listed below are received. If any item is missing or damaged, please contact your dealer. Repeater Part Name Part Name 1 TX Antenna Interface 6 Accessory Jack Part Name Part Name... -
Page 7: Installation Guide
Installation Guide Install the repeater as follows: Install the repeater at a proper location; Attach all necessary accessories; Proper installation can ensure optimum performance and Ground the repeater through the Ground Screw reliability of the repeater. Therefore, be sure to read the located on the rear panel. -
Page 8: After-Installation Verification
Installation Diagram Screw Icon Name Icon Repeater Status Screw Accessory An accessory is RF Cable Indicator * connected. Scrambler/ The Scrambler/ Encrypt Encrypt feature is Indicator active. The repeater is Operation operating in Repeat Mode Indicator mode. LED Indicator Duplexer with Front Side Facing Downwards After-installation Verification Part LED Indication... -
Page 9: Basic Operations
Basic Operations Note: When an alarm event occurs, the Radio Info backlight will remain activated until the Under this menu, you can view product information, alarm disappears. Turning the Repeater On/Off including Radio ID, Radio Alias, Serial Number, Radio Locking/Unlocking the Repeater Model, Freq Range, Firmware Ver, RCDB Ver, Bootload ON: To power up the repeater, connect a DC power ●... -
Page 10: Scan
Exit CH Alias, TX Frequency, RX Frequency, CH Band, TX CTCSS/ To exit the main menu: Mixed Channel CDCSS, RX CTCSS/CDCSS, Color In the main menu, rotate the Navigation knob to Code select the "Exit” option. To access this menu: Press this knob to return to the home screen. -
Page 11: Fan Failure Alarm
Check if connection between the transmitter and LCD will display the prompt message below: Then the repeater may continue transmission or RF cable or antenna feed line is loose or damaged. terminate it, subject to the detection result. You need to: Poor connection between them could cause high Check if the connection between the transmitter and TX power, which would make the temperature of the... -
Page 12: Troubleshooting
Caution: If low voltage is detected when the Troubleshooting repeater is powered by an external battery, please charge it in time. Disconnect the battery from the repeater before charging. Phenomena Analysis Solution TX/RX Unlock Alarm Power cord is not connected or is not Properly connect the power cord and The repeater cannot be securely connected to the outlet. -
Page 13: Care And Cleaning
Care and Cleaning To guarantee optimal performance as well as a long service life of the product, please follow the tips below. Product Care Keep the product at a place of good ventilation and ● ● heat dissipation to facilitate normal work. Do not place irrelevant articles on top of the product ●... -
Page 14: Optional Accessories
Optional Accessories The following items are the main optional accessories for the product, and please consult your local dealer for more other accessories. Palm Microphone SM16A1 Desktop Microphone Duplexer Bracket BRK09 Yagi Antenna Omni-directional Antenna SM10A1 (for DT11 and DT14 only) Bracket (2U)(grey) BRK14 External Power Supply (240W, backup Bracket (2U)(black) - Page 15 致用户 非常感谢您对我们产品的青睐!为了确保您最大限度地享用本产品所带来的各项便利,请于使用前详细 阅读本手册和《安全信息手册》。 本手册适用于以下机型: RD980...
- Page 16 可能出现的错误或疏漏,我司不承担任何责任。由于技术 阻带滤波器组成,避免本机发射信号传输到接收机。 天线的安装需按照厂商或供应商的要求进行,且安装 ● ● 的不断发展,我司保留不予通知而更改产品设计与规格的 馈线 ● ● 处与人体的距离不得少于3.5米。 权利。未经我司事先书面授权,不得以任何形式对本手册 在无线电发射机和天线之间传送射频能量的线路。 进行复制、修改、翻译和散发。 欧盟指令符合性声明 驻波比 ● ● 如需更多信息或对本手册有任何建议,欢迎访问我们的 本产品经独立第三方机构认证,符合欧盟指令“1999/5/ 驻波比是一个数值,用来表示天线和电波发射台是否 网站:http://www.hytera.com,或拨打我司服务热线400- EC”中的相关要求。请注意,本声明仅适合欧盟国家。 830-7020。 匹配。 静噪 ● ● 射频辐射信息 静噪可滤除通话过程中过度的背景噪声,用于解决通 射频辐射常识 话质量和噪声问题。 射频指可以辐射到空间的电磁频率,是通讯、医疗、食品 版权信息 加工等领域广泛使用的一种技术,在使用过程中会产生一 Hytera为海能达通信股份有限公司(以下简称“我司”) 定的射频辐射。 在中华人民共和国和世界其他国家和/或地区的商标或注 射频辐射安全 册商标。我司仅对自有商标及产品名称享有所有权,本手 为了确保用户的身心健康,来自科学、工程、医药、健康...
- Page 17 目录 质量保证和维修条款----------------------------------------------------------------------9 选购配件-------------------------------------------------------------------------------------10 检查包装内物品----------------------------------------------------------------------------2 熟悉本机-------------------------------------------------------------------------------------2 前面板 --------------------------------------------------------------------------------2 可编程键* ----------------------------------------------------------------------------2 后面板 --------------------------------------------------------------------------------2 内部结构 -----------------------------------------------------------------------------2 安装指南-------------------------------------------------------------------------------------2 安装要求 -----------------------------------------------------------------------------2 安装前准备 --------------------------------------------------------------------------3 安装步骤 -----------------------------------------------------------------------------3 安装后检查 --------------------------------------------------------------------------4 状态指示-------------------------------------------------------------------------------------4 LCD圖示 -----------------------------------------------------------------------------4 LED指示灯 ---------------------------------------------------------------------------4 基本操作-------------------------------------------------------------------------------------4 开机与关机 --------------------------------------------------------------------------4 调节音量 -----------------------------------------------------------------------------4 调整功率级别 -----------------------------------------------------------------------4 背光灯 --------------------------------------------------------------------------------4 锁定与解锁 --------------------------------------------------------------------------5 信道切换 -----------------------------------------------------------------------------5 菜单导航-------------------------------------------------------------------------------------5 对讲机信息...
-
Page 18: 检查包装内物品
检查包装内物品 熟悉本机 序号 部件名称 序号 部件名称 发射天线接口 附件接口 前面板 包装盒内含有以下物件。如有任何物件丢失或损坏,请与 可选接口1 直流电源输入接口 您所购产品的经销商联系。 接收/双工天线接口 以太网接口* 可选接口2 接地螺钉 监控/调测接口 主机 内部结构 序号 部件名称 序号 部件名称 附件接口 时隙1接收状态指示灯 【音量控制】旋钮/ 告警状态指示灯 电源指示灯 电源线 用户资料 中转状态指示灯 可编程键* LCD显示屏 模拟模式指示灯 时 隙 2 接 收 状 态 指 序号... -
Page 19: 安装前准备
将双工器装配到支架上。 将外部射频线从功放散热器旁边的小孔接出。如下图 备注:您可以参阅《安全信息手册》了解更多的 装配双工器前,请查看双工器左右两个天线口的规 所示: 安装相关信息。 格,以确认哪个端口与发射机连接。和发射机相连的 安装前准备 端口应靠近功放模块,这样可以减小发射机与双工器 之间的射频损耗。如下图所示: 电压检查 检查直流电源电压或外接电池电压是否在中转台的工作电 压范围之内(13.6V±15%)。 产品检查 将双工器安装到中转台上。 上电后,通过观察前面板上的8个LED指示灯的状态检查 将装配在支架上的双工器放置到中转台的激励模块和 中转台是否运行正常。 接收模块上,然后通过机箱内部2颗螺钉和机箱侧面2 颗螺钉将双工器固定。 参数配置 重新安装功放散热器,连接所有的功放电源线、数据 在确认中转台工作正常后,根据实际需求通过CPS配置中 打开中转台的机箱上盖(拧开机箱上盖板后端的螺 线和射频线。 转台的相关参数。例如:工作频率、发射功率等。完成参 钉,然后向后拉上盖板)。如下图所示: 合上中转台的机箱上盖,完成双工器安装。 数配置后,您可以进行现场安装。 双工器安装示意图 安装步骤 装配螺丝 射频线 本产品的安装步骤如下所示: 将中转台安装在所需的位置。 将天线、馈线和电源线等附件连接至中转台。 将中转台通过后面板上的接地螺钉进行接地。 安装双工器 如果该中转台需要匹配双工器工作,在安装中转台前,请 用十字螺丝批拧开中转台功放散热器6颗固定螺钉, 按照如下操作步骤安装双工器。... -
Page 20: 安装后检查
装配螺丝 射频线 图标名称 图标显示 中转台状态 指示灯状态 前面板部件编号 中转台状态 模拟模式指示灯亮 中转台在模拟模式 信号条数越多,表示 信号强度标识* 黄色灯 下工作 信号越强 数字模式指示灯亮 中转台在数字模式 蓝色灯 下工作 当前信道发射功率为 低功率 基本操作 发射功率标识 当前信道发射功率为 高功率 开机与关机 扫描标识* 处于扫描状态 开机:将本机连接外部直流电源,然后打开外部电源 ● ● 监听标识 已开启监听功能 的开关。开机时,电源指示灯亮绿灯,并显示开机动 装配螺丝 画。 扬声器标识 已开启扬声器 关机:断开电源。 ● ●... -
Page 21: 锁定与解锁
备注:当本机出现异常,处于告警状态时,背光 数据库版本、下载程序版本、最后编程日期、英语包版 再次按下【菜单导航】旋钮,进入本机当前信道的 灯将长亮。告警消失后,背光灯恢复原有工作方 本。 “信道信息”界面。 式。 您可以通过如下步骤进入此菜单: 在主界面下按【菜单导航】旋钮进入主菜单。 锁定与解锁 旋转【菜单导航】旋钮,选择“对讲机信息”菜单 您可以通过经销商锁定前面板所有按键和旋钮,以防止用 项。 户误操作。按键和旋钮锁定后,需由经销商进行解锁。 再次按下【菜单导航】旋钮,进入本机的“对讲机信 信道切换 息”界面。 您可以通过前面板的信道调整按键切换信道,LCD将显示 此时您可以通过旋转【菜单导航】旋钮滚动浏览当前信道 当前选择信道的别名。信道上调按键表示切换到上一个信 的相关信息。若想退出“信道信息”界面,您可以按下 道,信道下调按键表示切换到下一个信道。 【菜单导航】旋钮,主机将返回主菜单界面。 扫描 菜单导航 此功能可助您监听其他信道上的通信活动,您可通过经销 商为每个信道创建一个扫描列表,每个扫描列表最多包含 信道类型不同,相应的主菜单选项不同,对应关系如下: 此时您可以通过旋转【菜单导航】旋钮滚动浏览本机的相 32个信道。 模拟信道 ● ● 关信息。若想退出“对讲机信息”界面,您可以按下【菜 您可以通过如下步骤进入此菜单: 单导航】旋钮,主机将返回主菜单界面。 在主界面下按【菜单导航】旋钮进入主菜单。 备注:当本机烧录了非英语语言包时,在“对讲 旋转【菜单导航】旋钮,选择“扫描”菜单项。 机信息”菜单中将会显示“其他包版本”菜单 再次按下【菜单导航】旋钮,进入“扫描开关”界... -
Page 22: 中转台告警信息
可以关闭本机数字信道的语音输出。 检查风扇扇叶是否被硬物阻挡。如果是,请移除硬 您可以通过如下步骤进入此菜单: 物。 在主界面下按【菜单导航】旋钮进入主菜单。 如果现场无法解决,请联系您所在地的经销商提供协 旋转【菜单导航】旋钮,选择“数字语音输出”菜单 助。 项。 当风扇恢复工作时,告警提示框将自动消失,并且告警状 再次按下【菜单导航】旋钮,进入“数字语音输出” 态指示灯熄灭。 界面。 驻波比告警 出现此告警提示时,本机将停止发射。此时您需要采如下 发射天线端口的电压驻波比(VSWR)过大会损坏射频功 措施恢复发射: 放,严重情况下会导致发射机无法正常工作。当本机检测 检查本机的功放模块表面温度是否超过80℃。如果超 到电压驻波比超出正常值时,告警状态指示灯亮红灯,并 过80℃,请按照步骤2和3检查原因。 且LCD将弹出如下告警提示: 注意:此时本机的功放散热器可能处于高温状 态,切勿用手触摸本机,您可以使用带热电耦的 数字温度计进行测量。 若想退出“数字语音输出”界面,您可以按下【菜单导 检查环境温度和本机的通风条件。若不符合前文中要 航】旋钮,主机将返回主菜单界面。 求的安装条件,请尽快改善安装环境,例如:加装空 调设备,促进通风,降低温度。 退出 检查与发射机连接的射频转接线或天线/馈线是 否 您可以通过如下步骤退出主菜单界面: 松脱或损坏,是否由于连接不良导致发射功率过高, 在主菜单界面旋转【菜单导航】旋钮,选择“退出” 出现此告警提示时,本机将自动降低发射功率。此时您需 使散热器温升过快。如果是,请及时紧固或更换连接 菜单项。 要采取如下措施: 线。... -
Page 23: 过压/低压告警
注意:若使用外接电池对本机供电并发现电压过 低,请及时进行充电。充电前,请断开本机与电 池的连接。 发射/接收失锁告警 当本机检测到发射锁相环或接收锁相环失锁时,告警状态 指示灯亮红灯,并且LCD将弹出如下告警提示: 出现此告警提示时,本机将根据检测状态选择继续发射, 或者停止发射。此时您需要采取如下措施: 检查与发射机连接的射频转接线或天线/馈线是否松脱 或损坏。如果是,请及时紧固或更换连接线。 若现场无法解决,请联系您所在地的经销商提供协 助。 当前向功率恢复到正常值时,告警提示框将自动消失,并 发射失锁告警 接收失锁告警 且告警状态指示灯熄灭。 出现此告警提示时,本机的部分功能将自动停止,但仍会 过压/低压告警 保留LCD告警提示。此时您需要采取如下措施: 当本机检测到电压超出了电压范围(11V~15.6V)时, 断开电源,打开机箱,观察硬件连接线是否连接松脱 告警状态指示灯亮红灯,并且LCD将弹出如下告警提示: 或损坏。若是,请及时紧固或更换硬件连接线。 若现场无法解决,请联系您所在地的经销商提供协 助。 当发射/接收失锁恢复正常时,告警提示框将自动消失, 并且告警状态指示灯熄灭。 注意:若使用在您打开机箱检查失锁告警前,请 断开电源。 低压告警 过压告警 出现此告警提示时,本机将自动停止工作,但仍会保留 LCD告警提示。此时您需要采取如下措施: 使用电压表检查直流电源输入的电压是否过低或过 高。如果是,请及时更换直流电源或外接电池。 检查直流电源线是否松脱或损坏。如果是,请及时紧 固或更换直流电源线。 若现场无法解决,请联系您所在地的经销商提供协 助。 当电压恢复到正常工作电压范围时,告警提示框将自动消 失,并且告警状态指示灯熄灭。... -
Page 24: 故障处理指南
故障处理指南 保养与清洁 为了保证本产品发挥其良好性能,并延长其使用寿命,请 故障描述 原因分析 解决方法 熟悉以下内容,以便更好地对本产品进行日常保养与清 电源线未连接或者与插座接触太松 正确连接电源线、并保证接触良好 洁。 中转台无法开机 检查电源线内直流保险丝是否烧毁,如果烧 电源线内保险丝损坏 毁,请替换新保险丝 保养 中转台的收发频点与终端的收发频点不对 请保证本产品处于通风条件较好、易散热的位置,以 ● ● 检查频点是否对应,必要时请重新置频 应 便各部件正常地工作。 请勿将无关物品摆放在本产品上盖或散热器上,以保 ● ● 系统内组员之间无法通话, 工作频点受到强信号干扰,无法中转有用 查找干扰源,如果无法关闭或远离干扰源, 证其有效地散热。 中转台无法与终端通信 信号 请申请并更换信道频点 请勿用硬物穿刺或刮花本产品。 ● ● 组员已经离开中转台的信号覆盖范围 确认并回到中转台的信号覆盖范围内通话 请勿将本产品存放于含有腐蚀电子电路物质的环境。 ● ● 请勿将本产品浸泡于各种腐蚀剂、溶液或水中。... - Page 25 质量保证和维修条款 未经我司授权的改造、改动、拆卸、使用非原装的附 ● ● 件或电池,或未经我司授权的情况下对产品进行软件 升级、固件拆动等所造成的故障或损坏。 我司承诺:凡我司生产的产品,自购买之日起,在正常使 用、操作与维护条件下,出现材料或制造工艺方面的缺 非材料或加工问题所造成的天线故障或损坏。 ● ● 陷,可享受以下规定的保修服务。 主机上的我司相关标志或序列号码标贴被撕毁、序列 ● ● 保修的范围与期限 号被抹除或无法辨认的产品。 24 个月 主机 购买日期无法鉴定的产品。 ● ● 6 个月 标配附件(电源线) 不可抗力所造成的故障或损坏。 ● ● 保修的申请 正常及常规磨损。 ● ● 如申请我司产品保修服务,必须提供有效的我司产品保修 特别说明 卡或有效购机发票原件作为凭证。保修期内,我司产品的 相关标志,包括序列号码标签等,应保持清晰完整且不得 在法律允许的限度内,我司在任何情况下都不对超过 ● ● 撕毁。...
- Page 26 选购配件 本机主要的选购附件已包含在如下列表中,如需更多附件信息,请咨询您当地的经销商或拨打我司服务热线 400-830-7020。 双工器安装支架 BRK09 手持麦克风 台式麦克风 八木定向天线 全向玻璃钢天线 SM16A1 (仅适用于 DT11 和 DT14) SM10A1 双工器(频率范围:380-470MHz, 保险丝 POA33 车台电源(240W,可接备用 机柜电源安装附件 (2U) (灰色) 机柜电源安装附件(2U) 收发间隔:5 ~ 13MHz)DT11 BRK14 电源)PS22002 (黑色)BRK12 双工器(频率范围:160-174MHz, 收发间距:5MHz)DT12 双工器(频率范围:148-160MHz, 收发间距:5MHz)DT13 双工器(频率范围:336-370MHz, 收发间距:8-13MHz)DT14 双工器(频率范围:136-148MHz, 收发间距:5MHz)DT15 双工器(频率范围:440-480MHz, 收发间距:5MHz)DT16 直流电源线(10A 12AWG) 10pin 航空头编程连接线(USB 口)...
- Page 27 是海能达通信股份有限公司的注册商标或商标 Hytera Communications Corporation Limited. 2015 Hytera Communications Corporation Limited. 2015 海 能达 通 信股 份有限 公司 。 版权 所有 深圳 市 南 山区北环大 道9108号 Z04313 H05658 8 1 1 RD9 8 0 0 1 7 0 0...
Need help?
Do you have a question about the RD982 and is the answer not in the manual?
Questions and answers