
Related Manuals for Gliderol Glidermatic GTS 2000


Summary of Contents for Gliderol Glidermatic GTS 2000
- Page 1 Tilt and Sectional Overhead Door Operator GTS2K07-2 Installation Instructions and Owners Manual...
- Page 2 Important lnformation Please keep these instructions safe for later reference. Dear Customer, Batteries and light bulbs are not covered by the guarantee. We thank you for your decision to purchase this Any further processing must ensure that the national garage door operator. regulations governing the operation of electrical Attention:lmportant instructions for safe installation: equipment are complied with.
- Page 3 Important lnformation Please keep these instructions safe for later reference. The operator is designed for use in dry environments Maintenance Instructions: and therefore must not be installed exposed to weather. We advice you to make a complete check of the door system once annually.
-
Page 4: Technical Data
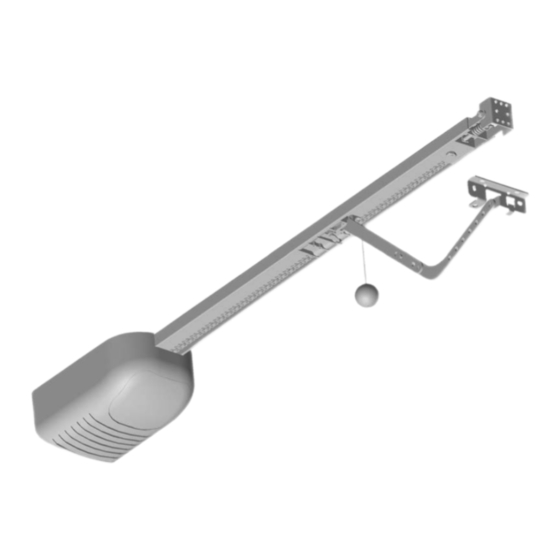
Technical Data Power Supply 240V 50Hz Force 700 N Running time max. 30% Speed without load approx. 14cm/ sec. Clearance for operator 40mm Drive mechanism chain Overall length 3210 mm Approx. Weight ~ 18kg Max. door opening(3m shaft) 2400mm Optional 3.6m shaft available Max. - Page 5 Installation lnstructions Contents Itemised Description of Parts: 1.L-Section Foot Mounting Bracket. 2.Boomerang Arm. 3.Boomerang Extension Arm. 4.Hinge Bracket. 5.Thrust Block & Pusher Arm. 6.Shaft. 7.Lintel Bracket. 8.Shaft Bracket. 9.Chain Tensioning Block. 10.Powerhead. 11.Manual Release Cable. 12.Chain Location Clip. 13.Transmitter. 14.Dual Purpose Transmitter Bracket. 15.Chain.
- Page 6 Installation lnstructions Deactivate all garage door locks Tilt door Min:40mm Sectional Door Min:40mm...
- Page 7 Installation lnstructions Tilt door Sectional Door Before starting to determine which type of door you have, this background depicts an ideal installation and can be scale. MIDDLE OF THE DOOR Min7 5mm It is essential the door header be substantial as nearly all the force generated by the opener is concentrated via the header bracket.
- Page 8 Installation lnstructions Insert carriage in shaft. Install chain as direction shown around tensioning pulley.
- Page 9 Installation lnstructions Link chain at correct length. Middle of the shaft Insert tensioning pulley to end of shaft...
- Page 10 Installation lnstructions Remove drive sprocket protection lid. Slide shaft and chain into powerhead chassis and then place chain over powerhead drive sprocket. Place powerhead on the garage floor, being careful not to damage or scratch the paintwork and attach shaft end bracket assembly to header bracket using nuts and bolts supplied. approx.
- Page 11 Installation lnstructions Fit drive sprocket protection lid as per diagram. Curved arm should not be used on tilting type doors. For sectional door, mount door bracket on top of door panel, ensuring a tek screw is fitted to centre stile.
- Page 12 Installation lnstructions Raise powerhead and support on step ladder. Raise the door to open position, align the drive shaft with the point market at the top of the door. Exact alignment is essential.
- Page 13 Installation lnstructions To secure the opener support powerhead in the manner shown using brackets supplied or fix directly to roof as in diagrams (a) & (b).
- Page 14 Disengage Auto Operation Test shaft in manual operation Unlock Main Chain Lever Test Manually Glide carriage forward and attach pusher arm to door bracket, as shown on page 15. Unlock...
- Page 15 Disengage Auto Operation Middle of the door Middle of the door...
- Page 16 Disengage Auto Operation Manual Release...
- Page 17 Limit Setting Option 1:PCB Procedures : (i) Press S3 to initiate learning mode (3 beeps) (ii) Press and hold S2, release when door reaches TOP position (iii) press S3 to confirm TOP position (2 beeps) (iv) Press and hold S2, release when door reaches BOTTOM position (v) Press S3 to confirm BOTTOM position (2 beeps) (vi) Controller will initiate checking process for both TOP and BOTTOM positions...
- Page 18 Limit Setting Option 2: Transmitter Procedures (i) Press and hold S1 + S3 for two seconds to initiate learning mode (3 beeps) (ii) Using buttons S2 & S3, locate TOP position (iii) Press S1 to confirm TOP position (2 beeps) (iv) Using buttons S2 &...
- Page 19 SENSOR CONNECTION DIAGRAM...
- Page 20 Transmitter Key and Code Setting Refer to PCB Code Setting Once the Key configuration is set you can now program Key Setting in the security code from your hand transmitter (s) Choose the Transmitter key configuration Key 1. Key 2.Key 3 Press the learn code key once (8) from the following:- Learn LED Indicator will light (8A)
- Page 21 You have purchased the best Tilt and Sectional Door Opener available for residential and light industrial use. Gliderol Garage doors Pty. Ltd, has many years experience in the manufacture of tilt and sectional doors and are world renown for their award winning roller door which has been granted the Industrial Design council of Australia Award with many of its operational features highly recommended by the council's assessment panel.
- Page 22 Owner's Manual for Glidermatic GTS Tilt and Sectional Door Opener Note that operating the automatic controls will The Power Head contains a transformer which either open or close the door by the same button reduces the domestic supply down to 24 volts to press action, when the door is closing, a further ensure your safety at all times.
- Page 23 These units are available separately or combined FOR DAMAGE TO THE VEHICLE WILL BE and are recommended for situations where no BOURNE BY GLIDEROL DOORS. other personnel access is available to the garage (Key Release) or where door opening is desired LIGHT TIMER without use of a hand set (Key Switch).
- Page 24 Owner's Manual for Glidermatic GTS Tilt and Sectional Door Opener B: ELECTRICAL POWER FAILURE Step 3: Manually raise the door. - WHEN ACCESS IS NOT AVAILABLE Step 4: Switch off the power and remove the These doors should have an External Keyed plug from the socket.
- Page 25 Do's and Don'ts DON'T R e c o r d t h e s e r i a l n u m b e r o f t h e u n i t Do not lock the boor manually whilst power is applied to the unit Remember that a normal common sense approach to all components will result in years...
- Page 26 How to Avoid Costly Service Bills PROBLEM ACTION Door does not operate Check electrical supply to unit. Press hand set and/or bell press button again. Manual release cable is in the engaged position Drive motor operates but door does and engaged in drive (move door manually to re- not move.
- Page 27 Vendee. 6.Faulty or unsuitable structures to which the Panel Glide is affixed. B. (2) Where the unit has not been installed on a gliderol garage door by the Manufacturer or its Authorised 7.Radio (including citizen band transmissions) or any Distributor, in addition to any warranty offered by the other electronic interference.
- Page 28 + 44 191 581 0455 + 44 191 581 0455 + 44 191 518 0548 + 44 191 518 0548...
Need help?
Do you have a question about the Glidermatic GTS 2000 and is the answer not in the manual?
Questions and answers
After closing there is a second beep and then the reopens again.
The Gliderol Glidermatic GTS 2000 beeps twice and reopens after closing likely because the close limit is not properly set. When the door reaches the closed position, it pauses, beeps, and reopens if the system does not recognize the position as fully closed. This can happen after using a different remote button or if the limits were accidentally reset. Adjusting and saving the correct close limit in the unit's memory should fix the issue.
This answer is automatically generated