Lowara TKS Series Instructions For Installation And Use Manual
Electric pumps with teknospeed speed variator
Hide thumbs
Also See for TKS Series:
- Instructions for installation & use (125 pages) ,
- Instructions for installation and use manual (120 pages) ,
- Instructions for installation and use manual (76 pages)
Table of Contents
Advertisement
ELETTROPOMPE SERIE TKS/...
it
CON VARIATORE DI VELOCITÀ TEKNOSPEED
TKS/..... SERIES ELECTRIC PUMPS
en
WITH TEKNOSPEED SPEED VARIATOR
ÉLECTROPOMPES SÉRIE TKS/.....
fr
AVEC VARIATEUR DE VITESSE TEKNOSPEED
PUMPEN BAUREIHE TKS/.....
de
MIT FREQUENZUMFORMER TEKNOSPEED
ELECTROBOMBAS SÉRIE TKS/.....
es
CON VARIADOR DE REVOLUCIONES TEKNOSPEED
ELECTROBOMBAS SÉRIE TKS/.....
pt
COM CONVERSOR DE VELOCIDADE TEKNOSPEED
ELEKTROPOMPEN TKS/... .. SERIE
nl
MET TEKNOSPEED SNELHEIDSREGELAAR
It
Conservate con cura il manuale per future consultazioni
en
Keep this manual for future reference
fr
Conservez avec soin le manuel pour toute consultation future
de
Das Handbuch muss für zukünftige Konsultationen sorgfältig aufbewahrt werden.
es
Guardar con cuidado el manual para poderlo consultar en el futuro
pt
Conservar cuidadosamente o manual para consultas futuras
nl
Bewaar de handleiding zorgvuldig voor latere readpleging
Applica qui l'adesivo col codice a barre
Apply the bar code label here
Lowara
Istruzioni d'installazione e d'uso
Instructions for installation and use
Instructions pour l'installation
et l'emploi
Installations- und
Bedienungsanleitungen
Instrucciones de
instalación y uso
Instruções instalação e uso
Aanwijzingen voor de installatie
en het gebruik
cod. 001076010 C 05/09
cod. 001076010 rev.E ed.05/2012
Advertisement
Table of Contents

Related Manuals for Lowara TKS Series


Summary of Contents for Lowara TKS Series
-
Page 1: Ricerca Guasti
Lowara ELETTROPOMPE SERIE TKS/... Istruzioni d’installazione e d’uso CON VARIATORE DI VELOCITÀ TEKNOSPEED TKS/….. SERIES ELECTRIC PUMPS Instructions for installation and use WITH TEKNOSPEED SPEED VARIATOR ÉLECTROPOMPES SÉRIE TKS/….. Instructions pour l’installation AVEC VARIATEUR DE VITESSE TEKNOSPEED et l’emploi PUMPEN BAUREIHE TKS/….. -
Page 2: Table Of Contents
ISTRUZIONI PER L’INSTALLAZIONE E L’USO 1 Generalità ..............pag. 2 Ispezione preliminare . -
Page 3: Ricambi
« Istruzioni originali » SONE E DELLE COSE AVVERTIMENTI PER LA SICUREZZA DELLE PER Questi simboli indicano la potenzialità del rischio derivante dal mancato rispetto della prescrizione alla quale sono stati abbinati, come sotto specificato La mancata osservanza della prescrizione comporta un rischio di danni alle perso- PERICOLO ne e alle cose. -
Page 4: Overview
1. Overview The purpose of this manual is to provide the necessary information for proper installation, operation and maintenance of the TEKNOSPEED converter connected to a LOWARA electric pump. Read this manual before using the product. Improper use may cause personal injury and damage to property, and lead to the forfeiture of the warranty coverage. -
Page 5: Installation
4.1 TKS system (TEKNOSPEED mounted on the electric pump) Do not use the product in environments where corrosive and/or flammable powders, acids, gases, etc. are present. Do not use the electric pump to handle dangerous or flammable liquids. • Ambient temperature: +0°C to +40°C •... -
Page 6: Start-Up
6. Start-up Information for installers The start-up operations must be performed by skilled and qualified personnel. Use adequate equipment and protections. Observe the accident prevention regulations in force. Before starting the unit, read these operating instructions and the manual for the electric pump. 6.1 Hydraulic Connection of Electric Pump The hydraulic connections must comply with current standards and legislation. - Page 7 Make sure that the surge tank can handle the maximum pressure of the system. Check and adjust the precharge pressure before connecting the surge tank to the system. If the surge tank is already connected, you will have to drain the system before you check and adjust the precharge pressure.
- Page 8 6.2.7 Protection against dry running (float switch) The TEKNOSPEED converter can be connected to an external device for protection against pump dry running (see chapter 6.1). The most conventional method consists in the use of a float switch installed in the suction tank.
- Page 9 6.2.11 Pressure Transmitter The TKS system comes with pressure transmitter connected to the TEKNOSPEED converter’s terminal board. The transmitter is equipped with a 2-meter shielded cable. If you need to wind up the cable, do not coil it but fold it . For further information refer to chapter 12.
- Page 10 - Open the on-off valve located on the pump’s delivery side. - Open a user or the test tap (chapter 6.1) partially, allowing the pressure to drop slowly. - The pump starts. - Turn the adjusting screw slowly to the left using a screwdriver. Use the slotted blade screwdriver (2.5 mm) provided with the TKS system.
-
Page 11: Maintenance
If the water consumption decreases gradually, the system runs the pump at a slightly higher pressure for approx. 60 seconds (with transmitter full scale equal to 10 bar + 0.2 bar), and then stops it if there is no further water consumption. If the system is powered the green (Power) light is on. -
Page 12: Troubleshooting
8. Troubleshooting Information for users and maintenance personnel Read this user’s manual and the operating instructions for the electric pump and diaphragm tank (if installed). Maintenance operations must be performed by qualified personnel only. For further information refer to chapters 7 and 12. 8.1 Visual Signaling Devices 8.1.1 Operation Signals TKS_M0025_A_OT.XLS... - Page 13 To reset the system, disconnect the power supply for at least one minute. If 10 minutes elapse after an alarm without any other malfunctions occurring, the alarm counter is reset and three new attempts are possible. If two or more alarms are triggered simultaneously (e.g. due to motor overtemperature and lack of water), only the first malfunction signal received by the control board is signaled.
- Page 14 8.2 Troubleshooting Guide PROBLEM PROBABLE CAUSE POSSIBLE REMEDY The electric pump does not start No power supply Restore the power supply Main switch on Green light off Triggering of magneto-thermal Reset the switch switch The electric pump does not start or it stops if it is already running *** = 2 flashes The main switch is on...
-
Page 15: Spare Parts
Triggering of general system Short circuit Check the connection cables protection Triggering of differential system Ground leakage Check the insulation of the protection (circuit breaker) electric pump and cables 9. Spare Parts Information for maintenance personnel Always state the exact model identification number and construction number when requesting technical information or spare parts from our Sales and Service Center. -
Page 16: Contrôle Préliminaire
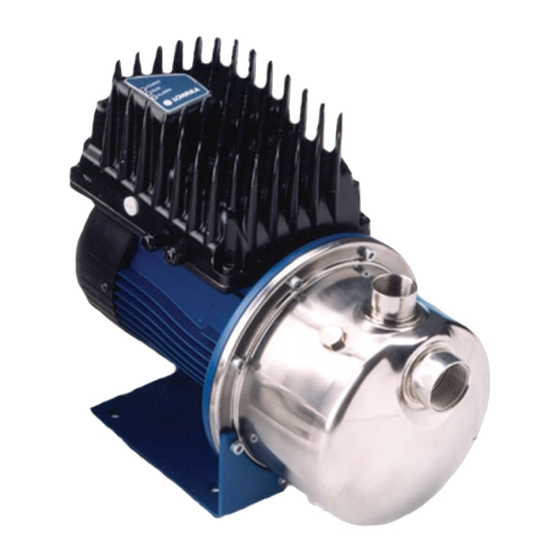
12. Tabelle e disegni - Tables and drawings -Tableaux et dessins - Tabellen und Zeichnungen - Tablas y dibujos - Tabelas e desenhos - Tabellen en tekeningen Composizione sistema TKS (capitoli 3 e 6.4) TKS system composition (chapters 3 and 6.4) Composition système TKS (chapitres 3 et 6.4) Zusammensetzung des TKS-Systems (Kapitel 3 und 6.4) Composición del sistema TKS (capítulos 3 y 6.4) -
Page 17: Limites D'emploi
Targa dati (capitoli 4 e 9) - Rating plate (chapters 4 and 9) - Plaque des données (chapitres 4 et 9) Datenschild (Kapitel 4 und 9) - Placa de características (capítulos 4 y 9) Placa dos dados (capítulos 4 e 9) - Typeplaatje (hoofdstuk 4 en 9) 1 Tipo elettropompa 7 Frequenza 12 Potenza nominale motore... -
Page 18: Fonctionnement (Mise En Service)
1 Tipo de electrobomba 6 Altura manométrica mínima* 11 Potência absorvida 2 Código 7 Frequência 12 Potência nominal do motorr 3 Campo de débito 8 Casse de isolamento e 13 Corrente 4 Campo de altura grau de protecção 14 Tipo de conversor manométrica* 9 Tipo de motor 15 Data de fabrico e número de... - Page 19 Esempi di installazione (capitolo 6) - Examples of installation (chapter 6) Exemples d’installation (chapitre 6) - Aufstellungsbeispiele (Kapitel 6) Ejemplos de instalación (capítulo 6) - Exemplos de instalação (capítulo 6) Installatievoorbeelden (hoofdstuk 6) Sottobattente - Positive suction head - Aspiration sous charge d’eau - Untere Saugleitung Bomba bajo el nivel del líquido que se debe aspirar - Coluna aspirada positiva Onder de aanzuighoogte 1 Vasca o serbatoio...
- Page 20 1 Wanne oder Behälter 7 Druckübertragungsgerät 2 Allfälliger Filter 8 Manometer 3 Sperrventil 9 Membrandruckbehälter 4 Rückschlagventil 10 Testhahn 5 Biegsames Rohr 11 Schwimmerschalter 6 Motorpumpe mit Teknospeed 1 Tanque o depósito 7 Transmisor de presión 2 Eventual filtro 8 Manómetro 3 Válvula de cierre 9 Acumulador hidráulico de membrana 4 Válvula de retención...
- Page 21 Soprabattente - Suction lift - Aspiration au-dessus du niveau de l’eau Obere Saugleitung - Bomba sobre el nivel del líquido que se debe aspirar Altura de aspiração - Boven de aanzuighoogte 1 Vasca 8 Manometro 3 Valvola di intercettazione 9 Autoclave a membrana 5 Tubo flessibile 10 Rubinetto di prova 6 Elettropompa con Teknospeed...
- Page 22 1 Wanne 8 Manometer 3 Sperrventil 9 Membrandruckbehälter 5 Biegsames Rohr 10 Testhahn 6 Motorpumpe mit Teknospeed 11 Schwimmerschalter 7 Druckübertragungsgerät 12 Bodenventil 1 Tanque 8 Manómetro 3 Válvula de cierre 9 Acumulador hidráulico de membrana 5 Tubo flexible 10 Grifo de prueba 6 Electrobomba con Teknospeed 11 Interruptor de flotador 7 Transmisor de presión...
-
Page 23: Entretien
Adesivo (capitolo 6) - Adhesive plate (chapter 6) - Autocollant (chapitre 6) - Klebeetikette (Kapitel 6) Adhesivo (capítulo 6) - Placa adesiva (capítulo 6) - Sticker (hoofdstuk 6) 1 Spia di segnalazione presenza tensione 1 Luz indicadora de presencia tensión 2 Spia di segnalazione pompa in marcia 2 Luz indicadora de bomba en marcha 3 Spia di segnalazione anomalia... -
Page 24: Recherche Des Pannes
Schema connessioni esterne del convertitore TEKNOSPEED (capitolo 6) Diagram of TEKNOSPEED converter’s external connections (chapter 6) Schéma de connexions externes du convertisseur TEKNOSPEED (chapitre 6) Schema der externen Anschlüsse des Frequenzumformers TEKNOSPEED (Kapitel 6) Esquema de conexiones exteriores del convertidor TEKNOSPEED (capítulo 6) Esquema das conexões externas do conversor TEKNOSPEED (capítulo 6) Schema van de uitwendige aansluitingen van de TEKNOSPEED omzetter (hoofdstuk 6) 1 Lampadine di segnalazione... - Page 25 1 Signallampen 5 Kabeleingang der Serienschnittstelle 2 Druckregulierungschraube (Kabelniederhalter oder Stopfen M16 x 1,5) 3 Kabeleingang des Druckübertragungsgerät 6 Kabeleingang des Anzeigerelais der (Kabelniederhalter M16 x 1,5) Anomalien (Kabelniederhalter oder Stopfen 4 Kabeleingang der externen M16 x 1,5) Trockenlaufvorrichtung (Kabelniederhalter oder 7 Speisekabeleingang (Kabelniederhalter M20 x Stopfen M16 x 1,5) 1,5)
- Page 26 Sequenza apertura convertitore TEKNOSPEED (capitolo 6) TEKNOSPEED converter opening sequence (chapter 6) Séquence d’ouverture TEKNOSPEED (chapitre 6) Sequenz zum Öffnen des Frequenzumformers TEKNOSPEED (Kapitel 6) Secuencia apertura convertidor TEKNOSPEED (capítulo 6) Sequência abertura conversor TEKNOSPEED (capítulo 6) Openingsvolgorde TEKNOSPEED omzetter (hoofdstuk 6)
-
Page 27: Pièces De Rechange
Come bloccare la schermatura del cavo (capitoli 6.2.8, 6.2.9, 6.2.11) How to fasten the cable shielding (chapters 6.2.8, 6.2.9, 6.2.11) Comment bloquer le blindage du câble (chapitres 6.2.8, 6.2.9, 6.2.11) Feststellen der Kabelabschirmung (Kapitel 6.2.8, 6.2.9, 6.2.11) Cómo bloquear el blindaje del cable (capítulos 6.2.8, 6.2.9, 6.2.11) Como bloquear a blindagem do cabo (capítulos 6.2.8, 6.2.9, 6.2.11) Wijze waarop de afscherming van de vastgezet moet worden (paragraaf 6.2.8, 6.2.9 en 6.2.11) - Page 28 Schema connessioni interne del convertitore TEKNOSPEED (capitolo 6) Diagram of TEKNOSPEED converter’s internal connections (chapter 6) Schéma des connexions internes du convertisseur TEKNOSPEED (chapitre 6) Schema der internen Anschlüsse des Frequenzumformers TEKNOSPEED (Kapitel 6) Esquema de conexiones interiores del convertidor TEKNOSPEED (capítulo 6) Esquema conexões internas do conversor TEKNOSPEED (capítulo 6) Schema van de inwendige aansluitingen van de TEKNOSPEED omzetter (hoofdstuk 6) Vista generale delle morsettiere - Overview of terminal boards - Vue générale des borniers...
- Page 29 1 Faston-Steckverbinder 6,35 mm für Kabel des Nullleiter (Speisekabel) Motor-Klemmenbretts 4 Erdungsschraube des Speisekabels 2 Klemmenbrett für Übertragungsgerät, 5 Dip-Switch zur Einstellung des Betriebsablaufs Schwimmerschalter und Serienschnittstelle 6 Faston-Steckverbinder 2,8 mm für Thermistor (IN / OUT) 7 Klemmenbrett zur Anzeige der 3 Faston-Steckverbinder 6,35 mm für Phase und Betriebsanomalien (OUT) 1 Conectores Faston macho 6,35 mm para ca-...
- Page 30 1 Connessione dispositivo esterno di protezione 4 Connessione al relè di allarme (capitolo 6.2.9) contro la marcia a secco (capitoli 6.2.7 e 6.2.8) 5 Connessione protezione dalla sovratemperatu- 2 Connessione trasmettitore esterno (capitolo ra motore – PTC (capitolo 6.2.5 ) 6.2.11) 6 Dip-switch di regolazione ciclo di funzionamen- 3 Connessione interfaccia seriale (capitolo...
- Page 31 Connessione alla protezione dalla sovratemperatura motore – PTC (capitolo 6.2.5) Connection to motor overtemperature protection – PTC (chapter 6.2.5) Connexion protection contre la surchauffe du moteur - PTC (chapitre 6.2.5) Anschluss an den Motorüberhitzungsschutz – PTC (Kapitel 6.2.5) Conexión a la protección contra la sobretemperatura motor - PTC (capítulo 6.2.5) Conexão com a protecção contra a temperatura excessiva do motor –...
- Page 32 Connessione al dispositivo esterno di protezione contro la marcia a secco (capitoli 6.2.7 e 6.2.8) Connection to external device for dry running protection (chapters 6.2.7 and 6.2.8) Connexion au dispositif extérieur de protection contre la marche à sec (chapitres 6.2.7 et 6.2.8) Anschluss an den externen Trockenlaufschutz (Kapitel 6.2.7 und 6.2.8) Conexión al dispositivo exterior de protección contra la marcha en seco (capítulos 6.2.7 y 6.2.8) Conexão com o dispositivo externo de protecção contra o funcionamento a seco (capítulos 6.2.7 e 6.2.8)
- Page 33 Connessione al relè di allarme (capitolo 6.2.9 Connection to alarm relay (chapter 6.2.9) Connexion au relais d’alarme (chapitre 6.2.9) Anschluss an das Alarmrelais (Kapitel 6.2.9) Conexión al relé de alarma (capítulo 6.2.9) Conexão com o relé de alarme (capítulo 6.2.9) Aansluiting op het alarmrelais (paragraaf 6.2.9) * massimo 230 Vca, massimo 1 A di solo carico resistivo * maximum 230 Vac, maximum 1 A of resistive load only...
- Page 34 Connessione interfaccia seriale (capitolo 6.2.10) Serial interface connection (chapter 6.2.10) Connexion interface série (chapitre 6.2.10) Anschluss an die Serienschnittstelle (Kapitel 6.2.10) Conexión interfaz serial (capítulo 6.2.10) Conexão interface série (capítulo 6.2.10) Aansluiting seriële interface (paragraaf 6.2.10)
- Page 35 Connessione al trasmettitore esterno (capitolo 6.2.11) Connection to external transmitter (chapter 6.2.11) Connexion capteur extérieur (chapitre 6.2.11) Anschluss an das externe Übertragungsgerät (Kapitel 6.2.11) Conexión al transmisor exterior (capítulo 6.2.11) Conexão com o transmissor externo (capítulo 6.2.11) Aansluiting op uitwendige transmitter (paragraaf 6.2.11) b = bianco m = marrone b = white...
- Page 36 Come piegare il cavo del trasmettitore esterno (capitolo 6.2.11) How to fold the external transmitter cable (chapter 6.2.11) Comment plier le câble du capteur extérieur (chapitre 6.2.11) Zusammenlegen des Kabels des externen Übertragungsgeräts (Kapitel 6.2.11) Cómo plegar el cable del transmisor exterior (capítulo 6.2.11) Como dobrar o cabo do transmissor externo (capítulo 6.2.11) Wijze waarop de kabel van de uitwendige transmitter gevouwen moet worden (paragraaf 6.2.11)
- Page 37 Impostazioni di fabbrica per i dip-switch di regolazione ciclo di funzionamento (capitolo 6.2.12) Factory settings of dip-switches for operating cycle adjustment (chapter 6.2.12) Paramétrages effectués en usine pour les dip-switchs de réglage du cycle de fonctionnement (chapitre 6.2.12) Werkseitige Einstellungen der Dip-Switches zur Einstellung des Betriebsablaufs (Kapitel 6.2.12) Configuraciones de fábrica para los dip-switch de regulación ciclo de funcionamiento (capítulo 6.2.12) Ajustes de fábrica para os dip-switch de regulação do ciclo de funcionamento (capítulo 6.2.12)
- Page 38 Procedure di modifica taratura di fabbrica (capitolo 6.3.3) Factory settings modification procedures (chapter 6.3.3) Procédures de modification des réglages effectués en usine (chapitre 6.3.3) Vorgehen zur Änderung der werkseitigen Einstellungen (Kapitel 6.3.3) Procedimientos de modificación calibrado de fábrica (capítulo 6.3.3) Procedimento de modificação do ajuste de fábrica (capítulo 6.3.3) Wijzigingsprocedure van de fabrieksmatige instellingen (paragraaf 6.3.3) 1 Valvola di intercettazione lato mandata...
- Page 39 1 Válvula de cierre lado impulsión 2 Grifo de prueba 3 Tapón de protección del tornillo de regulación 4 Destornillador para la regulación 5. Manómetro para leer el valor de la presión en la instalación 1 Válvula de intercepção lado compressão 2 Torneira de prova 3 Tampão de protecção do parafuso de regulação 4 Chave de parafusos para a regulação...
- Page 40 Struttura base di un convertitore di frequenza TEKNOSPEED (capitolo 6.4) Basic structure of TEKNOSPEED frequency converter (chapter 6.4) Structure de base d’un convertisseur de fréquence TEKNOSPEED (chapitre 6.4) Grundstruktur eines Frequenzumformers TEKNOSPEED (Kapitel 6.4) Estructura de base de un convertidor de frecuencia TEKNOSPEED (capítulo 6.4) Estrutura de base de um conversor de frequência TEKNOSPEED (capítulo 6.4) Basisconstructie van een TEKNOSPEED frequentieomzetter (paragraaf 6.4) c.a.
- Page 41 « TRADUCTION » EG-KONFORMITÄTSERKLÄRUNG « ÜBERSETZUNG » LOWARA SRL UNIPERSONALE, DONT LE SIÈGE EST SITUÉ 14 LOWARA SRL UNIPERSONALE, MIT SITZ IN VIA LOMBARDI 14 VIA LOMBARDI - 36075 MONTECCHIO MAGGIORE (VI) - ITALIE, - 36075 MONTECCHIO MAGGIORE (VI) - ITALIEN, ERKLÄRT, DÉCLARE QUE LE PRODUIT:...
- Page 42 « TRADUCCIÓN » DECLARAÇÃO CE DE CONFORMIDADE « TRADUÇÃO » LOWARA SRL UNIPERSONALE, CON SEDE EN VIA LOMBARDI A LOWARA SRL UNIPERSONALE, COM SEDE EM VIA 14 - 36075 MONTECCHIO MAGGIORE (VI) - ITALIA, DECLARA LOMBARDI 14 - 36075 MONTECCHIO MAGGIORE (VI) - ITÁLIA,...
- Page 43 Lowara se reserva el derecho de realizar modificaciones sin necesidad de aviso previo. A Lowara reserva-se o direito de proceder a alterações sem aviso prévio. Lowara behoudt zich het recht voor om zonder voorafgaand bericht wijzigingen aan te brengen. Lowara forbeholder sig retten til at ændre specifikationerne uden meddelelse herom.
Need help?
Do you have a question about the TKS Series and is the answer not in the manual?
Questions and answers