
Subscribe to Our Youtube Channel
Related Manuals for GreenWorks Pro 2508002CT


Summary of Contents for GreenWorks Pro 2508002CT
- Page 1 20’’ 60V Brushless Mower 2508002CT Owner’s Manual TOLL-FREE HELPLINE: 1-855-345-3934 www.GreenWorksTools.com Read all safety rules and instructions carefully before operating this tool.
-
Page 2: Table Of Contents
CONTENTS Contents ..........................2 ......................2 Safety information........................ 3 Symbols ..........................6 Know your lawn mower ......................8 Assembly ..........................9 Operation ........................... 17 Maintenance ........................22 Environmentally safe battery disposal ................26 Troubleshooting ......................... 27 Warranty ..........................28 Exploded View ........................29 Parts List.......................... -
Page 3: Safety Information
SAFETY INFORMATION READ ALL INSTRUCTIONS W A R N I N G This mower is capable of amputating hands and feet and throwing objects. Failure to observe the following safety instructions could result in serious injury or death. W A R N I N G When using electric lawn mowers, basic safety precautions should always be followed to reduce 1. - Page 4 SAFETY INFORMATION • Remove or disconnect battery before servicing, cleaning, or removing material from the lawn mower. • Use only approved replacement batteries, other batteries may cause injury or damage to the mower. For use only with Greenworks battery 2908402CT (4 AH) and Greenworks charger 2910402CT.
- Page 5 SAFETY INFORMATION 3. CHILDREN Tragic accidents can occur if the operator is not alert to the presence of children. Children are often attracted to the machine and the mowing activity. Never assume that children will remain where you last saw them. that may obscure your view of a child who may run into the path of the mower.
-
Page 6: Symbols
SYMBOL NAME DESIGNATION/EXPLANATION Volts Voltage Amperes Current Hertz Watts Minutes Time Alternating Current Type of current Type or a characteristic of current Rational speed, at no load Revolutions, strokes, surface speed, orbits etc., per minute Safety Alert Wet Conditions Alert To reduce the risk of injury user must read and Read The Operator’s Manual understand operator’s manual before using this... - Page 7 with this product. SYMBOL SIGNAL MEANING DANGER Indicates an imminently hazardous situation, which, if not avoided, will result in death or serious injury. WARNING Indicates a potentially hazardous situation, which, if not avoided, could result in death or serious injury. CAUTION Indicates a potentially hazardous situation, which, if not avoided, may result in minor or moderate injury.
-
Page 8: Know Your Lawn Mower
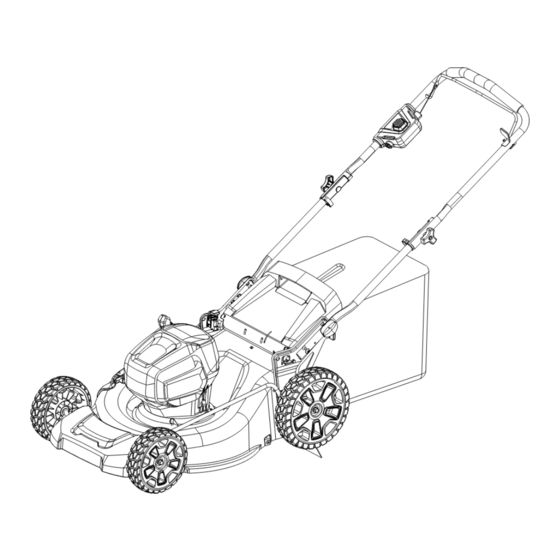
Read this operator's manual and safety rules before operating your lawn mower. Compare the illustration in Figure 1 to your lawn mower in order to familiarize yourself with the location of various controls and adjustments. Save this manual for future reference. Bail lever Safety lock-out button Rear chute cover... -
Page 9: Assembly
PART NAME FIGURE PART NO. Mower Grass Catcher Bag Handle Bolt Owner’s Manual Note: The mulching plug is installed in the rear discharge opening when shipped. - Page 10 UNPACKING listed in the packing list are included. product. W A R N I N G If any parts are damaged or missing do not operate this product until the parts are replaced. W A R N I N G leading to possible serious personal injury.
- Page 11 UNFOLDING AND ADJUSTING LOWER HANDLE (See Figure 2) W A R N I N G Folding or unfolding the handle improperly can damage the cables, causing an unsafe operating condition. sides. Move the lower handles to the operating position. You may raise or lower the handle to a knobs to lock the lower handle into position.
- Page 12 INSTALLING THE UPPER HANDLE (See Figure 3) (1) Upper handle (2) Lower handle (4) Knob (3) Bolt Fig. 3...
- Page 13 INSTALLING THE GRASS CATCHER BAG (See Figure 4) Release the rear discharge door. When installed correctly, the hooks on the grass catcher will (1) Rear discharge door (5) Door rod (2) Handle (3) Hooks (4) Grass Catcher Fig. 4...
- Page 14 INSTALLING / REMOVING THE MULCHING PLUG (See Figure 5) (1) Rear discharge door (3) Mulching plug (2) Handle Fig. 5...
- Page 15 INSTALLING SIDE DISCHARGE CHUTE (See Figure 6) discharge cover. the discharge chute. Release the side discharge cover. (4) Pins (1) Side discharge cover (2) Groove (3) Side discharge chute Fig. 6...
- Page 16 TO INSTALL BATTERY PACK (See Figure 7) secure in the mower before beginning operation. safety key. Close the door. (1) Battery door (2) Battery pack (3) Battery release button (4) Safety key Fig. 7 TO REMOVE BATTERY PACK (See Figure 7) tool slightly.
-
Page 17: Operation
STARTING/STOPPING THE MOWER (See Figure 8) To start the motor: Open the battery door. Insert the battery. To stop the motor: Release the bail lever. (1) Lock Out Button (2) Bail Lever Fig. 8 Soft-Start Remove the battery and check under the mower deck to ensure there is nothing obstructing the blade and that the blade can spin freely by hand. - Page 18 CUTTING HEIGHT ADJUSTMENT (See Figure 9) When shipped, the wheels on the mower are set to a low-cutting position. Before using the To adjust the blade height: the mower. the mower. Height Adjustments 1 3/8 - 3 3/4" 1st setting 1 3/8"...
- Page 19 SLOPE GAUGE (See Figure 10) W A R N I N G Slopes are a major factor related to accidents involving slips and falls, which can result in severe do not mow it. For your safety, use the slope gauge that is included as part of this manual to measure slopes before operating this unit on a sloped or hilly area.
- Page 20 MOWING TIPS NOTE: A sharp blade will greatly enhance the performance of the mower, especially when cutting high grass. Be sure to check the blade and to sharpen it at least once per year, as described in the Maintenance section. Verify that the lawn is free of stones, sticks, wires, and other objects that could damage the blades or the motor.
- Page 21 EMPTYING THE GRASS CATCHER BAG (See Figure 11) Empty grass clippings. manual. Fig. 11...
-
Page 22: Maintenance
MAINTENANCE REPLACING THE CUTTING BLADE (See Figure 12-13) W A R N I N G Always protect your hands by wearing heavy gloves and/or wrapping the cutting edges with rags when servicing or transporting the mower. REMOVE BATTERY. While wearing leather padded gloves, wedge a block of wood between the blade and the To re-install the blade, position the blade with the cutting edges toward the ground. - Page 23 MAINTENANCE CLEANING THE MOWER W A R N I N G of the mower deck should be cleaned after each use, because grass clippings, leaves, dirt, and other debris will accumulate, which will cause rust and corrosion. Occasionally wipe the mower clean with a dry cloth. If debris builds up on the underside of the mower during use, stop the motor, disconnect the battery, and then tilt the mower on its side, and scrape it clean using an appropriate tool.
- Page 24 MAINTENANCE VERTICAL STORAGE FUNCTION (See Figure 14) handle knobs to the locked position. W A R N I N G Always remove the battery from the mower before placing the unit in the vertical storage position. STORAGE SWITCH: replace the need to remove the safety key and battery to prevent accidental start-up or unauthorized use. Locked position Unlocked...
- Page 25 MAINTENANCE When servicing the mower, use only identical replacement parts that are available from the improper performance, and may compromise safety. Before cleaning, repairing, or inspecting; verify that the blade and all moving parts have come to a complete stop. Remove the battery when making any adjustments or when any of the four wheels must be lifted off the ground.
-
Page 26: Environmentally Safe Battery Disposal
Lithium-Ion, a toxic material. W A R N I N G lithium-ion disposal. W A R N I N G If the battery pack cracks or breaks, with or without leaks, do not recharge or use the battery. solution in the eyes or on skin, and do not swallow it. waste stream. -
Page 27: Troubleshooting
TROUBLESHOOTING PROBLEM POSSIBLE CAUSE SOLUTION The battery is not charged. Charge the battery. Replace the switch (call the toll free The switch is defective. helpline, at 1-855-345-3934. Grass is jammed between the Remove battery; check under the deck deck and the blade. for obstructions. -
Page 28: Warranty
proof of purchase parts found to be defective, through normal use, free of charge to the customer. This warranty is valid only for units which have been used for personal use that have not been hired or rented for industrial/commercial use, and that have been maintained in accordance with the instructions in the owners’... -
Page 30: Parts List
PARTS LIST ITEM NO. PART NO. DESCRIPTION 311051560 60V PCB 341191179 333011555 20” Blade 341011555 Side discharge chute 311061555 Side discharge cover assembly 341331179A Bumper cover 341011571 Bumper main body 3220504 Screw 341281179A 8” Wheel assembly 33307470A Axle press plate 322081163 Screw 311041571... - Page 31 PARTS LIST ITEM NO. PART NO. DESCRIPTION 311081571 Grass catcher bag assembly 341271179A 10” Wheel assembly 333111555 Height adjustment bar assembly 311101555 Rear wheel axle 333111179A Upper handle 311011179 Switch box assembly 333061179A Power lever 342021179 Sponge 369011171 Sponge 3220439 33323250-1 Limit piece 32208234D...
- Page 32 Greenworks Tools PO Box 1238 Mooresville, NC 28115 TOLL-FREE HELPLINE: 1-855-345-3934...
Need help?
Do you have a question about the 2508002CT and is the answer not in the manual?
Questions and answers