Advertisement
Quick Links
Product number: M-CC1BR
Package Contents
Mouse x 1
Cap with clip x 1
USB charger cable (15 cm) x 1
Manual x 1
Safety precautions x 1
ENGLISH
Compliance with regulations x 1
Basic Speci cations
Resolution
1200 dpi
Connection method
Wireless Bluetooth
®
connection
Compatible standard
Bluetooth
®
3.0 Class 2
Manual
Pro le
HID (Human Interface Device)
Radio frequency
2.4 GHz band
Radio wave method
FH-SS
Operation distance
Non-magnetic surface (e.g. wooden desk) approx. 10 m
Bluetooth
®
Mouse
Magnetic surface (e.g. steel desk) approx. 3 m
*These values were obtained in ELECOM's test
with Clip
environment and are not guaranteed.
Dimensions
When in use 41.0 mm × 87.0 mm × 30.3 mm
(W × D × H)
When stored 41.0 mm × 52.0 mm × 30.3 mm
Operating temperature/
5°C to 40°C/90%RH or less (without condensation)
humidity
Storage temperature/
-10°C to 60°C/90%RH or less (without condensation)
humidity
Battery
Built-in lithium-ion rechargeable battery
(the battery cannot be removed or replaced)
Operating time
Guidelines when used with a fully charged battery
Continuous operation time: Approx. 18 hours
Continuous standby time: Approx. 36 days
Estimated usage time: Approx. 32 days
(The usage time is estimated given a mouse
operation percentage of 5% of the 8 hours per
day spent operating a PC.)
패키지 내용 확인
마우스 본체 x 1
클립 부착 캡 x 1
USB 충전 케이블(15cm) x 1
취급설명서 x 1
취급 주의 사항 x 1
한국어
규칙 준수 x 1
기본 사양
카운트 수
1200 카운트
접속 방식
Bluetooth
®
무선 방식
적합 규격
Bluetooth
®
3.0 Class 2
취급설명서
프로파일
HID (Human Interface Device)
전파 주파수
2.4GHz 대
전파 방식
FH-SS 방식
전파 도달 거리
비자성체 ( 나무판 등 ) : 약 10m
클립 부착
자성체 ( 철판 등 ) : 약 3m
※폐사 환경에서의 테스트 값이며
Bluetooth
®
마우스
보증값은 아닙니다 .
외형 치수
사용 시
W41.0 mm × D87.0 mm × H30.3 mm
수납 시
W41.0 mm × D52.0 mm × H30.3 mm
동작 온도 / 습도
5℃ ~ 40℃ / ~ 90% RH( 단 , 결로가 없을 때 )
보존 온도 / 습도
-10℃ ~ 60℃ / ~ 90% RH( 단 , 결로가 없을 때 )
사용 전지
내장 리튬이온 충전지
( 전지는 분리 또는 교환되지 않습니다 )
동작 시간
완충 상태에서의 예상 시간
연속 동작 시간 : 약 18 시간
연속 대기 시간 : 약 36 일
예상 사용 가능 시간 : 약 32 일
(1 일 8 시간 컴퓨터 조작 중 5% 를 마우스 조작에
할당한 경우 )
确认包装内容
鼠标本体 x 1
带夹子的盖子 x 1
USB充电连接线(15 cm) x 1
使用说明书 x 1
安全注意事项 x 1
中文・简体
法规标示 x 1
基本规格
分辨率
1200 DPI
®
连接方式
Bluetooth
无线方式
符合规格
Bluetooth
®
3.0 Class 2
使用说明书
规范
HID (Human Interface Device)
电波频率
2.4GHz 频段
电波方式
FH-SS 方式
电波传播距离
非磁性物体 (木桌等) : 约 10 m
带夹子的
磁性物体 (铁桌等) : 约 3 m
Bluetooth
®
鼠标
※ 这是在本公司环境下的测试值,并非保证值。
外观尺寸
使用时
W41.0 mm × D87.0 mm × H30.3 mm
收纳时
W41.0 mm × D52.0 mm × H30.3 mm
工作温度 / 湿度
5℃~ 40℃ ,相对湿度最高 90% (但无结露)
存放温度 / 湿度
-10℃~ 60℃,相对湿度最高 90% (但无结露)
电池
内
置
锂
离
子
充
电
电
池
(
电
池
不
能
取
出
、
更
换
工作时间
充满电后的大致时间
连续工作时间 : 约 18 小时
连续待机时间 : 约 36 天
估计可用时间 : 约 32 天
(假设 1 天使用计算机 8 小时,其中 5% 的时间在
操作鼠标)
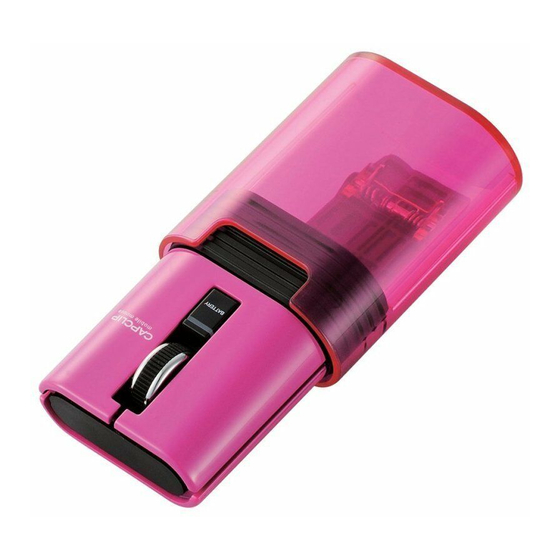
Name and Function of Each Part
Using the mouse
1. Left button
7. Pairing button
Attach the cap to the rubber part on the rear
2. Right button
8. Power switch
of the mouse.
3. Wheel
9. Optical sensor
4. LED light
10.
Clip
Blinks in red when in pairing standby mode
Turns on in red when charging
Turns on in red for a xed period of time when the
power turns on
Blinks in red when the remaining battery charge is low
5. Connector cover
6. Micro USB connector for charging
Mouse
8 9
2
3
1
4
5
Storing the mouse
Store the mouse in the cap.
5
6
7
You can carry the mouse around with you by
Cap with clip
clipping it onto an item such as a bag, a
breast pocket, or a PC.
10
각 부분의 명칭 및 기능
1. 좌 버튼
마우스 사용 시
7. 페어링 버튼
마우스 뒤쪽의 고무 부분에 캡을 부착해
2. 우 버튼
8. 전원 스위치
사용합니다.
3. 휠
9. 광학식 센서
4. LED 램프
10.
클립
페어링 대기 상태 적색으로 점멸
충전 중 적색으로 점등
전원 ON 시 일정시간 적색 점등
전지 잔량 부족 적색으로 점멸
5. 커넥터 커버
6. microUSB 충전 커넥터
마우스 본체
8 9
2
3
1
4
5
마우스 수납 시
마우스 본체를 캡에 수납합니다.
5
6
7
가방, 가슴주머니, PC 등에 끼워 부착한 다음,
클립 부착 캡
가지고 다닐 수 있습니다.
10
各部分的名称及其作用
使用鼠标时
1. 左键
7. 配对键
将盖子装到鼠标后部的橡胶部分处。
2. 右键
8. 电源键
3. 滚轮
9. 光学传感器
4. LED灯
10.
夹子
配对待机状态 红灯闪烁
充电中 点亮红灯
电源开启时 点亮红灯片刻
电池余量较少 红灯闪烁
5. 连接器盖子
6. microUSB充电接口
鼠标
8 9
2
3
1
4
5
收纳鼠标时
将鼠标本体收纳到盖子中。
5
6
)
7
可夹在皮包、胸前口袋、PC等处携带。
带夹子的盖子
10
1
2
Charging
Turning the Power On
Open the connector cover.
Slide the power switch to the on position
(the green side of the label).
Connect the USB [micro-B] connector of the included
The LED light turns on in red for a xed period of
USB charger cable to the charging micro USB connector
time.
of the product.
* When the remaining battery charge is low, this will
blink in red for a xed period of time.
Connect the USB [A] connector of the USB charger cable
to the USB port on a PC.
Low-energy mode
Be sure to suf ciently check the connector orientation
When a xed period of time elapses with the
and the insertion location.
power switch in the on position and with no
operations performed, the mouse will
If the PC is not on, turn it on.
automatically switch to low-energy mode.
The LED light turns on in red, and charging begins.
Move the mouse to return from low-energy mode.
When charging is nished, this light will turn off.
1
2
충전하기
전원 켜기
커넥터 커버를 엽니다
전원 스위치를 ON 위치(녹색 쪽)로 밉니다.
본 제품의 microUSB 충전 커넥터에 부속된 USB 충전 케이블의
LED 램프가 일정시간 적색으로 점등합니다.
USB[microB]커넥터를 연결합니다.
※ 건전지 잔량이 적을 때, 일정 시간 적색 점멸합니다.
USB 충전 케이블의 USB[A]커넥터를 컴퓨터의 USB 포트에
절전 모드에 대해
연결합니다.
전원 스위치는 ON인 상태에서 조작 없이 일정
시간이 지나면, 자동으로 절전 모드로 이행됩니다.
커넥터 방향과 삽입 장소를 정확히 확인하십시오.
마우스를 움직이면 절전 모드에서 복귀합니다.
컴퓨터의 전원이 켜져 있지 않을 경우에는 전원을 켭니다.
LED 램프가 적색으로 점등한 후, 충전을 시작합니다.
충전이 완료되면 소등합니다.
1
2
充电
打开电源
打开接口保护盖
将电源开关滑动到ON的位置(标签在绿色一
侧)。
将附带的USB充电连接线的USB[microB]接头连接到本产品
LED灯点亮红灯片刻。
的microUSB充电接口上。
※电池余量较少时,红灯闪烁片刻。
将USB充电连接线的USB[A]接头连接到计算机的USB端口
关于节电模式
上。
若在打开电源状态下时隔一段时间不进行操
作,自动进入省电模式。
请仔细确认接头的方向和插入部位。
移动鼠标,即可从省电模式恢复工作。
如果计算机电源没有打开,打开电源。
LED灯点亮红灯,开始充电。
充电完成后,灯熄灭。
3
Pairing with a PC
The pairing method may vary depending on the PC that you are using.
In this situation, see the PC's instruction manual.
Green
Windows
®
OSX 10.9
Right-click the
On the Bluetooth
icon in the
Bluetooth Preferences."
lower-right part of
Open the connector cover, and then use
the screen, and
an item with a pointed tip to hold down
then click "Add a
the pairing button for 2 to 3 seconds.
Bluetooth Device."
The LED light blinks in red.
Open the connector cover, and then use
an item with a pointed tip to hold down
the pairing button for 2 to 3 seconds.
The mouse will switch to pairing mode, and
the LED light will blink in red.
From Macintosh, select "ELECOM
Bluetooth BlueLED Mouse" to register
the device.
When the LED light turns off, the pairing is
Pairing button
complete.
On the PC, select "ELECOM IR
Optical Mouse" to register the device.
* The search method varies depending on
the device that you use.
When the LED light turns off, the pairing is
complete.
3
컴퓨터와 페어링 하기
페어링 방법은 사용하는 컴퓨터에 따라 다를 수 있습니다.
그 경우 컴퓨터 취급설명서를 확인하십시오.
녹색
Windows
®
의 경우
OSX 10.9 의 경우
화면 오른쪽 아래의
Bluetooth
를 우클릭해서
환경설정을 열기」를 클릭합니다.
「Bluetooth
커넥터 커버를 열어 끝이 뾰족한 것을
디바이스 추가」를
사용해 페어링 버튼을 2~3초 눌렀다가
클릭합니다.
땝니다.
LED 램프가 적색으로 점멸합니다.
커넥터 커버를 열어 끝이 뾰족한 것을
사용해 페어링 버튼을 2~3초 눌렀다가
땝니다.
페어링 모드가 되고, LED 램프가 적색으로
점멸합니다.
Macintosh에서 「ELECOM Bluetooth
BlueLED Mouse」를 선택하고
등록합니다.
LED 램프가 소등하면 페어링이 완료됩니다.
페어링
컴퓨터에서 「ELECOM IR Optical Mouse」
를 선택하고 등록합니다.
※ 검색 방법은 사용하는 기기에 따라 다릅니다.
LED 램프가 소등하면 페어링이 완료됩니다.
3
与计算机配对
配对方法可能因使用的计算机不同而有所差异。
这种情况下,请确认计算机的使用说明书。
绿色
Windows
®
时
OSX 10.9 时
右击画面右下的
在 Bluetooth
,点击"添加
'Bluetooth' 环境设定..." 。
Bluetooth设备"。
打开连接器盖子,用尖头的物品按压配
对键2~3秒后松开。
LED红灯闪烁。
打开接口保护盖,用尖头的物品按配对
键2~3秒后松开。
进入配对模式,LED红灯闪烁。
在Macintosh上选择"ELECOM Bluetooth
BlueLED Mouse"注册。
配对键
LED 灯熄灭后,配对完毕。
在计算机上选择"ELECOM IR Optical
Mouse"注册。
※ 搜索方法因使用的机器不同而有所差异。
LED灯熄灭后,配对完毕。
®
menu, click "Open
Pairing button
®
메뉴에서 「 "Bluetooth"
페어링
®
菜单上点击 " 打开
配对键
Advertisement

Related Manuals for Elecom M-CC1BR


Summary of Contents for Elecom M-CC1BR
- Page 1 Magnetic surface (e.g. steel desk) approx. 3 m Storing the mouse Open the connector cover. Slide the power switch to the on position *These values were obtained in ELECOM's test the LED light will blink in red. with Clip Store the mouse in the cap.
- Page 2 Menyala merah untuk jangka waktu tertentu saat daya menyala Cahaya LED berubah merah, dan Berkedip merah bila daya baterai lemah Pada PC, pilih "ELECOM IR Optical Mouse" pengisian daya dimulai. 5. Penutup konektor untuk mendaftarkan perangkat. Saat mengisi daya seleasi, lampu ini 6.
Need help?
Do you have a question about the M-CC1BR and is the answer not in the manual?
Questions and answers