Advertisement
Product number: M-XT1DR
Package Contents
Trackball x 1
Receiver unit x 1
AA alkaline battery for checking product operation x 1
Manual x 1
Safety precautions x 1
Compliance with regulations x 1
Basic Speci cations
English
Resolution
750/1500 dpi (switchable)
Interface
USB
Radio frequency
2.4 GHz band
Radio wave method
GFSK
Operation distance
Non-magnetic surface (e.g. wooden desk) approx. 10 m
Manual
Magnetic surface (e.g. steel desk) approx. 3 m
* These values were obtained in ELECOM's test
environment and are not guaranteed.
Trackball : 94.7 mm × 124.4 mm × 47.9 mm
Dimensions
Receiver unit : 13.1 mm × 18.2 mm × 5.0 mm
(W × D × H)
Operating temperature/humidity 5°C to 40°C/90%RH or less (without condensation)
EX-G
Storage temperature/humidity -10°C to 60°C/90%RH or less (without condensation)
Wireless Trackball
Supported battery
AA alkaline battery, AA manganese battery,
AA nickel-metal hydride rechargeable battery
Operating time
Guidelines when using an alkaline battery
Low-energy mode
Continuous operating time: approx. 125 hours
Continuous standby time: approx. 694 days
Estimated usage time: approx. 273 days
High-speed mode
Continuous operating time: approx. 76 hours
Continuous standby time: approx. 694 days
Estimated usage time: approx. 176 days
(When the computer is used for eight hours a day,
with 5% of that time spent operating the trackball)
패키지 내용 확인
트랙볼 본체 1대
리시버 유닛 1대
동작 확인용 AA 알칼리 건전지 1개
취급설명서 x 1
안전 조치 x 1
규칙 준수 x 1
기본 사양
한국어
카운트 수
750/1500 카운트 ( 전환 가능 )
대응 인터페이스
USB
전파 주파수
2.4GHz 대
전파 방식
GFSK 방식
전파 도달 거리
비자성체 ( 나무판 등 ): 약 10m
취급설명서
자성체 ( 철판 등 ): 약 3m
※폐사 환경에서의 테스트 값이며 보증 값은 아닙니다 .
외형 치수
트랙볼 본체
W94.7 mm × D124.4 mm × H47.9 mm
리시버 유닛
W13.1 mm × D18.2 mm × H5.0 mm
EX-G
동작 온도 / 습도
5℃∼ 40℃ / ∼ 90% RH( 단 , 결로가 없을 때 )
무선 트랙볼
보존 온도 / 습도
-10℃∼ 60℃ / ∼ 90% RH( 단 , 결로가 없을 때 )
대응 전지
AA 알칼리 건전지 , AA 망간 건전지 ,
AA 니켈수소 2 차 전지
동작 시간
알칼리 건전지 사용 시 기준
저에너지 모드
연속 동작 시간 : 약 125 시간
연속 대기 시간 : 약 694 일
예상 사용 가능 시간 : 약 273 일
하이스피드 모드
연속 동작 시간 : 약 76 시간
연속 대기 시간 : 약 694 일
예상 사용 가능 시간 : 약 176 일
(1 일 8 시간 컴퓨터 조작 중 5% 를 트랙볼 조작에
할당한 경우 )
确认包装内容
轨迹球本体 x 1
接收器 x 1
确认动作用 5 号碱性干电池 x 1
使用说明书 x 1
安全注意事项 x 1
法规标示 x 1
中文・简体
基本规格
分辨率
7
5
0
1 /
5
0
0
D
I P
(
可
切
换
)
支持接口
USB
电波频率
2.4GHz 频段
电波方式
GFSK 方式
使用说明书
电波传播距离
非磁性物体 (木桌等) : 约 10 m
磁性物体 (铁桌等) : 约 3 m
※ 这是在本公司环境下的测试值,并非保证值。
外观尺寸
轨迹球本体
W94.7 mm × D124.4 mm × H47.9 mm
接收器
EX-G
W13.1 mm × D18.2 mm × H5.0 mm
无线 轨迹球
工作温度 / 湿度
5℃~ 40℃ ,相对湿度最高 90% (但无结露)
存放温度 / 湿度
-10℃~ 60℃,相对湿度最高 90% (但无结露)
适用电池
5 号碱性干电池、5 号锰干电池、5 号镍氢充电电池
工作时间
使用碱性干电池时的大致时间
低能耗模式
连续工作时间 : 约 125 小时
连续待机时间 : 约 694 天
估计可用时间 : 约 273 天
高速模式
连续工作时间 : 约 76 小时
连续待机时间 : 约 694 天
估计可用时间 : 约 176 天
(假设 1 天使用电脑 8 小时,其中 5% 的时间在操作
轨迹球)
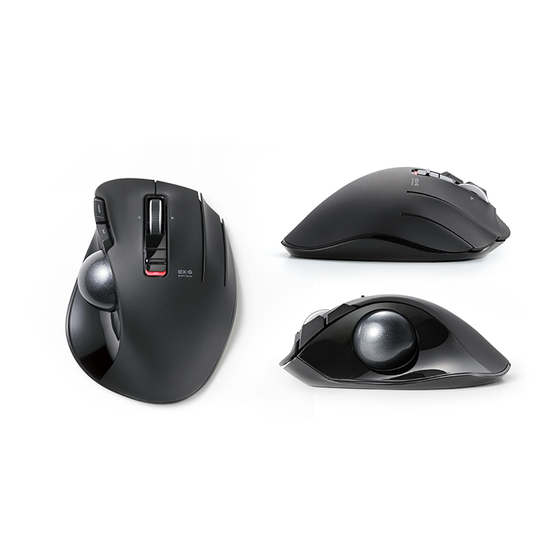
Names and Functions of Each Part
1.
Left button
8. Trackball
2. Right button
9. Operation mode switch
3. Tilt wheel/remaining battery power indicator
(power off)
(low-energy mode)
4. "Back" button
(high-speed mode)
Can perform the "Back" operation in a web browser
10. Ball removal hole
5. "Forward" button
11. Optical sensor (under the ball)
Can perform the "Forward" operation in a web browser
12. Receiver unit storage compartment
6. "Pointer" speed reduction switch
13. Battery cover
The pointer movement speed decreases when this
switch is pressed during operation.
14. Battery storage compartment
7. "Pointer" speed change switch
15. USB connector (male)
Switches the counts per inch (the pointer speed)
(750 dpi)/
(1500 dpi)
Trackball
During maintenance,
remove the ball.
2
3
6
11
9
1
10
7
Receiver unit
5
15
4
12
13
8
14
각 부분의 명칭 및 기능
1.
8. 트랙볼
좌 버튼
2. 우 버튼
9. 동작 모드 선택 스위치
3. 틸트휠/건전지 잔량 표시 램프
(전원 OFF )
(저에너지 모드)
4. 「뒤로」버튼
(하이스피드 모드)
Web 브라우저에서 「뒤로」 조작이 가능합니다.
10. 볼 분리 구멍
5. 「앞으로」버튼
11. 광학식 센서(볼 안쪽)
Web 브라우저에서 「앞으로」 조작이 가능합니다.
12. 리시버 유닛 수납부
6. 감속 스위치
13. 전지 커버
조작 중에는 누르고 있는 동안만 포인터 이동 속도가
느려집니다.
14. 전지 수납부
7. 포인터 속도 변경 스위치
15. USB 커넥터(수컷)
카운트 수(마우스 커서 속도)를 변경합니다.
(750카운트)/
(1500카운트)
트랙볼 본체
관리 시 볼을 꺼냄
2
3
6
9
11
1
10
7
리시버 유닛
5
15
4
12
13
8
14
各部分的名称及其作用
1.
8. 轨迹球
左键
2. 右键
9. 动作模式选择开关
3. 倾斜滚轮 / 电池余量指示灯
(关闭电源)
(低能耗模式)
4. " 返回"键
(高速模式)
可在网页浏览器上进行"返回"操作
10. 滚球取出孔
5. " 前进"键
11. 光学传感器(滚球内侧)
可在网页浏览器上进行"前进"操作
12. 接收器收纳部
6. 减速键
13. 电池盖
操作中,只在按住期间指针移动速度会减慢。
14. 电池存放部
7. 指针速度切换开关
15. USB 连接器(公)
切换 DPI(鼠标光标的速度)
(750 DPI)/
(1500 DPI)
轨迹球本体
维护时取出滚球
2
3
6
9
11
1
10
7
接收器
5
15
4
12
13
8
14
Inserting the Battery
Turning the Power On
Remove the battery cover.
Slide the operation mode selection switch to the H
(high-speed mode) or L (low-energy mode) position.
Insert the battery.
In high-speed mode, high-speed ball movements are translated
more accurately, but the battery charge will drain faster.
Ensure that the battery is inserted with its positive (
)
The area around the tilt wheel will turn on in red for a xed period of time.
and negative (
) ends oriented correctly.
* When the remaining battery charge is low, this area will blink in red for
a xed period of time.
Attach the battery cover.
Power saving mode
When a xed period of time elapses with the power switch on
and with no operations performed, the trackball will
automatically switch to power saving mode.
Move the trackball to return from power saving mode.
전지 삽입
전원 켜기
전지 커버를 분리한다.
동작 모드 선택 스위치를 H(하이스피드 모드) 또는 L(저에너지
모드) 위치에 슬라이드시킵니다.
전지를 삽입한다.
하이스피드 모드는 볼을 빠르게 움직일 때의 추종성이 높아지지만,
건전지 수명이 짧아집니다.
전지의 +극(
)과 -극(
) 방향을 올바르게 삽입하십시오.
틸트휠 주위가 일정 시간 적색 점등합니다.
※ 건전지 잔량이 적을 때, 일정 시간 적색 점멸합니다.
전지 커버를 원래대로 부착한다.
절전 모드에 대해
전원 스위치는 ON 상태에서 조작 없이 일정 시간이 지나면,
자동으로 절전 모드로 이행합니다.
트랙볼을 움직이면 절전 모드에서 복귀합니다.
放入电池
打开电源
拆下电池盖。
将动作模式选择开关滑到 H(高速模式)或者 L(低能耗模式)
的位置。
在高速模式时,快速移动滚球时的跟踪性会提升,但电池寿命
放入电池。
变短。
请正确插入电池正极
和负极
的方向。
倾斜滚轮周围会点亮红灯片刻。
※电池余量较少时,点亮红灯片刻。
装回电池盖。
关于节电模式
若在打开电源状态下时隔一段时间不进行操作,自动进入省电
模式。
移动轨迹轮,即可从省电模式恢复工作。
Connecting to a PC
Insert the receiver unit here.
USB port
Receiver unit
Start the PC.
Start the PC, and then wait for it to be ready to perform operations.
Insert the receiver unit into the PC's USB port.
Be sure to suf ciently check the connector orientation
and the insertion location.
The driver will be automatically installed, and you will
then be able to use the trackball.
Download "ELECOM Mouse Assistant" from the ELECOM website
to use its button assignment and high-speed scrolling functions.
http://www.elecom.co.jp/global/download/utility/
mouse_assistant/
컴퓨터 접속
이 부분에 삽입합니다.
USB 포트
리시버 유닛
컴퓨터를 기동합니다.
컴퓨터를 기동하고 조작 가능한 상태가 될 때까지 기다리십시오.
리시버 유닛을 컴퓨터 USB 포트에 삽입합니다.
커넥터 방향과 삽입 장소를 충분히 확인하십시오.
드라이버가 자동으로 설치되며, 트랙볼이 사용 가능하게 됩니다.
엘레컴 웹사이트에서 「엘레컴 마우스 어시스턴트」를 다운로드하여
설치하면 버튼 할당이나 고속 스크롤 기능을 사용할 수 있습니다.
http://www.elecom.co.jp/global/download/utility/
mouse_assistant/
连接到计算机
插入到此部位。
USB 端口
接收器
启动计算机。
启动计算机,在进入可操作状态前,请稍等。
将接收器插入计算机 USB 端口。
请仔细确认连接器的方向和插入部位。
驱动程序将自动安装,自此即可进行使用轨迹球。
从本公司官网下载并安装"ELECOM Mouse Assistant"后,即可使用
自定义按键、高速滚动功能。
http://www.elecom.co.jp/global/download/utility/
mouse_assistant/
Advertisement
Table of Contents

Related Manuals for Elecom M-XT1DR


Summary of Contents for Elecom M-XT1DR
- Page 1 7. "Pointer" speed change switch 15. USB connector (male) Magnetic surface (e.g. steel desk) approx. 3 m * These values were obtained in ELECOM's test Switches the counts per inch (the pointer speed) environment and are not guaranteed. (750 dpi)/ (1500 dpi) Start the PC.
- Page 2 750) * Cuando la carga de batería ELECOM (ELECOM del sitio web de ELECOM para usar la ) USB durante el funcionamiento. Tapa de la batería 1500) restante sea baja, este área se asignación del botón y las funciones de...
Need help?
Do you have a question about the M-XT1DR and is the answer not in the manual?
Questions and answers