Juniper SRX 210 Getting Started Manual
Services gateway
Hide thumbs
Also See for SRX 210:
- Hardware manual (204 pages) ,
- Manual (200 pages) ,
- Quick start manual (7 pages)
Advertisement
Quick Links
V
SRX 210 Services Gateway
Use the instructions in this guide to help you connect the SRX 210 services gateway to your network. For details, see the
SRX 210 Services Gateway Hardware Guide at http://www.juniper.net/techpubs/a057.html
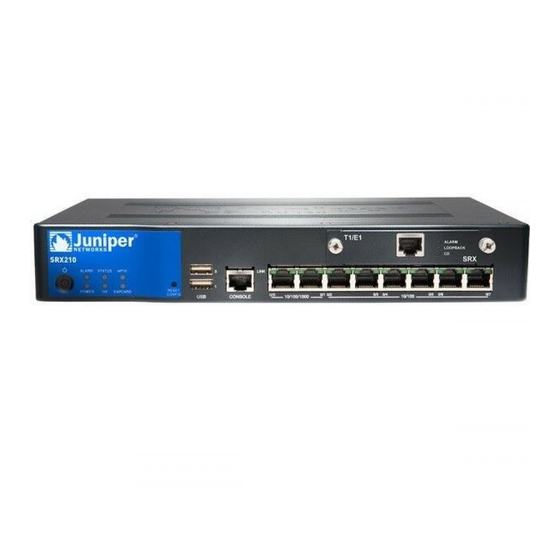
SRX 210 Services Gateway Front Panel
1) Alarm LED
6) HA LED
2) Status LED
7) ExpressCard LED
3) Mini-PIM LED
8) Power Button
4) Mini-PIM Slot
9) Reset Config Button
5) Power LED
10) USB Port
The following three types of SRX 210 services gateways are available:
Features
SRX 210B
SRX 210 H
SRX210H-POE
CONNECTING AND CONFIGURING THE DEVICE
Use the instructions below to connect and set up the SRX 210 services gateway to protect your network. Refer to the
LEDs on the front panel of the device to help you determine the status of the device.
Step 1
Connect the management device to the services gateway using either
of the following methods:
•
Connect an Ethernet cable from the ge-0/0/0 port to the Ethernet
port on the management device (workstation or laptop).
(We recommend this connection method.)
•
Connect an RJ-45 cable from the console port to the supplied
DB-9 adapter, which then connects to the serial port on the
workstation. (Serial port settings: 9600 8-N-1-N)
Step 2
Connect the power cable to the device and a power source. (We
recommend using a surge protector.) Note the following indications:
•
Power LED (green): The device is receiving power.
•
Status LED (steadily green): The device is operating normally.
11) Console Port
12) Gigabit Ethernet
Ports
13) Fast Ethernet
Ports
DDR Memory
PoE
512 MB
No
1 GB
No
1 GB
Yes (ge-0/0/0 to ge-0/0/1 and fe-0/0/2 to fe-0/0/3)
SRX 210 Services Gateway Back Panel
1) Power Supply Point
2) Cable Tie Holder
3) Grounding Point
4) Lock
5) Exhaust Vents
Step 3
Note: The services gateway functions as a DHCP server and will
assign an IP address to the management device.
Ensure that the management device acquires an IP address on the
192.168.1/24 subnetwork (other than 192.168.1.1) from the gateway.
Note: If an IP address is not assigned to the management device,
manually configure an IP address in the 192.168.1/24 subnetwork. Do
not assign the 192.168.1.1 IP address to the management device, as
this IP address is assigned to the gateway.
Step 4
Access J-Web:
1.
Launch a Web browser from the management device.
2.
Enter 192.168.1.1 in the URL address field.
Getting Started Guide
6) ExpressCard Slot
Power Supply Adapter
60 watts
60 watts
150 watts
Advertisement

Related Manuals for Juniper SRX 210


Summary of Contents for Juniper SRX 210
- Page 1 Getting Started Guide SRX 210 Services Gateway Use the instructions in this guide to help you connect the SRX 210 services gateway to your network. For details, see the SRX 210 Services Gateway Hardware Guide at http://www.juniper.net/techpubs/a057.html SRX 210 Services Gateway Front Panel...
- Page 2 JUNOSe is a trademark of Juniper Networks, Inc. All other trademarks, service marks, registered trademarks, or registered service marks are the property of their respective owners. All specifications are subject to change without notice. Juniper Networks assumes no responsibility for any inaccuracies in this document or for any obligation to update information in this document.
Need help?
Do you have a question about the SRX 210 and is the answer not in the manual?
Questions and answers