Table of Contents
Advertisement
Advertisement
Chapters
Table of Contents

Subscribe to Our Youtube Channel
Related Manuals for Rain Bird ESP-LX


Summary of Contents for Rain Bird ESP-LX
- Page 1 ESP-LX Modular Controller Installation, Programming, & Operation Guide...
- Page 2 SAFETY INFORMATION WARNING: A CIRCUIT BREAKER OR CUTOFF SWITCH IS ATTENTION: UN DISJONCTEUR OU UN INTERRUPTEUR TO BE PROVIDED IN THE FIXED WIRING TO ISOLATE THE DOIT ETRE INSTALLE SUR LE PRIMAIRE POUR ISOLER LE CONTROLLER. PROGRAMMATEUR. MEMORY IS RETAINED BY A BATTERY, WHICH IS TO BE LA MEMOIRE EST MAINTENUE GRACE A UNE BATTERIE DISPOSED OF IN ACCORDANCE WITH LOCAL RECHARGEABLE A DISPOSER SELON LA...
-
Page 3: Table Of Contents
Delay Watering..............30 Rain Delay ..............30 Introduction ................3 Calendar Day Off............31 Welcome to Rain Bird............3 Valve Settings..............33 ESP-LX Modular Controller ..........3 Valve Delay ..............33 Valves ................4 Cycle+Soak™..............35 Basic Operation............. 5 MV or Pump ..............37 Controls, Switches, and Indicators ........6 Sensor Override ............38... - Page 4 Installing the Controller ............67 Installation Checklist ............67 Check Box Contents ............67 Choose Location ..............68 Gather Installation Tools .............69 Mount Controller ..............70 Install Module(s)..............72 Connect Field Wiring ............73 Connect Sensor Wiring............74 Connect Source Power............75 Complete Installation............78 Troubleshooting Chart.............79 Index ..................82 ESP-LX Modular Controller...
-
Page 5: Introduction
Your new Rain Bird controller is designed to give you a lifetime of on-site watering control. ESP-LX Modular Controller The ESP-LX Modular controller is an irrigation timing system designed for commercial and residential use. -
Page 6: Valves
Valves The ESP-LX Modular controls when your sprinkler system turns on, and how long the sprinklers run. The controller has several valves connected to it, as shown in the illustration on the following page. Each valve opens when it receives power from the controller, and the sprinklers connected to that valve turn on. -
Page 7: Basic Operation
Basic Operation ESP-LX Modular Controller... -
Page 8: Controls, Switches, And Indicators
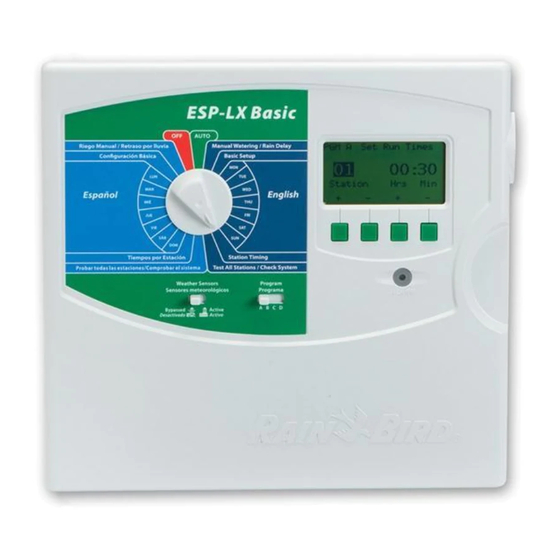
Controls, Switches, and Indicators This illustration shows the controls, switches, and indicators on the ESP-LX Modular controller, including: Programming Dial—used to turn the controller off and on, and for programming. Program Select Switch—used to select watering program A, B, C, or D (D-drip). -
Page 9: Basic Programming
NOTE: The term “start time” refers to the time that a program starts, not to the time that each individual valve begins to run. Valve run time—the number of minutes (or hours and minutes) that each valve runs. ESP-LX Modular Controller... -
Page 10: Programming Under Battery Power
Connect the controller to an AC power source as soon as possible. NOTE: All program information is stored in non- volatile memory so it will be preserved indefinitely in the event of a power outage. ESP-LX Modular Controller... -
Page 11: Programming Checklist
Set special valve features (optional) Programming Checklist Cycle+Soak™...........Page 35 To program the ESP-LX Modular controller for the first time, we recommend that you complete the following steps in order. For Master valve or pump start relay......Page 37 your convenience, a check-off box ( ) is provided for each step. -
Page 12: Fill Out Programming Chart
2 and valve 3, etc. times for each program, but only one is needed to run the program. Make any special notes in the space provided. Repeat steps 5 through 10 for Programs B, C, and D. ESP-LX Modular Controller... -
Page 13: Sample Programming Chart
Sample Programming Chart ESP-LX Modular Controller... -
Page 14: Clear Programs
See page 17 for instructions. NOTE: All settings for this program will be erased. Make sure you have the correct program selected before continuing. The Clear Programs menu appears in the display. Press “1” to select “Individual PGM.” ESP-LX Modular Controller... -
Page 15: All Programs
“Yes” to delete all programs. Press and hold “No” to leave the programs intact. NOTE: Start times, watering days, and run times for ALL programs will be erased. Make sure you want to do this before continuing. ESP-LX Modular Controller... -
Page 16: Restore Defaults
NOTE: ALL programming information for ALL programs will be erased. Make sure you want to do this before continuing. If you press “No” (or you don’t respond within several seconds), the message “No change made” appears. Then the Clear Programs menu reappears. ESP-LX Modular Controller... -
Page 17: Set Date
The month in the display flashes. Press “+” or “–“ to set the current month. Press “Next.” The day number flashes. Press “+” or “–“ to set the current day of the month. Press “Next.” The year flashes. Press “+” or “–“ to set the current year. ESP-LX Modular Controller... -
Page 18: Set Time
The hour in the display flashes. Press “+” or “–“ to set the current hour. NOTE: To change the AM/PM setting, advance the hour past 12. Press “Next.” The minutes number flashes. Press “+” or “–“ to set the current minute. ESP-LX Modular Controller... -
Page 19: Select Program
Select Program Four independent programs are available in the ESP-LX Modular controller: A, B, C, and D-drip. Multiple independent programs let you enter watering schedules to meet the requirements of different types of plant materials, soils, slopes, and shady or sunny areas. -
Page 20: Set Watering Start Times
Press “+” or “–” to set the start time. To turn off a start time, press “+” or “–” until the display shows the “OFF” setting between 11:59 p.m. and 12:00 a.m. If you want to set additional start times, press “Next.” Then repeat steps 2 through 4. ESP-LX Modular Controller... -
Page 21: Select Days To Water
31 and February 29 , or even- numbered days of the month. See page 21. CYCLICAL waters on a selected daily interval (for example, every other day, or every third day). See page 22. ESP-LX Modular Controller... -
Page 22: Custom Cycle
“On” or “Off.” If the program you want is not displayed, use the program select switch to change it. See page 17 for instructions. Press “On” to turn the selected day on. Press “Off” to turn the selected day off. ESP-LX Modular Controller... -
Page 23: Odd/Odd31/Even Cycle
Turn the dial to “ADVANCED CYCLES.” The display shows the currently selected program and its current watering day cycle If the program you want is not displayed, use the program select switch to change it. See page 17 for instructions. ESP-LX Modular Controller... -
Page 24: Cyclical
Turn the dial to “ADVANCED CYCLES.” The display shows the currently selected program and its current watering day cycle. If the program you want is not displayed, use the program select switch to change it. See page 17 for instructions. ESP-LX Modular Controller... - Page 25 NOTE: Any days you turn OFF via the Custom cycle will override watering days set via a Cyclical cycle. For more information, see the note on page 19. When you have finished setting the “Day Cycle” and the “Days Remaining,” press “Back.” ESP-LX Modular Controller...
-
Page 26: Set Valve Run Times
Then the run time will change in 10- minute increments. To set run times for additional valves, repeat steps 3 through 5. NOTE: If you have finished setting all programs, you should confirm your program settings. See “Confirm Programs” on page 54. ESP-LX Modular Controller... -
Page 27: Advanced Programming
10 minutes (100%), and you set the seasonal adjustment to 80%, the valve will run for 8 minutes (80% of 10). If you set the seasonal adjustment to 120%, that same valve will run for 12 minutes (120% of 10). ESP-LX Modular Controller... -
Page 28: Individual Program
Press “+” or “–” to set the percentage from 0 – 300 percent. NOTE: Setting the percentage to “0” will prevent the program from watering. To set the percentage for another program, use the program select switch to change the program. Then repeat steps 2 through 6. ESP-LX Modular Controller... -
Page 29: By Month
For more information, see page 25. Turn the dial to “SEASONAL ADJUST %.” The Seasonal Adjust menu appears. Press “2” on the Seasonal Adjust menu. The Seasonal Adjust by Month menu appears. ESP-LX Modular Controller... - Page 30 The month flashes. Press “+” or “–” to select the month you want. Then repeat steps 2 through 5. When you have finished setting the monthly percentages, press “Back.” Select Programs The Seasonal Adjust by Month menu appears. ESP-LX Modular Controller...
- Page 31 To apply the monthly adjustment percentage to this program, press “YES.” To remove the monthly adjustment percentage from this program, press “NO.” To set the monthly adjustment for another program, use the program select switch to change the program. Then repeat steps 3 through 5. ESP-LX Modular Controller...
-
Page 32: Delay Watering
Delay Watering The ESP-LX Modular controller lets you turn off watering during rainy periods or on specific calendar days. Rain Delay The rain delay feature lets you suspend watering for up to 14 days. For example, if rainy weather lasts for two or three days, you can set a rain delay of five or six days to let the landscape dry out before resuming normal watering schedules. -
Page 33: Calendar Day Off
Press “2” on the Delay Watering menu. The display shows the current date, along with “On” or “Off.” The day number flashes. Press “+” or “–” to change the date. You can select any date within 30 days of the current date. ESP-LX Modular Controller... - Page 34 To turn watering off on the selected date, press “Off.” All watering will be suspended on this date. The next time the date occurs, normal watering schedules will resume. To set another day off, press “Back.” Then repeat steps 2 through 7. ESP-LX Modular Controller...
-
Page 35: Valve Settings
Valve Settings The ESP-LX Modular controller lets you assign special settings to valves. These include: Valve Delay— Program a pause between the end of one valve’s operation and the beginning of the next valve’s operation. Cycle+Soak™—Break up a valve run time to prevent runoff and puddling. - Page 36 9 hours long. This delay time will affect all valves in the selected program. To set a valve delay for another program, use the program select switch to change the program. Then repeat steps 4 through 6. ESP-LX Modular Controller...
-
Page 37: Cycle+Soak
This process repeats until the valve has run for its total run time of 20 minutes. NOTE: Cycle+Soak™ times affect the valve in all programs to which it is assigned. Turn the dial to “VALVE SETTINGS.” ESP-LX Modular Controller... - Page 38 Press “Next.” The Soak numbers flash. Press “+” or “–” to set the minimum number of minutes (up to 60) for soaking between cycles. To set Cycle+Soak™ for another valve, press “Next.” Then repeat steps 4 through 10. ESP-LX Modular Controller...
-
Page 39: Mv Or Pump
MV or Pump The ESP-LX Modular controller has a connection for a single master valve or pump start relay. You can set the master valve/pump output on or off for each valve. If the output is on, any time the valve operates, the master valve or pump start relay will also turn on. -
Page 40: Sensor Override
To select another valve, press “+” or “–” until the valve number you want appears. Then repeat steps 6 and 7. Sensor Override The ESP-LX Modular controller lets you set valves to run even when a sensor is active. Turn the dial to “VALVE SETTINGS.”... - Page 41 “Off.” The sensor override setting affects the valve in all programs to which it is assigned. To select another valve, press “+” or “–” until the valve number you want appears. Then repeat steps 6 and 7. ESP-LX Modular Controller...
-
Page 42: Special Features
Special Features The Special Features of the ESP-LX Modular controller let you: Set the language that appears in the display Store and manually or automatically recall the programs you have entered Set Language Turn the dial to “SPECIAL FEATURES.” The Special Features menu appears. -
Page 43: Backup Programs - Contractor Default
“Yes” to store all program information. Press and hold “No” to skip storing the programs. If you press “No” (or you don’t respond within several seconds), the message “No change made” appears. Then the Special Features menu reappears. ESP-LX Modular Controller... - Page 44 NOTE: This feature will work properly only if you have previously backed up your programs, as described on page 41. If you have not backed up the programs, you will receive an error message. ESP-LX Modular Controller...
- Page 45 You could then set a delayed recall to automatically restore the original programs after several weeks. Turn the dial to “SPECIAL FEATURES.” The Special Features menu appears. Press “2” on the Special Features menu. ESP-LX Modular Controller...
- Page 46 41. If you have not backed up the programs, you will receive an error message. To cancel a delayed recall once you have stored it, repeat steps 1 through 7. Set the number of days to “None.” ESP-LX Modular Controller...
-
Page 47: Optional Smart Modules
The ESP-LX Modular controller lets you connect various types of sensors that interrupt watering when a specific condition is detected. For example, if you have a Rain Bird RSD Series Rain Sensor or a WRS Wireless Rain Sensor connected to the controller, watering will be suspended when rainfall activates the sensor. - Page 48 ON. See page 38 for more information about sensor override. To deactivate the sensor, set the sensor bypass switch to “BYPASSED.” Use this setting for troubleshooting or manual watering while a sensor condition is in effect. ESP-LX Modular Controller...
- Page 49 The display shows that the sensor is bypassed and that all watering is allowed. ESP-LX Modular Controller...
-
Page 50: Operating The Controller
After you have programmed the controller, you will normally set it to operate automatically. You can manually run one or more programs, and you can manually operate a single valve or several valves. The ESP-LX Modular controller also provides several testing and diagnostic functions. Operate Controller Automatically To operate the controller automatically, turn the dial to “AUTO.”... - Page 51 “OFF.” Any valve that is currently operating will stop running. The display shows “All Watering Off,” along with the current time. You can use the “OFF” setting to suspend watering during seasonal shutdown or system maintenance. ESP-LX Modular Controller...
-
Page 52: Manual Watering
The display shows Valve 1 and the run time set in the currently selected program (or “0:00”). The valve number flashes. To select a different valve, press “+” or “–” until the valve number you want appears. Press “Next.” ESP-LX Modular Controller... - Page 53 You can press“+” or “–” to add or subtract run time from the valve that is currently running. To advance to the next manually started valve in sequence, press “Adv. Valve.” Go to step 1. ESP-LX Modular Controller...
-
Page 54: Start Program
To cancel the manual operation of all selected valves, turn the dial to “OFF” for three seconds. Then turn the dial back to “AUTO.” Start Program Selecting the Program Turn the dial to “MANUAL WATERING.” The Manual Watering menu appears. Press “2” on the Manual Watering menu. ESP-LX Modular Controller... - Page 55 To advance to the next valve in the program sequence, press “Adv Valve.” Go to step 1. To cancel the manual operation of the program, turn the dial to “OFF” for three seconds. Then turn the dial back to “AUTO.” ESP-LX Modular Controller...
-
Page 56: Test All Valves/Check System
Test All Valves/Check System The ESP-LX Modular Controller provides built-in diagnostic functions that let you: Confirm all information entered for each program Calculate the total run time of each program Calculate the total daily watering times of each valve in each... - Page 57 The display shows the currently selected program and its watering start times. If the program you want is not displayed, use the program select switch to change it. See page 17 for instructions. Press “Next.” ESP-LX Modular Controller...
- Page 58 Program’s watering day cycle (display will vary depending on the how the program is set) Program’s watering days Run times of each valve assigned to the program Seasonal adjust percentages (by program and/or by month) Rain delay ESP-LX Modular Controller...
- Page 59 Sensor overrides that are turned ON On some screens, you can press“+” or “–” to scroll through more information. When you are finished viewing a screen, press “Next” to display the next screen. The Confirm Programs menu reappears. ESP-LX Modular Controller...
- Page 60 Turn the dial to “TEST ALL VALVES/CHECK SYSTEM.” The Check System menu appears. Press “1” on the Check System menu. The Confirm Programs menu appears. Press “2” on the Confirm Programs menu. ESP-LX Modular Controller...
- Page 61 20 minutes. If a seasonal adjust percent of 80% were also in effect, the calculated run time would be 16 minutes. Turn the dial to “TEST ALL VALVES/CHECK SYSTEM.” The Check System menu appears. Press “1” on the Check System menu. ESP-LX Modular Controller...
-
Page 62: Test All Valves
You can use this program to check out the operation of all the sprinklers in the system. Turn the dial to “TEST ALL VALVES/CHECK SYSTEM.” ESP-LX Modular Controller... - Page 63 The display shows the default test time of two minutes. The time digits flash. Press “+” or “–“ to change the test time. This is the time that each valve will run during the test. Press “Run.” The message “Watering” appears. Turn the dial to “AUTO.” ESP-LX Modular Controller...
- Page 64 To advance to the next valve in sequence, press “Adv. Valve.” Go to step 1. To cancel the valve test, turn the dial to “OFF” for three seconds. Then turn the dial back to “AUTO.” ESP-LX Modular Controller...
-
Page 65: Rapid Station Test Routine - Raster
Rapid Station Test Routine — RASTER™ Rain Bird’s RApid Station TEst Routine (RASTER™) lets you diagnose and troubleshoot field wiring, solenoid, and controller problems quickly and easily. To run a RASTER™: Turn the dial to “TEST ALL VALVES/CHECK SYSTEM.” The Check System menu appears. - Page 66 Shorted valve solenoid Nicked or “skinned” field wires Loose or corroded wire connections on the controller terminal or at the valve solenoid After you have repaired the fault, run RASTER™ again to verify that the problem has been corrected. ESP-LX Modular Controller...
-
Page 67: Reset Controller
Reset Controller If the display of the ESP-LX Modular controller “freezes” and the controller stops responding to commands, you may be able to reset the internal circuitry. Resetting the controller will cancel any watering that my be occurring at the time, but the controller will retain the date, time, and all programming information. -
Page 68: Alarm Light
Alarm Light The alarm light on the face panel of the ESP-LX Modular will illuminate and an appropriate text message will display when programming errors and other conditions (for example electrical faults or an active sensor) prevent watering. Electrical Faults... -
Page 69: Installing The Controller
INSTALLING THE Check Box Contents CONTROLLER This section explains how to mount the ESP-LX Modular controller on the wall and connect the wiring. ESP-LX Modular Controller NOTE: This controller must be installed in compliance with local electrical codes.. Installation Checklist... -
Page 70: Choose Location
Is near a 120 V or 230/240 V AC power source, depending on model Is safe from potential vandalism Is outside the range of operating sprinklers NOTE: This controller must be installed in compliance with local electrical codes. ESP-LX Modular Controller... -
Page 71: Gather Installation Tools
Gather Installation Tools Wire strippers Phillips head screwdriver Slotted thin-blade screwdriver Electric drill (or hammer drill if Marking pencil installing in masonry or concrete) Metal drill bit(s) Hammer ESP-LX Modular Controller... -
Page 72: Mount Controller
Disconnect the ribbon cable from the front panel by gently pulling the connector out and away from the socket. CAUTION: Be careful NOT to bend the pins in the socket. Shift the front panel up and remove the lower hinge pin. Remove the front panel. ESP-LX Modular Controller... - Page 73 Slide the controller over the top center screw. Line up the controller cabinet with the remaining four pilot holes. Drive the appropriate fastener(s) through the mounting holes into the mounting surface. Verify that the cabinet is secure. ESP-LX Modular Controller...
-
Page 74: Install Module(S)
Install Module(s) The ESP-LX Modular controller lets you add modules for additional valve connections. The controller can accommodate up to four modules. To install a module, align the connector on the back of the module with the module slot on the back panel. Press firmly until the module snaps into place. -
Page 75: Connect Field Wiring
The controller does not provide main power for a pump. Connect the master valve or pump start relay wiring to the MV and COM terminals, as shown in the illustration. ESP-LX Modular Controller... -
Page 76: Connect Sensor Wiring
The ESP-LX Modular controller lets you connect various types of sensors that interrupt watering when a specific condition is detected. For example, if you have a Rain Bird RSD Series Rain Sensor or a WRS Wireless Rain Sensor connected to the controller, watering will be suspended when rainfall activates the sensor. -
Page 77: Connect Source Power
Electrical shock can cause severe injury or death. The ESP-LX Modular controller has an internal transformer that reduces supply voltage (120 VAC in U.S. models; 230 VAC in international models; 240 VAC in Australian models) to 24 VAC to operate the valves connected to the controller. - Page 78 (“hot”) to the black transformer wire. On 120 VAC models (U.S.), connect the white supply wire (“neutral”) to the white transformer wire. On 230 VAC models (international), connect the blue supply wire (“neutral”) to the blue transformer wire. ESP-LX Modular Controller...
- Page 79 (“ground”) to the green-with-yellow- stripe transformer wire. NOTE: The ground wires MUST be connected to provide electrical surge protection. Verify that all connections are secure. Then close the cover of the high-voltage compartment and secure it with the screw. ESP-LX Modular Controller...
-
Page 80: Complete Installation
This battery will allow you to program the controller with the front panel disconnected from the cabinet. To irrigate, you will need to re- connect the front panel to the cabinet and connect the controller to source power. ESP-LX Modular Controller... -
Page 81: Troubleshooting Chart
No sensor or jumper is connected to the Turn the sensor bypass switch to BYPASSED. To controller’s SENSOR terminals, and the SENSOR prevent future occurrences, install the supplied jumper BYPASS switch has been set to ACTIVE. on the controller’s SENSOR terminals. ESP-LX Modular Controller... - Page 82 Check the main power supply to the controller. 17. PTC fuse is open. Disconnect the controller from its power source. Identify and repair the circuit fault that caused the fuse to blow. Reconnect power to the controller. ESP-LX Modular Controller...
- Page 83 (other than D) is running. Use “Confirm Programs” (see page 54) to make sure Programs A, B, and C are not scheduled to start when any program other than D is scheduled. ESP-LX Modular Controller...
-
Page 84: Index
41 Controls, 6 Installation, 67 clear, 12 Custom cycle, 19, 20 checklist, 67 confirm, 54 Cycle completing, 78 delayed recall, 43 custom, 19, 20 module, 72 drip, 17 cyclical, 19, 22 tools, 69 manual operation, 52 ESP-LX Modular Controller... - Page 85 Remote capability, 3 Smart Modules™. See Module from valves, 73 Reset controller, 65 Source power, 75 sensor, 74 Review program, 54 Special features, 40 source power, 75 Run time, 24 Stacking programs, 17 program, 58 Start time, 7, 18 ESP-LX Modular Controller...
- Page 86 ESP-LX Modular Controller...
- Page 87 NOTES...
- Page 88 RAIN BIRD CORPORATION 6991 E. Southpoint Road, Bldg. 1 • Tucson, AZ 85706 Rain Bird Europe, S.A.R.L. • 900, rue Ampere • BP 72000 • 13792 Aix en Provence Cedex 3 • France © 2006 Rain Bird Corporation ® Registered trademark of Rain Bird Corporation. • ® Marca registrada de Rain Bird Corporation.
Need help?
Do you have a question about the ESP-LX and is the answer not in the manual?
Questions and answers
How do u fix the stations1-6 to 7-12 slide switch on the panel? it is a serviceable part where can I buy it?