Table of Contents
Advertisement
Quick Links
Advertisement
Table of Contents

Related Manuals for Vega VEGABAR series 80


Summary of Contents for Vega VEGABAR series 80
- Page 1 Operating Instructions Electronics module VEGABAR series 80 Document ID: 45054...
-
Page 2: Table Of Contents
Dismounting steps......................10 Disposal ......................... 10 Safety instructions for Ex areas Take note of the Ex specific safety instructions for Ex applications. These instructions are attached as documents to each instrument with Ex approval and are part of the operating instructions. Editing status: 2018-08-31 Electronics module • VEGABAR series 80... -
Page 3: About This Document
Symbols used Document ID This symbol on the front page of this instruction refers to the Docu- ment ID. By entering the Document ID on www.vega.com you will reach the document download. Information, tip, note This symbol indicates helpful additional information. -
Page 4: For Your Safety
If the instrument comes with approvals, the associated approval documents of the sensor must always be noted. They are included with the delivery but can also be downloaded under "www.vega.com", "Instrument search" as well as via "Downloads" and "Approvals". Environmental instructions Protection of the environment is one of our most important duties. -
Page 5: Product Description
Unless otherwise indicated, the packages must be stored only under the following conditions: • Not in the open • Dry and dust free Electronics module • VEGABAR series 80... - Page 6 Protected against solar radiation • Avoiding mechanical shock and vibration • Storage and transport Storage and transport temperature see chapter "Supplement - temperature Technical data - Ambient conditions" • Relative humidity 20 … 85 % Electronics module • VEGABAR series 80...
-
Page 7: Mounting
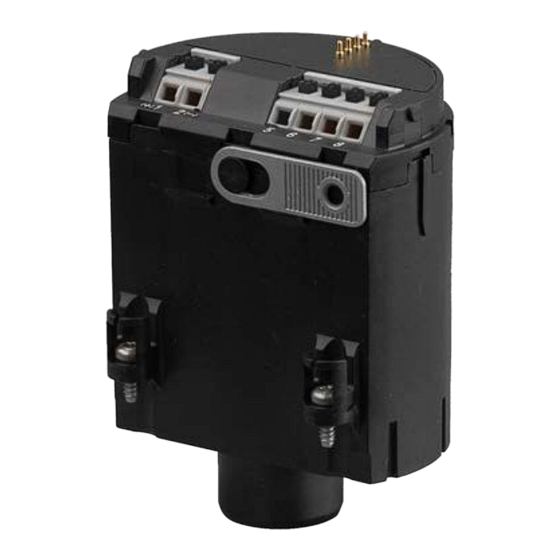
The electronics modules differ in their signal output, e.g. 4 … 20 mA/ HART, Profibus PA or Foundation Fieldbus. Another difference for example is the version "Relative pressure", "Absolute pressure" or "Relative pressure, climate-compensated". With SIL qualified instruments, only SIL replacement electronics may be used. Also keep the corresponding instructions in chapter "Setup" in mind. Installation procedure Fig. 1: Single chamber housing Position electronics compartment/Electronics module Electronics module • VEGABAR series 80... - Page 8 7. Screw in the two holding screws and tighten them 8. Attach the terminal blocks according to the operating instructions manual of the respective sensor 9. Screw the housing lid back on The electronics exchange is now finished. Electronics module • VEGABAR series 80...
-
Page 9: Setup
The instrument data also include the TAG no., information on the process fitting and seal as well as activation data for a supplementary electronics. At www.vega.com go to "Instrument search (serial number)". The order data of the instrument are displayed after entering the serial number. Under "Related documentation" you will find "Sensor for electronics exchange" as an XML file. Save this DTM configuration file with "Save... -
Page 10: Dismount
Pass the instrument directly on to a specialised recycling company and do not use the municipal collecting points. If you have no way to dispose of the old instrument properly, please contact us concerning return and disposal. Electronics module • VEGABAR series 80... - Page 11 Notes Electronics module • VEGABAR series 80...
- Page 12 Subject to change without prior notice © VEGA Grieshaber KG, Schiltach/Germany 2018 VEGA Grieshaber KG Phone +49 7836 50-0 Am Hohenstein 113...
Need help?
Do you have a question about the VEGABAR series 80 and is the answer not in the manual?
Questions and answers