Advertisement
Quick Links
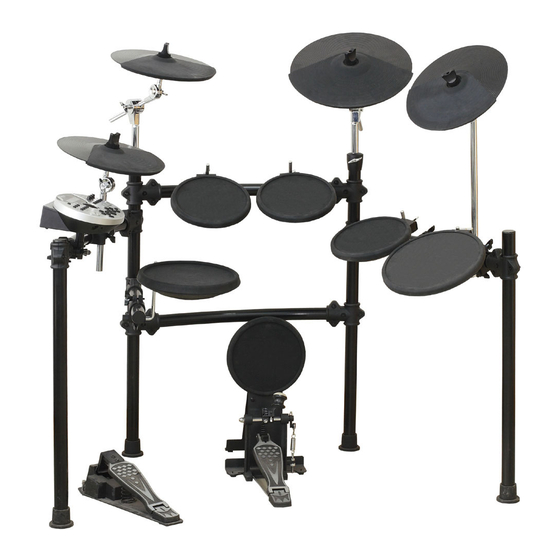
ASSEMBLY INSTRUCTIONS
Watch your fingers when adjusting clamps. They may become pinched resulting in injury.
Be careful around pipe ends, inside the pipe and screw ends. Metal shavings, etc. May injure your fingers.
Inside This Package
Before assembly, please make sure that all the items listed below are present.
[14" CYMBAL PAD] BOX
[12" CYMBAL PADS] BOX
14" Cymbal Pad
12" Cymbal Pads x 3
[11" DRUM PADS] BOX
[9" DRUM PADS AND KICK PAD] BOX
9" Tom Pads x 3
11" Drum Pad x 2
DRUM RACK
Pillar(L1)
Pillar(R1)
Pillar(L2)
Pillar(R2)
ACCESSO RY BOX
Cymbal Holder (Short)
L-Rods of Pads X 5
Cymbal Holder (Long)
Hexagon Key (M5)
Boom Cymbal Arms X 2
Caution !
[HI-HAT PEDAL] BOX
Hi-Hat Control Pedal
Center Pipe(1)
[DRUM MODULE] BOX
Center Pipe(2)
Side Arm(L1)
[Kick Trigger] BOX
Side Arm(R)
Side Arm(L2)
Connection Cables X 11
Drumsticks X 2
AC Adapter
Instruction Manual
Drum Key
Assembly
1 Setting up the frame of the digital drum set
[1] Attach the Center Pipe(1) to the clamp on the pillar(L1)
[2] Attach the Center Pipe(2) to the clamp on the pillar(L1)
[3] Attach the Center Pipe(1)(2) to the clamp on the pillar(R1)
[4] Using the drum key tighten the screws on the clamp.
[5] Attach the side arm (L1) to the clamp on the pillar(L2)
[6] Tighten the screws on the clamp.
[7] Attach the side arm (R) to the clamp on the pillar(R2)
[8] Tighten the screws on the clamp.
[9] Attach the side arm(L1) to the clamp on the pillar (L1)
[10] Tighten the screws on the clamp.
[11] Attach the side arm(R) to the clamp on the pillar(R1)
[12] Tighten the screws on the clamp.
[13] Attach the side arm(L2) to the clamp on the pillar(L1)
[14] Tighten the screws on the clamp.
Center Pipe( 1)
Kick Pad
6
Side Arm(L1)
5
Pillar(L2)
10
Tighten th es c r ew
3
Pillar(R1)
3
Center Pipe(2)
8
Side Arm(R)
7
Pillar(R2)
Pillar(L2)
Pillar(R1)
11
14
Tighten
the s cr ew
Pillar(L1)
Center Pipe(1)
1
2
Center Pipe(2)
4
4
T ightenth e s c r ew
Tight en thes c r ew
4
4
Tighten the s c r ew
Tighten th es c r ew
Pillar(L1)
9
Pillar(L1)
12
13
Tighten th e sc r ew
Side Arm(L2)
Advertisement

Related Manuals for Medeli DD508


Summary of Contents for Medeli DD508
- Page 1 Assembly ASSEMBLY INSTRUCTIONS Caution ! 1 Setting up the frame of the digital drum set Pillar(L1) Center Pipe(1) [1] Attach the Center Pipe(1) to the clamp on the pillar(L1) Watch your fingers when adjusting clamps. They may become pinched resulting in injury. Be careful around pipe ends, inside the pipe and screw ends.
- Page 2 Attaching pads to rack Attaching module Loosen L-rod wing nuts on tom clam ps. Loosen the wing screw on the cla mp In sert tex tured pla stic end of L -rod into to m clamp and tighten wi ng nu ts. Insert the drum modu le to the clamp Repeat for each tom clamp.
Need help?
Do you have a question about the DD508 and is the answer not in the manual?
Questions and answers