Table of Contents
Advertisement
Advertisement
Table of Contents

Subscribe to Our Youtube Channel
Related Manuals for Medeli DD522


Summary of Contents for Medeli DD522
- Page 1 AW_DD522_manual_G04_140310 2014 13:11:56...
- Page 2 INFORMATION FOR YOUR SAFETY! THE FCC REGULATION WARNING (for USA) PRECAUTIONS This equipment has been tested and found to comply with PLEASE READ CAREFULLY BEFORE PROCEEDING the limits for a Class B digital device, pursuant to Part 15 of Please keep this manual in a safe place for future reference. the FCC Rules.
-
Page 3: Table Of Contents
Contents Main Features ............Appendix Drum Kit List .............. Panel & Display Description Drum Voice List............25 Front Panel..............5 Song List..............28 Side Panel (Connecting)..........6 GM Drum Voice List..........29 LCD Display..............7 GM Backing Instrument List ........MIDI Implementation Chart........32 Setup Connecting Pads and Pedals........8 Getting Ready to Play Setting up the Power Supply........9 Turning the Power On/Off...........9... -
Page 4: Main Features
Main Features Bring the Professional Experience to Your Performance Natural and Realistic Voices This fresh digital drum has equipped with all fresh voices, which vastly improved sound quality and will reach a super natural and realistic sense for your ears. No matter playing the stroke roll or striking pads with velocity dynamic, all of these let you enjoy delicate nuances and natural voice, capture the unique characteristics of acoustic drum kit. -
Page 5: Panel & Display Description
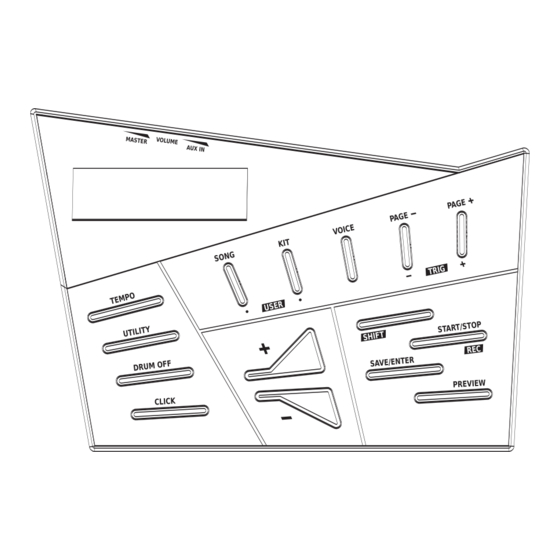
Panel & Display Description Front Panel 1. LCD Display 10. [+]/[-] Button Shows the name and parameter settings of Kit, Gradually increasing or decreasing the value of Voice, Song and so on. settings. 2. [TEMPO] Button 11. [SHIFT] Button Adjust the tempo value. Combined with [SONG] / [KIT] / [PAGE+] / [PAGE-] / [START / STOP] buttons. -
Page 6: Side Panel (Connecting)
Panel & Display Description Side Panel (Connecting) Note: To prevent malfunction and equipment failure, alwaysturndown the volume, and turn off all the units before making any connections. MIDI Device 15. DC IN jack 20. AUX IN jack (1/8”) Connect the AC adaptor here. Plug the AC adaptor cable For connecting an extra audio player, for example, Mp3 into the DC IN jack. -
Page 7: Lcd Display
Panel & Display Description LCD Display 1. Mode 4. Parameter Name Display the current mode, such as SONG, KIT and so on. Display the parameter name, such as PAN, REVERB and so on or the name of song/kit. 2. Velocity Display the touch sensitivity of current pad you are 5. -
Page 8: Setup
Setup Caution! To prevent electric shock and damage to drum module or other devices, always turn off the power of all devices before making any connections. Connecting Pads and Pedals Standard configuration: KICK, SNARE (rim shot), TOM 1~3, CRASH 1 (Choke), RIDE (Choke), HI-HAT, HI-HAT CONTROL PEDAL. -
Page 9: Getting Ready To Play
Getting Ready to Play Setting up the Power Supply Connect the DC plug of the AC power adaptor to the DC IN jack on the rear panel. Connect the other end of the power cord to the AC outlet. Note: 1. -
Page 10: Quick Play
Quick Play Drum Kits and Voices KIT xx There is only a fixed drum kit in an acoustic drum, but, to a digital drum, it has a lot of drum kits. This is just one of the digital drum KICK SNARE characteristics. -
Page 11: Playing The Pads
Quick Play Playing the Pads This section introduces various performance functions that will help Head you perform more expressively on the pads. Similar to an acoustic drum kit, the digital drum responds differently to various playing techniques and dynamics. All the pads are velocity sensitive. And some voices change timbre depending on the striking force. -
Page 12: Metronome
Quick Play Metronome Practicing with the metronome is the best way to develop your accurate timing. Adjust a right tempo for your learning / performance require. Starting/ Stopping the Metronome and Its Feature Press the [CLICK] button. The metronome will start playing, and the button will blink as the tempo. -
Page 13: Select A Preset Drum Kit And Create A User Drum
Select a Preset Drum Kit and Create a User Drum Kit About the Preset and User Drum Kit From no.1 to 30 are preset drum kits. You can edit the parameter of drum kit (from no.1-30), and you need save these changes into user drum kits (from user kit 001~005). -
Page 14: Save User Drum Kit
Select a Preset Drum Kit and Create a User Drum Kit Parameter Value Description Triggers VOICE NAME 1-380 KI (Kick) Select a voice. SN (Snare) VOLUME 0~16 Adjust the volume of voice. SNR (Snare Rim) -8~8 Adjust the pan of voice. T1 (Tom1) PITCH -8~8... -
Page 15: Playing Along With A Song
Playing Along with a Song There are 82 built-in songs coving a variety of styles. You can play the drums while listening to one of these songs. Playing Along with a Song Press the [SONG] button to enter the selection menu. Press the [PAGE +] / [PAGE -] button to select the menu that you want to edit. -
Page 16: Utility Mode (Utility)
Utility Mode (UTILITY) This mode contains two parts: the drum pad trigger settings and drum module settings. The Drum Pad Trigger Settings As a professional drummer, you may be very pleased to set your drum triggers carefully corresponding to your playing habits and feelings, making your performance more interesting and professional. -
Page 17: The Drum Module Settings
Utility Mode (UTILITY) Striking the specified pad or use the [SHIFT] + [PAGE +] / [SHIFT] + [PAGE -] combination buttons, select the pad that you want to edit. Use the [+] / [-] button to adjust the parameter value. Volume Volume Volume... - Page 18 Utility Mode (UTILITY) You can press the [PAGE +] / [PAGE -] button to select the function menu and use the [+] / [-] button to adjust the parameter value. The Setting description of drum module, as follows: Parameter Value Description L-R EXCH Exchange the left and right pad position.
-
Page 19: Record
Record This digital drum lets you easily record your own performance. Quick record 5 user songs and about 6500 drum notes could be recorded in a song. Each song has two parts (The Drum and Accompaniment). Preparing and starting record, refer to details bellow: Preparing Record Press the [REC] button (Combination buttons [SHIFT] + [START/STOP]) to enter prepare record mode, the [REC] button will light, enter the... -
Page 20: Downloading Midi Songs From A Computer
The interface of download software showed on the right side: Download specified software: You can download “Style Transfer” software on the website http://www.medeli.com.hk/..Connect to a computer: Download MIDI songs from a computer. It is very easily to download MIDI songs to your module (For more details, please refer to PC help content). -
Page 21: Midi
MIDI About MIDI MIDI (Musical Instrument Digital Interface) is a standard that allows performance data and other information to be exchanged among electronic musical instruments and computers. With a MIDI cable connecting MIDI connectors equipped device, you can play multiple instruments with a single electronic musical instrument, have multiple instruments perform in ensemble, program the settings to change kits automatically to match the performance as the song progress, and... -
Page 22: Troubleshooting
Troubleshooting Problem Possible Cause and Solution No sound Rotate the [VOLUME] knob to be sure that the volume isn’t down. To be sure that Local Mode should be set to “ON”. No sound from Pads To be sure that the pad is connected correctly. To be sure not set the volume of the pad to 0. -
Page 23: Specifications
Specifications Maximum Polyphony Drum kits Kit: 35 (30 Presets + 5 Users) GM Drum Kit: 9 GM Drum Kits Instruments Instrument: 380 (Drum Voice, Percussion Voice, Effect Voice) 10 Hi-hat Companion Effect Reverb, 3-band EQ Sequencer Preset Pattern: 60 Preset Hit/Tap: 22 User Song: 5 Tick: 192 ticks per beat Record: Real-time Record... -
Page 24: Drum Kit List
Drum Kit List PRESET KITACOUSTIC FUNK STANDARD BRUSH DANCE ROCK JAZZ FUNKBAND FX MIX POWER LATIN MARIMBA PERCUSS METAL INDIAN AFRICAN ELECTRIC REGGAE ORCHESTR SONGO HIPHOP BIG BAND MAGIC LIVE HOUSE JAZLATIN TECHNO VINTAGE AW_DD522_manual_G04_140310 2014 13:12:03... -
Page 25: Drum Voice List
Drum Voice List NAME LCD NAME Magic Snare Rim MAGIC SR KICK Acoustic Snare Stick AC SX1 22”Acoustic Kick 1 22AC K1 Standard Snare Stick 1 STD SX1 22”Acoustic Kick 2 22AC K2 Brush Snare Stick BRUSH SX 24”Standard Kick 24STD K Standard Snare Stick 2 STD SX2... - Page 26 Drum Voice List Jazz Tom 6 Rim JAZZ T6R 20'' Rock Ride Edge 20RK RDE Fusion Tom 1 FUS T1 20'' Rock Ride Bell 20RK RDB Fusion Tom 2 FUS T2 808 Ride 808 RD Fusion Tom 3 FUS T3 20'' Room Ride 20RM RD Fusion Tom 4...
- Page 27 Drum Voice List Latin Crash 2 LATIN C2 Indian 7 INDIAN7 FX 12 Fx12 Latin Crash 2 Edge LATN C2E Indian 8 INDIAN8 FX 13 FX13 China 1 CHINA1 Indian 9 INDIAN9 FX 14 FX14 China 1 Edge CHINA1 E Indian 10 INDIAN10 FX 15...
-
Page 28: Song List
Song List NAME LCD NAME NAME LCD NAME PATTERN LOOP Band Jazz BANDJAZZ Blues Funk BLUESFK Blues BLUES Fusion 1 FUSION 1 3/4 Jazz 3/4 JAZZ Cool Jazz COOLJAZZ 80's Metal 80SMETAL Ballad BALLAD 6/8 Soul 6/8SOUL Samba1 SAMBA 1 Latin Jazz LATINJAZ Vintage Hip-Hop... -
Page 29: Gm Drum Voice List
GM Drum Voice List Note No. Standard Set(bank 0) Funk Set(bank 8) Rock Set(bank 16) Electric Set(bank 24) Analog Set(bank 25) Eb1[27] High Q ﹤- ﹤- ﹤- ﹤- E 1[28] Slap ﹤- ﹤- ﹤- ﹤- F 1[29] Scratch Push ﹤- ﹤-... - Page 30 GM Drum Voice List Note No. Jazz Set(bank 32) Brush Set(bank 40) Orchestra Set(bank 48) Dance Set(bank 56) Eb1[27] ﹤- ﹤- Closed Hi-hat 2 ﹤- E 1[28] ﹤- ﹤- Pedal Hi-hat ﹤- F 1[29] ﹤- ﹤- Open Hi-hat 2 ﹤- F#1[30] ﹤-...
-
Page 31: Gm Backing Instrument List
GM Backing Instrument List AW_DD522_manual_G04_140310 2014 13:12:03... -
Page 32: Midi Implementation Chart
MIDI Implementation Chart ○: YES ×: NO DD522 _G04 AW_DD522_manual_G04_140310 2014 13:12:04...
Need help?
Do you have a question about the DD522 and is the answer not in the manual?
Questions and answers