Table of Contents
Advertisement
Advertisement
Table of Contents

Related Manuals for Boly BG962-K30W


Summary of Contents for Boly BG962-K30W
- Page 1 Hunting Camera BG962 Series/ BG960 Series...
-
Page 2: Table Of Contents
Contents 1.Basic..................1 1.1General Discription............1 1.2 Camera at a Glance............2 1.3 Shooting Information Display........4 1.4 Cautions................ 4 2.Quick Start Guide............. 6 2.1Power Supply..............6 2.2 Insert The SD Card............. 6 2.3 Do The Camera Common Operation....... 7 3.Advanced Operation............8 3.1 Work Mode..............8 3.2Trigger Mode.............. -
Page 3: Basic
1.Basic 1.Basic 1.1General Discription Thanks for your purchase of Boly Scouting camera. This camera is a surveillance device working automatically. It can be triggered by any movement of human or animal in a certain region of interested monitored by a highly sensitive Passive Infra-Red (PIR) motion sensor ,... -
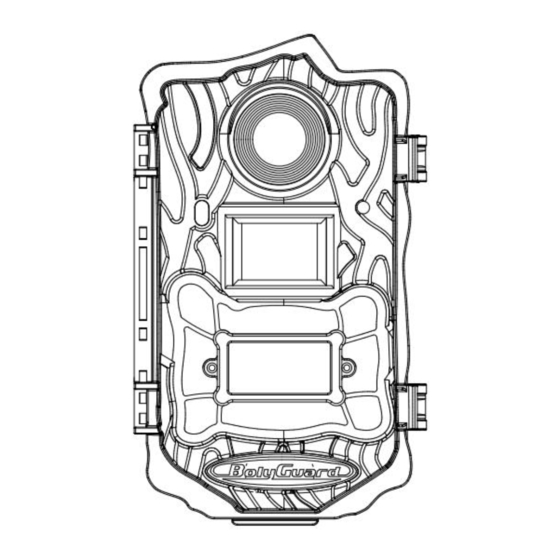
Page 4: Camera At A Glance
1.Basic 1.2 Camera at a Glance ⑦ Fig. 1: Front view of BG962-X30W Fig. 2: Front view of BG962-K30W/BG960 Series ⑧ ⑨ ⑩ ○ Fig. 3: Inner panel view... - Page 5 1.Basic ○ ○ ○ ○ ○ ○ Fig. 4: Bottom view Lens Indication LED ① ② ③ Flash Lock ④ ⑤ ⑥ Speaker LCD display Battery bays ⑦ ⑧ ⑨ Operation Panle Power Switch ○ DC 6V ○ ○ TV out USB port SD card slot ○...
-
Page 6: Shooting Information Display
1.Basic 1.3 Shooting Information Display When the camera is turned on (power switch is slid to SETUP position), the current settings will be displayed on the screen. Fig. 5: LCD Display 1.4 Cautions ★The camera is supplied by 8 AA batteries or DC power adapter with output of 6V (recommended) though the range of voltage can be 5V to 12V. - Page 7 1.Basic will shut down automatically after an indication beep. ★Please do not insert or take out the SD card when the power switch is in the ON position. ★It is recommended to format the SD card by the camera when used for the first time. ★The camera will be in USB mode when connected to a USB port of a computer.
-
Page 8: Quick Start Guide
2.Quick Start Guide 2.Quick Start Guide What You Need To use camera ,you need: An unlocked SD card; 4 or 8 AA batteries,High-density and high- performance alkaline batteries are recommended A PC with a USB 2.0 port and the Internet access; 2.1Power Supply ★1)Battery Power:Load 4 or 8 AA batteries according to shown polarity. -
Page 9: Do The Camera Common Operation
2.Quick Start Guide 2.3 Do The Camera Common Operation Do This Preview state Flip the power switch on SETUP into Homescreen. Setting state Flip the power switch on SETUP,Press MENU into Setting state. Playback state Flip the power switch on SETUP,Press into playback state. -
Page 10: Advanced Operation
3.Advanced Operation 3.Advanced Operation 3.1 Work Mode SETUP mode:Switch the camera to SETUP position to set camera ,manual capture ,playback the photos and video clips or send MMS manually. Hunting mode:Switch the camera to ON position to hunt or monitor animals.When the animal or human intrudes into the monitoring region,the camera will take pictures or videos automatically according to the previous programmed settings. -
Page 11: Item Settings
3.Advanced Operation PIR&Timer Triggering:For both PIR triggering and Timer triggering, the user need go to PIR sensitivity to set “normal, high or low” sensitivities according to the external environments, and set the Timer interval to a desired non-zero value. The camera will capture pictures or videos in a preset time interval even there is no motions detected, the camera will also capture pictures and videos if... - Page 12 3.Advanced Operation default value is 10 seconds. Press LEFT and RIGHT to decrease or increase the value by 10 seconds. Set camera date and time. You can change the date and time of the device by setting this parameter when necessary, e.g., after every battery change.
- Page 13 3.Advanced Operation sensitivity in room or environment with PIR Trigger little interference, and to use lower sensitivity for outdoor or environment with lots of interference like hot wind, smoke, near window etc. Furthermore, the sensitivity of the PIR is strongly related to the temperature.
- Page 14 3.Advanced Operation time according to the preset settings. Choose the days of the week the camera Work Day works on. It means this camera can play audio file at a preset time clock of a day. The audio file must be saved in the directory of \DCIM\100BMCIM\ with a name of AUDIxxxx(from 0000 to 9999).WAV Game Call...
-
Page 15: Default Setting
3.Advanced Operation *After changing each setting in SETUP mode you must press “OK”, otherwise the camera will stay at the default setting . 3.4Default Setting Setting Items Default Options Camera Mode Photo Video ,Pic+Video 30M(BG962 20M/14M(BG962 Photo Size Series/18M(B Series,12M/5M(BG960 G960 Series) Series) Video Size... -
Page 16: Power Off
3.Advanced Operation Format SD Enter Default Set Save Version Enter 3.5 Power Off Switch the camera to OFF position to power off the camera. Please note that even in OFF mode, the camera still consumes certain power at μA level. Therefore, please remove the battery if the camera will not be used for a long time. -
Page 17: Mounting The Camera
4.Mounting The Camera 4.Mounting The Camera When use the camera in outdoor environment, such as hunting or monitoring the living habits of wild animals, you need to mount the device on a certain place properly. It is recommended to mount the camera on a tree, to get the optimal picture quality, the recommended distance is 16ft from the tree to the target monitoring area and recommended... -
Page 18: Pir Detection Zone
PIR detection Zone PIR Detection Zone This camera has a new design of PIR and the new PIR is patented. The new patented PIR’s detection range can reach to 100ft in good environments. Following picture shows the compared detection zone between normal PIR and the new patented PIR. -
Page 19: Technical Specifications
Technical Specifications Technical Specifications 14MP Color CMOS(962-K/X) Image Sensor 5MP Color CMOS (960-K/I) F/NO=2.4 Lens FOV(Field of View)=110° PIR detection 100ft range Display Screen 2.0″ LCD Memory Card From 8MB to 32GB Picture 30MP/20MP /14MP (962-K/X) Resolution 18MP/12MP /5MP(960-K/I) 1920x1080 Video Resolution 1280x720 640x480... - Page 20 Technical Specifications Operation 5% - 90% Humidity Security FCC, CE, RoHS Authentication -18-...
-
Page 21: Parts List
Part List Parts List Part Name Quantity Digital Camera USB Cable Belt Mounting Bracket User Manual Warranty Card For more detail about our product or software,please downlo https://bolyinc.com/updates/ ad from our website Version 2.1 -19-...
Need help?
Do you have a question about the BG962-K30W and is the answer not in the manual?
Questions and answers