Table of Contents
Advertisement
Quick Links
Download this manual
See also:
Owner's Operation Manual
Advertisement
Table of Contents

Related Manuals for Future Mobility Healthcare Orion II 500


Summary of Contents for Future Mobility Healthcare Orion II 500
- Page 1 480 - REV03, REV DATE: 09/04/2013...
-
Page 2: Table Of Contents
Adjusting and Installing T-Style Pin Release Armrests [Figure 4] Angle Adjustable Back Canes Adjusting the angles of back cane [Figure 5] Tilt Chair Using the tilt function [Figure 6] 480 REV03, REV DATE: 09/4/13 Orion II 500 - Heavy Duty... - Page 3 13 Casters and Forks Replacing and Installing Front Casters [Figure 15, Figure 16, Figure 17,Table 1] 14 Anti-tippers Installing and adjusting the anti-tippers [Figure 18] 15 Cleaning Instructions 16 Warranty 480 REV03, REV DATE: 09/4/13 Orion II 500 - Heavy Duty...
-
Page 4: General
- otherwise, injury or damage may occur. NOTE: Check all parts for shipping damages before using. In case of damage, DO NOT use the equipment. Contact the Equipment Supplier for further instructions. 480 REV03, REV DATE: 09/4/13 Orion II 500 - Heavy Duty... -
Page 5: Operating Safety Warnings
It is not recommended to transport users in vehicles of any kind while seated in the wheelchair. Do not use any kind of wheelchair Tie-Down restraints that are not approved by the ADP. 480 REV03, REV DATE: 09/4/13 Orion II 500 - Heavy Duty... -
Page 6: Features
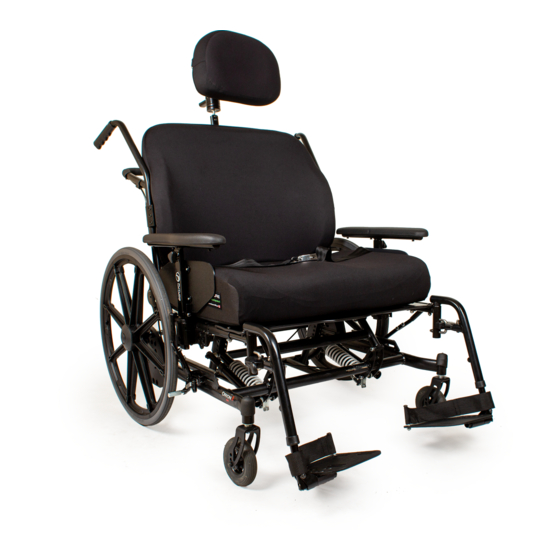
Aluminum Seat Pan PRISM Ideal Cushion Adjustable Orion Back Two-Way, Padded, Contoured Headrest Anti-rattle rear Anti-Tippers Choice of Two Colors User weight capacity: 500lbs 480 REV03, REV DATE: 09/4/13 Orion II 500 - Heavy Duty... -
Page 7: Safety Inspection Checklist
Wheel locks prevent chair from moving when engaged SEAT AND BACK Inspect for rips or sagging Inspect for loose or broken hardware Inspect cane and hand grips for wear/looseness TIRES 480 REV03, REV DATE: 09/4/13 Orion II 500 - Heavy Duty... - Page 8 Adjust bearing system if wheel wobbles or binds to a stop. Ensure wheel bearings are clean and free of moisture. Check stem caster journal and lock nut for tightness Inspect casters for cracks and wear Inspect for cracked, bent or broken spokes CLEANING Clean upholstery and armrests 480 REV03, REV DATE: 09/4/13 Orion II 500 - Heavy Duty...
-
Page 9: Troubleshooting
GENERAL Troubleshooting Solutions Check for loose nuts and bolts Check angle adjustable caster assembly Check that rear wheels are equally spaced away from seat frame. 480 REV03, REV DATE: 09/4/13 Orion II 500 - Heavy Duty... -
Page 10: Labels
GENERAL Labels ORION II 500 – Heavy Duty Chair WARNING DO NOT OPERATE WITHOUT THE ANTI-TIP MECHANISM IN PLACE WEIGHT CAPACITY 500 LBS (227 kgs) REFER TO OWNER’S MANUAL CAUTION MOVING THE REAR AXLE TO THE FORWARD POSITION MAY DECREASE THE STABILITY OF... -
Page 11: Style Arm Rests
Arm Height Adjustment 1. Loosen knob (`D'). 2. Lift armrest until desired position is acquired Figure 1 (ranges from 9 ½” – 14” in ½” increments). 3. “Re-tighten” knob (‘D’). 480 REV03, REV DATE: 09/4/13 Orion II 500 - Heavy Duty... -
Page 12: 2 Point Heavy Duty Arm Rests
2. For removal, push and hold release lever (`A'), while lifting armrest from 2-point mounting plate Note: The 2-point Heavy Duty Arm Rest is not adjustable in height Figure 2 480 REV03, REV DATE: 09/4/13 Orion II 500 - Heavy Duty... -
Page 13: Pin Style Leg Rests
Adjusting foot plate height 1. Loosen knob (`B'). 2. Lift armrest until desired position is acquired (ranges from 9 ½” – 14” in ½” increments). 3. “Re-tighten” knob (‘B’). Figure 3 480 REV03, REV DATE: 09/4/13 Orion II 500 - Heavy Duty... -
Page 14: Center Pivot Style Swingaway Legrest
Remove footrest bracket bolt. Slide footrest extension tube up or down to desired height. "Re-install" bolt. Loosen bolt (‘D’) to adjust footplate angle and horizontal position. "Re-tighten" bolt after final adjustment. Figure 4 480 REV03, REV DATE: 09/4/13 Orion II 500 - Heavy Duty... -
Page 15: Angle Adjustable Back Canes
‘locked’ in position prior to placing occupant into wheelchair. Note: Manufacturer's setting is -7 degrees, with each hole representing 7 degree increments (holes range from +7 degrees to -21 degrees) Figure 5 480 REV03, REV DATE: 09/4/13 Orion II 500 - Heavy Duty... -
Page 16: Tilt Chair
Using the tilt function [Figure 6] Grasp trigger handle (‘A’) with one’s fingers and pull the handle upwards. The Orion II 500 wheelchair has 2 handles – 1 located on each push cane respectively or both located on the push bar. -
Page 17: Adjusting Tilt Angle Settings
Repeat for other side of chair and ensure the hole chosen for tilt stop is the same on both sides in Figure 7 order to prevent wheelchair problems. 480 REV03, REV DATE: 09/4/13 Orion II 500 - Heavy Duty... -
Page 18: Rear Wheels
BEFORE operating the wheelchair. The locking pins MUST be protruding past the inside of the rear wheel axle bushing for a positive lock. Keep Figure 8 locking pins clean. 480 REV03, REV DATE: 09/4/13 Orion II 500 - Heavy Duty... - Page 19 LOCKING PIN DETENT PIN OUTSIDE OF INSIDE OF WHEELCHAIR WHEELCHAIR QUICK-RELEASE AXLE Figure 9 480 REV03, REV DATE: 09/4/13 Orion II 500 - Heavy Duty...
-
Page 20: Wheel Locks
(‘E’) so that when engaged, the Figure 10 wheel lock brake shoe (‘C’) embeds the tire (‘D’)1/8” (3/16” for pneumatic tires) and HOLDS the occupied wheelchair in place when pushed. 480 REV03, REV DATE: 09/4/13 Orion II 500 - Heavy Duty... - Page 21 HOLDS the occupied wheelchair in place when pushed. 8. Engage both wheel locks and ensure the occupied wheelchair is held in place when pushed. Figure 11 480 REV03, REV DATE: 09/4/13 Orion II 500 - Heavy Duty...
-
Page 22: Gas Spring Settings
Insert the .312 x 2.5” long shoulder bolt and 1/4-20 lock nut to secure the Tilt Stop Assembly and Gas Cylinder Assembly to the wheelchair. Figure 12 480 REV03, REV DATE: 09/4/13 Orion II 500 - Heavy Duty... - Page 23 GAS SPRING SETTINGS Figure 13 480 REV03, REV DATE: 09/4/13 Orion II 500 - Heavy Duty...
-
Page 24: Head Rest
When the desired position is obtained turn the t- handle assembly clockwise to ‘lock’ the headrest in position. Figure 14 480 REV03, REV DATE: 09/4/13 Orion II 500 - Heavy Duty... -
Page 25: Casters And Forks
Figure 15 immediately rest in a straight downward position). 7. Adjust locknuts according to freedom of caster swing. 8. Test wheelchair for maneuverability. 480 REV03, REV DATE: 09/4/13 Orion II 500 - Heavy Duty... - Page 26 FRONT CASTERS guide to properly install the new fork assembly and prevent fluttering. Figure 16 Seat to Floor height 1. Follow the values in the table below to achieve the 480 REV03, REV DATE: 09/4/13 Orion II 500 - Heavy Duty...
- Page 27 Figure 17 be inserted in the hole closest to the front of the chair. 480 REV03, REV DATE: 09/4/13 Orion II 500 - Heavy Duty...
- Page 28 16.375 Long 14.875 15.375 Short 14.00 16.00 Short 15.00 15.75 Long 14.00 16.25 Long 15.00 17.75 Long 16.00 16.25 Long 15.00 16.75 Long 15.00 18.00 Long 17.00 Table 1 480 REV03, REV DATE: 09/4/13 Orion II 500 - Heavy Duty...
-
Page 29: Anti-Tippers
Inc. strongly recommends ordering the anti-tippers as a safeguard for the wheelchair user. Anti-tippers MUST be fully engaged and snap buttons fully protruding out of adjustment holes. Ensure both anti-tippers are adjusted to the same mounting hole. 480 REV03, REV DATE: 09/4/13 Orion II 500 - Heavy Duty... - Page 30 1. Press the snap button on the anti-tip assembly and adjust the anti-tip slide tube up or down until a 1 ½“ to 2” clearance from the ground is achieved. 480 REV03, REV DATE: 09/4/13 Orion II 500 - Heavy Duty...
- Page 31 ANTI-TIPPERS 2. Check to make sure that the snap buttons are fully engaged in the adjustment holes 480 REV03, REV DATE: 09/4/13 Orion II 500 - Heavy Duty...
-
Page 32: Cleaning Instructions
RINSE WITH A DAMP RAG AFTER CLEANING TO ENSURE THAT ANY SOAP RESIDUE IS REMOVED DO NOT USE CLEANING PRODUCTS WITHOUT CONSULTING THE PRODUCTS’ INSTRUCTIONS AND TAKING APPROPRIATE PRECAUTIONS FOR HUMAN EXPOSURE TO CHEMICALS 480 REV03, REV DATE: 09/4/13 Orion II 500 - Heavy Duty... -
Page 33: Warranty
The frame is warranted for the lifetime of the original purchaser/user. The Orion II 500 back is warranted for two (2) years and the upholstery for 90 days, upon normal usage by original purchaser. - Page 34 WARRANTY 480 REV03, REV DATE: 09/4/13 Orion II 500 - Heavy Duty...
Need help?
Do you have a question about the Orion II 500 and is the answer not in the manual?
Questions and answers