Table of Contents
Advertisement
Quick Links
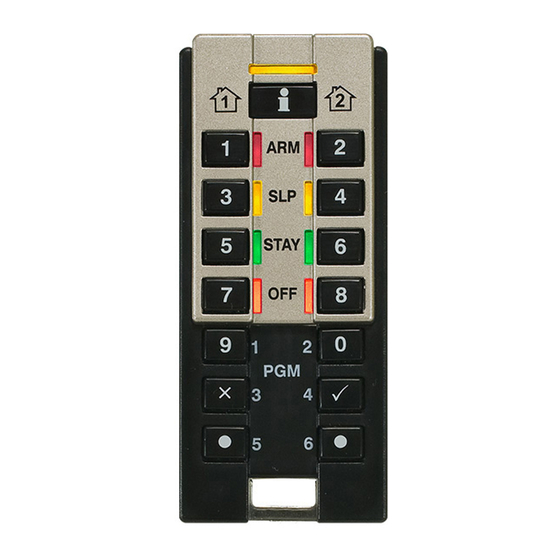
REM3: Hand-held Two-way Remote Keypad
Reference and Installation Manual V1.10
PARADOX.COM
Printed in Canada - 05/2013
REM3-EI09
Overview
The REM3 combines the flexibility of a keypad with the convenience and mobility of a remote control. Its 15 buttons allow for a greater level of
interaction with the system than regular remote controls, and the two-way transceiver allows for accurate feedback for up to two partitions.
Compatibility and Technical Specifications
The following table provides the compatibility and technical specifications for the REM3 Hand-held Two-way Remote Keypad.
Specifications
RF frequency
433MHz or 868MHz
Battery type
One 3V lithium battery (2032)
Consumption
Standby: 0.9uA, 19mA during transmission
Battery life expectancy is a minimum of 1 year.
"Low Battery Signal" is sent to the control panel when battery is below 2.2Vdc. Upon power-up, a "Low
Battery Restore Signal" is sent to the control panel when the battery voltage level has reached 2.6Vdc
or higher. The low battery restore feature is only compatible with the following:
Battery life
MG series: 4.90 and up
SP series: 4.90 and up
SP65, SP4000: 5.10 and up
RTX3: V5.20 and up
Range
(typical in a residential
45m (150ft)
environment)
MG5000 / MG5050 V3.0 and higher /
Spectra SP Series V3.0 and higher in conjunction with a RTX3 V1.31 and higher.
Compatibility
EVO V2.10 and higher in conjunction with a RTX3 V1.50 and higher.
IMPORTANT: The REM3 is not compatible with the RPT1 and will not benefit from the additional range.
Dimensions
8cm x 3.4cm x 1.5cm (3.1in x 1.3in x 0.6in)
Temperature Rage
0-50°C (32-120° F)
Humidity
5-90%
Weight
32 g (1.2 oz)
Standards
EN 50131-3 Grade 2 Class II
MGSP Remote Control Programming
Use the following sections to program the various remote controls in your MGSP system.
Assigning the REM3 to the Panel
Table 1: Steps for assigning the REM3 to an MGSP panel
Step
Fig. 1:Action on Keypad Details
The [
] key will flash.
LED/key on = programmed user.
1
[
] + [
]
MASTER CODE
[
PARTITION MASTER CODE
2
[user number]
2 digits: 01 to 32
3
[code]
Enter 4- or 6-digit code
4
[confirm code]
Re-enter 4- or 6-digit code
Press and hold the Information key ([i]) on the designated remote. Important: For partitioned
5
[learn remote]
systems, go to step 6. For non-partitioned systems, go to step 2 to add another remote or press [
exit.
Assign the user to one or both partitions, then press [
6
[1] and/or [2] + [
]
ENTER
Go to step 2 or press [
(portable type B; certification body = Intertek)
] may also be used.
].
ENTER
] to exit.
CLEAR
One-touch Arm Keys
The REM3 offers the use of one-touch arm keys. The use of one-touch arm keys must be enabled in section [703], options [1] to [3] in the panel.
Table 2: One-Touch arm key options
Option Description
1
One-touch regular arming
2
One-touch stay arming
3
One-touch sleep arming
PGM Key Assignment
The REM3 provides six PGM keys. See sections [610] to [642] in the panel to define the six PGM keys and two combo keys:
Worksheet 1: Programming remote controls
PGM 1
[9]
Default Data
B
Section
Default
_____
[610]
ALL RCs
Important: When section [610] is accessed, the panel will copy the saved value of that section to all remotes.
_____
[611]
RC#1
_____
_____
[642]
RC# 32
PGM Key Definitions Table
[
] - Empty / Button disabled
SLEEP
[1] - Regular / Regular Force arming
[2] - Stay / Stay Force arming
[3] - N/A
[4] - Sleep / Sleep Force arming
[5] - PGM Activation (Event Group #22)
[6] - PGM Activation (Event Group #23)
[7] - N/A
One-Touch Programming
Program the REM3 to enable one-touch mode to disarm your system and/or trigger PGMs. By default, the REM3 is set to require code entry.
Section [360] is used to configure all odd and even-numbered REM3s, while sections [361] to [376] are used to configure REM3s by pairs.
Table 3: Programming One-touch
Odd-numbered REM3s
[1] PGM activate/deactivate
[2] Disarm
[360]
[3] & [4]
Even-numbered REM3s
[5] PGM activate/deactivate
[6] Disarm
REM3 #1
[1] PGM activate/deactivate
[2] Disarm
[361]
[3] & [4]
] to
REM3 #2
CLEAR
[5] PGM activate/deactivate
[6] Disarm
REM3 #31
[1] PGM activate/deactivate
[2] Disarm
[376]
[3] & [4]
REM3 #32
[5] PGM activate/deactivate
[6] Disarm
[703]
OFF
ON
REM3 Remote Control
PGM 2
PGM 3
PGM 4
PGM 5
[0]
[x]
[]
[ ]
C
D
E
5
_____
_____
_____
_____
_____
_____
_____
_____
_____
_____
_____
_____
_____
_____
_____
_____
[8] - Panic 1
[9] - Panic 2
[A] - Panic 3
[B] - PGM Activation (Event Group #8)
[C] - PGM Activation (Event Group #9)
[D] - PGM Activation (Event Group #10)
[E] - PGM Activation (Event Group #11)
[F] - Paramedic alarm
OFF = Code entry
ON = One-touch
OFF = Code entry
ON = One-touch
N/A
N/A
OFF = Code entry
ON = One-touch
OFF = Code entry
ON = One-touch
OFF = Code entry
ON = One-touch
OFF = Code entry
ON = One-touch
N/A
N/A
OFF = Code entry
ON = One-touch
OFF = Code entry
ON = One-touch
OFF = Code entry
ON = One-touch
OFF = Code entry
ON = One-touch
N/A
N/A
OFF = Code entry
ON = One-touch
OFF = Code entry
ON = One-touch
PGM 6
PGM
PGM
[ ]
[x] + []
[ ] + [ ]
6
SLEEP
SLEEP
_____
_____
_____
_____
_____
_____
_____
_____
_____
_____
_____
_____
Advertisement
Table of Contents

Subscribe to Our Youtube Channel
Related Manuals for Paradox REM3


Summary of Contents for Paradox REM3
- Page 1 One-touch Arm Keys Reference and Installation Manual V1.10 The REM3 offers the use of one-touch arm keys. The use of one-touch arm keys must be enabled in section [703], options [1] to [3] in the panel. Table 2: One-Touch arm key options PARADOX.COM...
- Page 2 _____ _____ _____ _____ _____ _____ _____ [2913] Warranty: For complete warranty information on this product please refer to the Limited Warranty Statement found on the website www.paradox.com/terms. Your use of the _____ _____ _____ _____ _____ _____ _____ _____ Paradox product signifies your acceptance of all warranty terms and conditions.
Need help?
Do you have a question about the REM3 and is the answer not in the manual?
Questions and answers