Advertisement
Quick Links
Advertisement

Related Manuals for uPunch HN1000


Summary of Contents for uPunch HN1000
- Page 1 HN1000/HN3000 Product Manual...
- Page 2 CONTENTS INTRODUCTION SETTING UP THE CLOCK WALL MOUNT USING THE CLOCK YOUR uPUNCH ACCOUNT REPLACING PRINT RIBBON ADD DEPARTMENTS LIMITED WARRANTY SAFETY INFORMATION ADD USERS...
- Page 3 INTRODUCTION CREATE YOUR ACCOUNT Thank you for purchasing the HN Series Auto-Align time clock, part of the uPunch system by Workwell Technologies. ADD DEPARTMENTS Setting up your uPunch Time Clock and cloud AND USERS account can be completed in just 4 easy steps.
- Page 4 1. On a wall, drill two ” holes, ” apart. 2. Insert two dowels into the holes, then insert two screws into the dowels. 3. Hang clock on the screws, ideally 36-40” from the base to the ground. QUESTIONS? Watch our helpful videos at upunch.com/resources...
- Page 5 “Upgrade to uPunch” link in your Account Overview page to schedule a free live demo. The uPunch Time and Attendance system collects real time punch data, then sends it to your cloud account where it can be viewed from any Internet connected device, 24/7.
- Page 6 The Device ID can be found on the back cover of this manual and on the clock itself. If either number is missing, please contact Customer Support at support@trackmypunch.com or 1-800-518-8925. QUESTIONS? Watch our helpful videos at upunch.com/resources...
- Page 7 3. Enter your company information, then click Next. The “Site Name” field allows you to customize the uPunch login address that you and your employees will use to access the account. Specify an easy-to- remember URL extension (web address), perhaps a shortened company name (e.g., trackmypunch.com/flowershoppe).
- Page 8 LIFETIME WARRANTY. ACCOUNT FEATURES Your FREE uPunch account includes 50 Employees, 20 Departments, Holiday Settings, Exports to Payroll Systems, Punch Rounding, Weekend Overtime, and More! QUESTIONS? Watch our helpful videos at upunch.com/resources...
-
Page 9: Adding Departments
ADDING DEPARTMENTS Departments are used to group users together within the uPunch system. You will need to set up at least one department before you add employees to your account. Specify other department settings, such as Punch Rounding and Overtime Rules, during the initial setup or you may choose to enter that information later. - Page 10 5. Select... a. “Save & Add New” to add a new department. b. “Save & Continue” to add more rules and policies. c. “Save & Close” to move to the next step. QUESTIONS? Watch our helpful videos at upunch.com/resources...
-
Page 11: Adding Users
ADDING USERS The uPunch time clock tracks hours worked per day and pay period for up to 50 employees. Complete the following steps to add employees to your account: 1. Select the Users tab on your Dashboard. 2. Select “Add Employee.”... - Page 12 To change the settings on your time clock, remove the cover with the included key to expose the setup labels that correspond with the IN and OUT buttons. QUESTIONS? Watch our helpful videos at upunch.com/resources...
-
Page 13: Button Function
The following is a detailed list of each button’s functionality. Switch Function Enter and exit the setup mode (- / 0). When the Set switch is pushed to the left (–), the clock is ready for punching. When the Set switch is pushed to the right (0), the clock is in the setup mode and you can begin setting up the menus. - Page 14 When a code is flashing, you can make changes using the + and – buttons. Once you select the desired option, press the Enter button. To scroll through codes without changing settings, press the Enter button. The Back button allows you to reset an option that was confirmed incorrectly. QUESTIONS? Watch our helpful videos at upunch.com/resources...
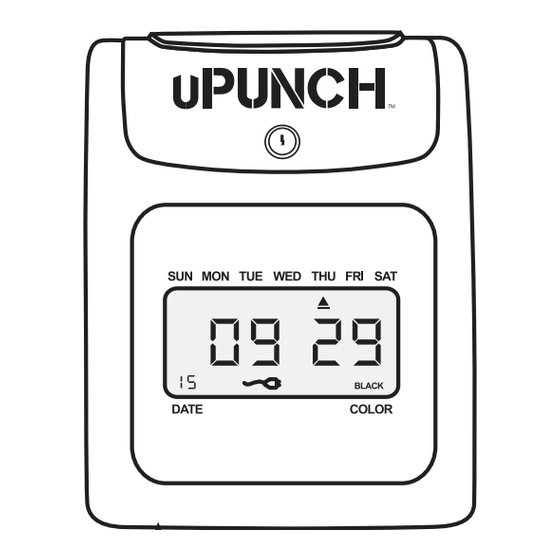
- Page 15 MON TUE WED THU FRI SAT BLACK NOTE: If you are using your cloud account to manually enter your time and attendance data, it’s important that you match your uPunch cloud account settings with your uPunch time clock settings.
- Page 16 Setting the Hour and Minute (code 02) After confirming the month and date, the code “02” appears. Set the hour (HH) and minute (MM) using the + and – buttons. Press Enter to confirm the setting. QUESTIONS? Watch our helpful videos at upunch.com/resources...
- Page 17 Setting the Hour Format Display (code 03) When the code “03” appears, set the hour display. This allows the selection of 24-hour (Military) or 12-hour (Standard) time for display on the time clock and printing on the time card. Use the + and – buttons to make your selection, then press Enter to confirm the setting.
- Page 18 When the code “05” appears, set the hour and minute of the start of Daylight Savings Time (HH:MM) to 2:00am. Use the + and – buttons to make your selection, then press Enter to confirm the setting. QUESTIONS? Watch our helpful videos at upunch.com/resources...
- Page 19 Setting the Month and Date of the end of Daylight Savings Time (code 06) When the code “06” appears, set the month and date of the end of Daylight Savings Time (MM-DD). Use the + and – buttons to make your selection, then press Enter to confirm the setting.
- Page 20 5 Semi-monthly—Select 05 for the Semi-monthly option, then select the first payday. Enter 01 for the paydays to fall on the 1st and 16th of the month or enter 15 for the paydays to fall on the 15th and the last day of the month. QUESTIONS? Watch our helpful videos at upunch.com/resources...
- Page 21 Use the + and – buttons to make your selection, then press Enter to confirm the setting. Setting Printing Position Adjustment: Up/Down (0–9) (Code 02) This step is optional during initial set up. This setting can be changed later if you find that the printing alignment is off.
- Page 22 – button moves your selection from left to right. Press the Back button to toggle each day on or off. For example, if you would like to enable the alarm for weekdays only, you will disable the QUESTIONS? Watch our helpful videos at upunch.com/resources...
- Page 23 alarm for Saturday and Sunday. When you see the flashing triangle on Sunday, press the Back button and the triangle will be removed. Then press the – button to select Saturday. When you see the flashing triangle on Saturday, press the Back button to disable Saturday. Monday through Friday are still selected.
- Page 24 The + button moves your selection from right to left and the – button moves your selection from left to right. Press the Back button to toggle each day on or off. QUESTIONS? Watch our helpful videos at upunch.com/resources...
- Page 25 For example, if you would like to set the column shift for weekdays only, you will disable the setting for Saturday and Sunday. When you see the flashing triangle on Sunday, press the Back button and the triangle will be removed. Then press the – button to select Saturday.
- Page 26 2. Use the + and – buttons to select the minute. For 8:15am, set the minute to 15 and then press Enter to confirm the setting. After you have set the time, you will set the days of the week for the color change. QUESTIONS? Watch our helpful videos at upunch.com/resources...
- Page 27 3. Use the + and – buttons to scroll through the days. A flashing triangle indicates the day that is currently selected. The + button moves your selection from right to left and the – button moves your selection from left to right. Press the Back button to toggle each day on or off.
-
Page 28: Understanding Time Cards
If you use biweekly pay periods, you may use the reverse side for the following pay period; row 16 will reflect the first day of the next pay period. QUESTIONS? Watch our helpful videos at upunch.com/resources... - Page 29 Example 4: If you have set up semi-monthly pay periods, row 1 will show punches for the first day of the pay period. If you use semi-monthly pay periods, you may use the reverse side for the following pay period; row 16 will reflect the first day of the next pay period. NAME PUNCHING TIME CARDS PAYROLL ID...
- Page 30 Set switch back to the “–” position (to the left). Setting the clock to factory reset will restore the default values, including: Date, Time, Time Signal, Print Color Options, and Printing Position. QUESTIONS? Watch our helpful videos at upunch.com/resources...
- Page 31 REPLACING HN SERIES RIBBON CARTRIDGE To replace the ribbon cartridge in your time clock, follow these steps. Open the top cover and press the button corresponding with column 4 to move the ribbon cartridge to center. As shown in the figure below, pull the ribbon holders toward you and, holding them steady in the position, use the handle to take out the cartridge.
-
Page 32: Upunch Warranty And Terms Of Service
WARRANTY AND TERMS OF SERVICE This Warranty covers the HN Series time clock, and any subsequent uPunch Device models. A. Warranty and Warranty Periods. Workwell Technologies, Inc. (“WWTech”) warrants only to the original Purchaser that the Device will be free from material defects and mechanical failures for one year from the date of purchase, starting from the date of shipment from Workwell Technologies to the client. - Page 33 enforceable. WWTech does not assume responsibility for any specific application to which any products or parts are applied including, but not limited to, compatibility with other equipment. All statements, technical information, or recommendations relating to the products or parts are based upon tests believed to be reliable, but do not constitute a guaranty or warranty.
- Page 34 H. Lifetime Trade-In Program. WWTech offers a trade-in for a free CB6000, or a free CB5000 if customer has a Costco customer warranty, when customer converts their uPunch account to a uPunch account. QUESTIONS? Watch our helpful videos at upunch.com/resources...
- Page 35 SAFETY INFORMATION IMPORTANT SAFEGUARDS FOR SAFE OPERATION & USE SAVE THESE INSTRUCTIONS. CAUTION/WARNING DANGEROUS VOLTAGE DO NOT CONNECT DAMAGED SUPPLY CORD THIS PRODUCT IS FOR COMMERCIAL USE ONLY. The time clock is an electrical device. In order to reduce the risk of fatal electrical shock and fire, basic safety precautions should be followed, including the following: 1.
- Page 36 RISK OF FIRE OR ELECTRIC SHOCK – DO NOT OPEN WARNING: TO REDUCE THE RISK OF FIRE OR ELECTRIC SHOCK, DO NOT OPEN THE TIME CLOCK. NO USER SERVICEABLE PARTS ARE INSIDE. REPAIRS SHOULD BE COMPLETED BY AUTHORIZED SERVICE PERSONNEL ONLY. QUESTIONS? Watch our helpful videos at upunch.com/resources...
- Page 38 Questions? Contact us seven days a week. Monday-Friday 5am–6pm Pacific | Saturday-Sunday 7am–3:30pm Pacific Call Text Email Visit 800-518-8925 760-701-5102 support@trackmypunch.com support.trackmypunch.com Designed, Developed, and Supported by Workwell Technologies, Inc. © Workwell Technologies, Inc. All rights reserved. 2777 Loker Avenue Suite A Carlsbad CA 92010 workwelltech.com Rev: 06/2018...
Need help?
Do you have a question about the HN1000 and is the answer not in the manual?
Questions and answers