Advertisement
Available languages
Available languages
Quick Links
VDPL1
V
1503
M
OVING H
HEAD – L
M
OVING H
HEAD – L
PR
ROJECTE
EUR LYR
CA
ABEZA M
MÓVIL –
"M
MOVING
HEAD"-
US
SER MAN
UAL
GE
EBRUIKER
RSHANDL
NO
OTICE D'E
EMPLOI
MA
ANUAL D
EL USUAR
BE
EDIENUN
GSANLEIT
MHW
W12
LED WAS
SH 15X3
LED WAS
SH 15X3
E À LED
WASH R
WASH –
– 15 X LE
SCHEINW
WERFER
ARA
LEIDING
13
RIO
17
TUNG
22
W RGB 3
3-IN-1 L
W RGB 3
3-IN-1 L
RVB – 15
5 X LED D
ED RGB 3
3 EN 1 D
R – WASH
H – 15 X
AS 45
5 W
4
4
8
LEDS
LEDS
DE 3W T
TYPE 3 E
DE 3W
X 3-IN-1
RGB-LED
N 1
D VON 3 3W
Advertisement

Related Manuals for HQ Power vdpl1503mhw12


Summary of Contents for HQ Power vdpl1503mhw12
- Page 1 VDPL1 1503 OVING H HEAD – L LED WAS SH 15X3 W RGB 3 3-IN-1 L LEDS OVING H HEAD – L LED WAS SH 15X3 W RGB 3 3-IN-1 L LEDS ROJECTE EUR LYR E À LED WASH R RVB –...
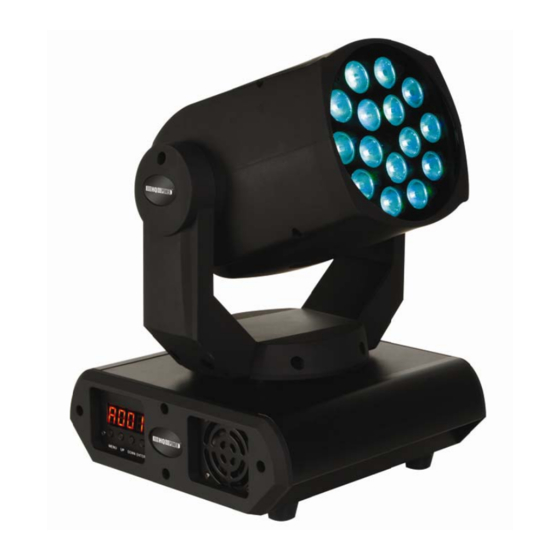
- Page 2 PL1503MHW movin ng head yoke carryi ng handle base movin ng head draagj handv voet proje ecteur lyre ving head Movin g Head pala nche yugo Joch poig née puñadura Griff base base Basis DMX output DMX input power cord fuse holder DMX uitgang DMX ingang...
- Page 3 VDPL1503MHW12 terminator – eindweerstand - résistance de terminaison – terminación – Terminierung How to turn the controller line from 3-pins into 5-pins (plug and socket) Controller line van 3-pin naar 5-pin aanpassen (stekker en contact). Modifier la ligne du contrôleur de 3 broches en 5 broches (fiche et contact) Modificar la línea del controlador de 3 polos y 5 polos (conector y contacto)
- Page 4 PL1503MHW R MAN NUAL Intro oduction o all residen nts of the E European Un nion mportant en nvironment tal informat tion about t this produc This symbol on th he device or r the packag e indicates t that disposa l of the devi ce after its l ifecycle coul...
-
Page 5: General Guidelines
When applicable, connect an XLR cable to the female 3-pin XLR output of a controller (not incl.) and the other side to the male 3-pin XLR input [6] of the VDPL1503MHW12. Multiple VDPL1503MHW12’s can be linked through serial linking. The linking cable should be a dual core, screened cable with XLR input and output connectors. - Page 6 PL1503MHW • A DMX term minator is re ecommended d for installa ations where e the DMX ca able has to r un a long dis stance or is an electric ally noisy en nvironment ( (e.g. discos) ). The termin nator preven nts corruptio n of the digi...
- Page 7 PL1503MHW bmenu display function / / descriptio tilt clockwi tilt tilt inverse normal dis splay splay directio 180° rotat ted display display vis sible splay view display bla anked out MX Mode is mode allo ows you to co ontrol the fix xture by any y universal D DMX controlle...
- Page 8 PL1503MHW • There are no user-serv viceable part ts, apart from m the fuse. • Contact yo our dealer fo r spare part s if necessar Tech nical spe ecificatio wer supply 230Vac / 50H 3W Edison h igh power R RGB 3-in-1 (1 12x) wer consum...
- Page 9 PL1503MHW aak het toes stel niet aan wanneer he et in gebruik is: de behu izing wordt w warm. org voor een n minimuma fstand van 0 0,5 m tussen n de lichtuitg gang van het t toestel en het belichte ppervlak.
- Page 10 Indien van toepassing, sluit een XLR-kabel aan de vrouwelijke 3-pin XLR-uitgang van een controller (niet meegelev.) en de andere kant van de mannelijke 3-pin XLR-ingang [6] van de VDPL1503MHW12. U kunt verscheidene VDPL1503MHW12’s aan elkaar koppelen met behulp van een seriële koppeling. Gebruik daarvoor een 2-aderige afgeschermde kabel met XLR ingang- en uitgangsaansluitingen.
- Page 11 PL1503MHW Gebr ruik adpleeg de f figuren op p pagina 2 van deze handle eiding. et bediening gspaneel • Bedien het t paneel met t behulp van n de vier toet tsen [11] on nderaan de leddisplay [1 10]. Van lin ks naar rech hts: func...
- Page 12 PL1503MHW • Druk op < MENU> tot op d de display ve erschijnt. • Stel het st artadres ( ) in met <UP> en < DOWN>. MX-waarde n per kana anaal func ctie schrijving sluit ter dicht sluit ter/ stro boscoop traa ag ->...
- Page 13 PL1503MHW © AUTEURSR RECHT elleman nv heeft het a auteursrech ht voor deze e handleidi ing. Alle we ereldwijde rechten vo oorbehoude et is niet toeg gestaan om deze handle eiding of ged deelten ervan n over te ne men, te kop piëren, te ve rtalen, te werken en o...
-
Page 14: Directives Générales
Toute modification est interdite pour des raisons de sécurité. Les dommages occasionnés par des modifications par le client ne tombent pas sous la garantie. • N’utiliser votre VDPL1503MHW12 qu’à sa fonction prévue. Tout autre usage peut causer des courts- circuits, des brûlures, des électrochocs etc. Un usage impropre annule d'office la garantie. •... - Page 15 PL1503MHW • Éviter de v vous position nner en dess sous de l’app pareil pour l’ enlever ou lo ors du mont tage ou du n nettoyage. U technicien qualifié doit t réviser l’ap pareil avant t la mise en s service.
- Page 16 PL1503MHW afficheur fonction / / descriptio mode pilot tage par le s mode lent ode autonom uto run) mode rapid mode veill mode 1 mode 2 ode Maître/e esclave mode 3 mode 4 onctions du sous-menu us-menu afficheur fonction / / descriptio mouvemen nt horizonta...
- Page 17 PL1503MHW canal onction à descrip ption itesse pan/t rapide - > lent ED rouges variateu ur 100% -> 0 0° ED vertes variateu ur 100% -> 0 0° ED bleues dimmer 100% -> 0° ° Netto oyage et t entretie •...
- Page 18 PL1503MHW ¡G racias por ha aber compra ado la VDPL L1503MHW1 12! Lea aten ntamente las s instruccion nes del manu ual antes de ar el aparato o. Si el apara ato ha sufrid do algún dañ ño en el tran nsporte no lo o instale y pó...
-
Page 19: Instalación
Si fuera necesario, conecte un cable con conector XLR (no incl.) a la salida XLR hembra de 3 polos del controlador y el otro conector XLR macho de 3 polos a la entrada [6] de la VDPL1503MHW12. Es posible conectar varios VDPL1503MHW12 en serie. Use un cable blindado de doble hilo conductor con conectores XLR de entrada y de salida VDPL1503MHW12. - Page 20 PL1503MHW eneral • Pregunte a a un electrici ista cómo ha acer la conex xión eléctrica • Conecte el aparato a la a red eléctric ca con la con nexión de al imentación. Asegúrese d de que los a paratos no estén alim entados por un reóstato...
- Page 21 PL1503MHW bmenú pantalla función / descripció ón pantalla vi isible sualizar pant talla pantalla no o visible odo de cont trol DMX te modo per rmite control lar su foco s in controlad or DMX. • Si se usa u una señal DM MX, cada apa arato tiene s...
- Page 22 PL1503MHW Espe ecificacio ones mentación 230Vac / 50H 3W Edison RG GB 3 en 1 (1 12x) de alta potencia nsumo mensiones 279 x 274 x 413mm 10kg sible 5A / 230Vac (FF5N) tilice este a parato sólo o con los ac ccesorios o riginales.
- Page 23 PL1503MHW erühren Sie das Gehäuse e während d des Betriebs nicht, denn das Gehäus se heizt auf. eachten Sie eine minima ale Entfernun ng von 0.5m m zwischen d der Lichtausb beute und irg gendeiner eleuchteten Fläche. Verw wenden Sie d das Gerät ni e in der Näh he von entfla...
- Page 24 Wenn nötig, so verbinden Sie ein XLR-Kabel mit dem 3-Pin XLR-Ausgang der Steuerung (nicht mitgeliefert) und die andere Seite mit dem 3-Pin XLR-Eingang [6] des VDPL1503MHW12. Sie können verschiedene VDPL1503MHW12 in Serie schalten. Verwenden Sie ein zweipoliges abgeschirmtes Kabel mit XLR Ein- und Ausgangsanschlüssen.
- Page 25 PL1503MHW Anwe endung ehe Abbildun ngen, Seite 2 2 dieser Bed dienungsanle eitung. edienfeld • Bedienen S Sie das Bedi enfeld mit d en vier Tast en [11] unt ten im LED-D Display [10] ]. Von links nach rechts: aste Funktion <M MENU>...
- Page 26 PL1503MHW • Drücken S ie auf <MEN NÜ> bis im Displ ay erscheint • Stellen Sie e die Startad resse ( ) mit <UP> > und <DOW WN> ein. MX-Werte p pro Kanal Kanal Funk ktion Besc chreibung Shutt ter dicht Strob boskop langs sam ->...
- Page 27 - defecten veroorzaakt door opzet, nalatigheid of door een onoordeelkundige behandeling, slecht onderhoud of abnormaal Velleman® Service and Quality Warranty gebruik of gebruik van het toestel strijdig met de voorschriften van Since its foundation in 1972, Velleman® acquired extensive de fabrikant. experience in the electronics world and currently distributes its - schade ten gevolge van een commercieel, professioneel of collectief products in over 85 countries.
- Page 28 nur aufladbare, sondern auch nicht aufladbare, eingebaute oder ersetzbare), Lampen, Gummiteile, Treibriemen, usw. (unbeschränkte Garantía de servicio y calidad Velleman® Liste). Desde su fundación en 1972 Velleman® ha adquirido una amplia - Schäden verursacht durch Brandschaden, Wasserschaden, Blitz, experiencia como distribuidor en el sector de la electrónica en más de Unfälle, Naturkatastrophen, usw.
Need help?
Do you have a question about the vdpl1503mhw12 and is the answer not in the manual?
Questions and answers