
Related Manuals for Jitterbug Flip


Summary of Contents for Jitterbug Flip
-
Page 1: User Guide
® User Guide jitterbug Everything you need to know about your Jitterbug Flip. ®... - Page 3 This helpful User Guide contains everything you need to know to about your Jitterbug Flip. And if you have any questions or need assistance, our award- winning, 100% U.S.-based customer service team stands ready to assist you. Best Regards,...
-
Page 5: Table Of Contents
Contents Section 1: Getting Started ............1 Key Items in Your Jitterbug Box ..............3 Your Jitterbug Flip ..................4 Activating Your Jitterbug ................10 Charging the Battery ..................14 Battery Level Indicator .................17 Powering Your Jitterbug On and Off ............18 How to Read the Inside Display ..............20 Using the Main Screen ................22... - Page 6 Adjusting the Volume ...................38 Phone Book ....................39 Call History ....................44 Voice Dial .....................46 Voicemail......................48 Personal Operator ..................53 Emergency 9-1-1 Services ................55 Call Waiting ....................56 International Dialing ..................58 Section 3: Camera ..............61 Taking a Photo .....................62 Viewing a Photo ...................64 Sending a Photo ..................65 Deleting a Photo ..................67 Receiving a Photo ..................68...
- Page 7 Sharing Photos on Facebook ..............70 Section 4: Text Messages ............73 Text Message Notifications ................74 Reading Text Messages................75 Replying to Text Messages ................77 Deleting Text Messages ................79 Sending Text Messages ................80 Entering Text with the Keypad ..............82 Section 5: Additional Information ..........89 GreatCall Health &...
- Page 8 Legal ..................111 Safety and Use ..................111 Customer Agreement.................123 Index ..................137...
-
Page 11: Section 1: Getting Started
Section 1: Getting Started Topics • Key Items in Your Jitterbug Box • Your Jitterbug Flip • Activating Your Jitterbug • Charging the Battery • Battery Level Indicator • Powering Your Jitterbug On and Off • How to Read the Inside Display •... - Page 12 USB Cable Wall Charger Charging Dock Jitterbug Flip...
-
Page 13: Key Items In Your Jitterbug Box
Key Items in Your Jitterbug Box • Jitterbug Flip • Charging Dock • USB Cable • Wall Charger • Activation Card • User Guides i INFO The rechargeable battery has been pre-installed for your convenience. -
Page 14: Your Jitterbug Flip
Your Jitterbug Flip Camera Flash / Flashlight Headset Jack Indicator Light Outside Display USB Connector Dock Connector... - Page 15 • Camera – Take clear pictures. • Flash / Flashlight – Automatically turns on when taking pictures in low light and can be manually activated using the Flashlight Button. • Headset Jack – Connect a headset for hands-free calling. • Indicator Light – Lights up for incoming calls or when the phone is fully charged.
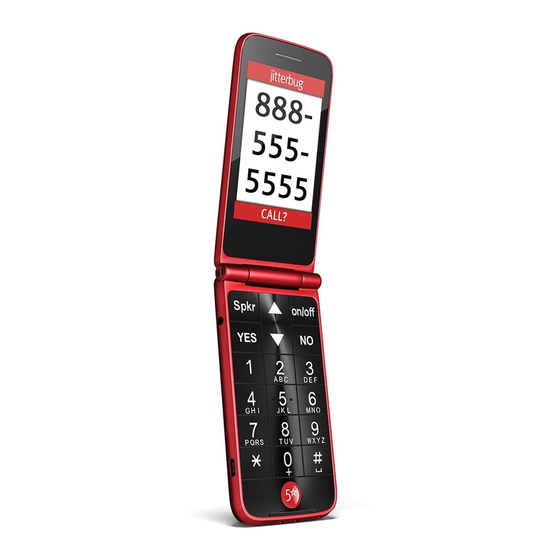
- Page 16 Earpiece Speaker Inside Display Up/Down Button Speakerphone Button On/Off Button YES Button NO Button Keypad 5Star Button Microphone...
- Page 17 • Up/Down Button – For navigating within the screens you see. • Speakerphone Button – Turns Speakerphone on and off. • On/Off Button – Turns your Jitterbug on and off. • YES Button – Allows you to answer “YES” to questions or commands.
- Page 18 External Speaker Flashlight Button Volume Button Battery Cover Battery Cover Release...
- Page 19 • External Speaker – Delivers loud and clear sound when the Speakerphone feature is enabled. • Flashlight Button – Press and hold this button while your Jitterbug is open to help you see in low light conditions. • Volume Button – Allows you to adjust the ringer, Earpiece Speaker and External Speaker volume.
-
Page 20: Activating Your Jitterbug
Activating Your Jitterbug Depending where your Jitterbug was purchased, your phone may already be activated. The following three easy steps will guide you in powering on your phone for the first time. IMPORTANT! Please do not turn on your phone until instructed to do so. If you turn it on prior to setting up your account, the device may fail to activate. - Page 21 STEP 1 Determine where your phone was purchased. • If you purchased your Jitterbug from GreatCall or firstSTREET, your phone is already activated and you may skip to STEP • If you purchased your Jitterbug from Amazon, Best Buy, Fry’s Electronics,...
- Page 22 GreatCall.com/Activate to activate your account. You will be asked to enter in your Jitterbug Serial Number which can be found on the included Activation Card or on the side of the retail box. If you do not have Internet access, you can call our Activation (888) 900-1367.
- Page 23 This process may take a few minutes and you may notice the phone restart a few times. Once complete, you will see a screen “Phone was set up successfully!” You’re now ready to enjoy the benefits of your easy-to-use Jitterbug phone.
-
Page 24: Charging The Battery
2. Plug the larger end of the USB Cable into the Wall Charger. 3. Plug the Wall Charger into a standard wall outlet (110/220 VAC). 4. Place the Jitterbug into the Charging Dock as illustrated. Your Jitterbug is fully charged when you see “Charging Complete” on the Outside Display. - Page 25 IMPORTANT! It is recommended to fully charge your Jitterbug after activating it for the first time. Your phone may turn off sooner than expected if using it before fully charging.
- Page 26 Charging Without the Charging Dock It’s also possible to charge your Jitterbug without the Charging Dock by using the included USB Cable. 1. Plug the larger end of the USB Cable into the Wall Charger. 2. Plug the Wall Charger into a standard wall outlet (110/220 VAC).
-
Page 27: Battery Level Indicator
Battery Level Indicator Your Jitterbug will remind you to charge the battery. Reminders appear on the Inside Display and Outside Display with the following messages: • Battery Low – This will appear when your battery is beginning to get low. -
Page 28: Powering Your Jitterbug On And Off
2. Press and hold the On/Off Button ( ) until the Inside Display turns on. 3. When you hear a dial tone, your Jitterbug has service and is ready to use. If a connection is not possible, a “No Service” message will appear on the Outside Display and a dial tone will not be heard. - Page 29 1. Press and hold the On/Off Button ( ) until the GreatCall logo appears on the Inside Display. 2. Your Jitterbug will then turn off. i INFO We recommend keeping your Jitterbug on at all times and charging it at night so you can always stay connected.
-
Page 30: How To Read The Inside Display
How to Read the Inside Display Throughout this guide, the screen on the inside of your Jitterbug is referred to as the Inside Display. The following diagram explains the areas of the Inside Display and how to use them. Below is an example of the Phone Book screen. - Page 31 • Feature Area – Identifies the feature you are using. For example, when you are in the Phone Book, you will see “PHONE BOOK” in this area. • Detail Area – Details of the feature you are using will appear here. For example, information such as detailed entries from your Phone Book, will appear in this area.
-
Page 32: Using The Main Screen
Using the Main Screen When you open your Jitterbug while it is powered on, you will see the Main Screen as shown in the image below. My # 800-650-5703 Voicemail Phone Book Magnifier SELECT? i INFO The Main Screen will display your Jitterbug phone number at the top of the... - Page 33 The Main Screen is where you access the features on your Jitterbug. Your Jitterbug is designed with the following six features installed 1. Phone Book – Store up to 200 of the names and numbers that you call most often. Our Personal Operators can even set up your Phone Book for you.
- Page 34 4. Settings – The following items can be changed from within the Settings feature: colors, jingle on/off, ring tones and Bluetooth. See “Phone Settings” on page 105 for more information. 5. Camera – This is where you will take photos that will be automatically stored in My Photos.
- Page 35 Navigating the Main Screen with the Keypad You can easily access all of your features within the Main Screen using three simple buttons located at the top of the Keypad.
- Page 36 INFO By default, your phone always displays the Main Screen when opening your Jitterbug after it has been closed. If you find it easier to have your Jitterbug start directly in your Phone Book each time you open your phone, you can dial “0”...
-
Page 37: The 5Star Button
The 5Star Button If you have a Health & Safety Package, press the red 5Star Button in an uncertain or unsafe situation to be connected to a highly-trained 5Star Agent. The Agent will assess your situation, confirm your location using GPS and connect you to emergency services if you need it. - Page 38 IMPORTANT! If you do not have a Health & Safety Package, you will be asked if you would like to be connected directly to 9-1-1 services when the 5Star Button is pressed. Press the YES Button ( ) if you would like to call 9-1-1 or the NO Button ( ) if you would like to hang up.
-
Page 41: Section 2: Phone Calls
Section 2: Phone Calls Topics • Making and Answering Phone Calls • Speakerphone • Adjusting the Volume • Phone Book • Call History • Voice Dial • Voicemail • Personal Operator • Emergency 9-1-1 Services • Call Waiting • International Dialing... -
Page 42: Making And Answering Phone Calls
You can dial a phone number directly from almost every screen on your Jitterbug. 1. When you open your Jitterbug, you will hear a dial tone indicating that service is available. If service is not available, there will be no dial tone and you will see “No Service”... - Page 43 Incoming Phone Calls Your Jitterbug rings or vibrates to indicate when you have an incoming call. Additionally, there are other indications that you have an incoming call: • The Indicator Light on the outside of your Jitterbug flashes. • The name or phone number of the person calling will appear on the Outside Display.
- Page 45 Answering a Call When Your Jitterbug is Closed 1. Open your Jitterbug when you hear it ring. The ring tone will stop when the phone is opened. 2. A “Connected” message will appear on the Inside Display and the caller’s voice can be heard through the Earpiece Speaker.
- Page 46 Ignoring Incoming Calls When you receive an incoming call while your Jitterbug is closed you can press the Volume Button on the side of your phone to mute the ringer. If you receive an incoming call while your phone is open, you can press the NO Button ) to ignore the call.
-
Page 47: Speakerphone
To turn Speakerphone on, press the Speakerphone Button while on a call. You will hear the caller’s voice coming from the External Speaker on the back of your Jitterbug. Press the Speakerphone Button again if you would like to switch audio back to the Earpiece Speaker. -
Page 48: Adjusting The Volume
Adjusting the Ringer Volume While not actively on a call, press the Volume Button up or down until the ringer volume is at the desired level. Your Jitterbug has five volume options for the ringer: Max, High, Medium, Low and Vibrate. -
Page 49: Phone Book
Phone Book Your Jitterbug allows you to store up to 200 names and numbers of the people you call on a regular basis. Once your Phone Book is set up, you can quickly call your contacts without having to dial their number. You will also be able to see your contact’s name every time you receive a call from them. - Page 50 GreatCall’s Personal Operators are able to manage your Phone Book for you. See “Personal Operator” on page 53 for more information. Adding a Contact Directly on Your Jitterbug 1. From the Main Screen, use the Up/Down Buttons ( ) until Phone Book...
- Page 51 5. Using the numeric Keypad, enter the phone number for the new contact and press the YES Button ( ) when finished entering in the phone number. i INFO When text entry is necessary, press the number key on the Keypad that has the desired letter printed on it until it appears on the screen.
- Page 52 Modifying a Contact Directly on Your Jitterbug 1. From the Main Screen, use the Up/Down Buttons ( ) until Phone Book appears highlighted and press the YES Button ( 2. Use the Up/Down Buttons ( ) until “EDIT PHONE BOOK” is highlighted and press the YES Button ( 3.
- Page 53 Press the YES Button ( ) to save your changes to the phone number. Deleting a Contact Directly on Your Jitterbug 1. From the Main Screen, use the Up/Down Buttons ( ) until Phone Book appears highlighted and press the YES Button ( ) to view your Phone Book.
-
Page 54: Call History
Call History Your Jitterbug keeps a list of your 10 most recent outgoing, incoming and missed calls. Reviewing Your Call History 1. From the Main Screen, use the Up/Down Buttons ( ) until Call History appears highlighted and press the YES Button ( ) to view your Call History. - Page 55 • Missed – You missed a call from this phone number. • Incoming – You received and answered a call from this phone number • Outgoing – You placed a call to this phone number. Making Calls from Your Call History With Call History you can quickly return missed calls, as well as redial both incoming and outgoing calls.
-
Page 56: Voice Dial
After the beep, say the name exactly as it appears in your Phone Book. 3. If your Jitterbug recognizes the name it will ask for confirmation by asking, “Did you say ________?” Confirm by saying “Yes” after the beep. - Page 57 i INFO If Voice Dial is unable to find the name, press the YES Button ( ) to retry, or the NO Button ( ) to exit to the Main Screen. To ensure a successful Voice Dial experience, remember these important tips: •...
-
Page 58: Voicemail
Voicemail i INFO This section only applies if you have purchased Voicemail with your GreatCall service. To purchase Voicemail service for your Jitterbug, please call us at 1-800-733-6632. Setting Up Voicemail To access your Voicemail, from the Main Screen, use the Up/Down Buttons... - Page 59 2. Listen to the prompts and when the Voicemail system asks if you would like to review your greeting, press the YES Button ( 3. Follow the instructions, pressing the YES Button ( ) or NO Button ) as necessary. 4. To exit your Voicemail, simply close your Jitterbug at any time.
- Page 60 When to Check Your Voicemail Messages If you miss a call and the caller leaves you a voice message, your Jitterbug will notify you in several ways: • “New Voicemail” will appear on the Outside Display. • “You have a new voice message” will appear on the Inside Display. Press...
-
Page 62: Listening To Voicemail Messages
2. Listen to the prompts to play, save or delete your voice messages using the YES Button ( ) and NO Button ( 3. To exit your Voicemail, simply close your Jitterbug at any time. i INFO To quickly advance through the Voicemail system messages, press the NO Button ( ) during a system message. -
Page 63: Personal Operator
Inside Display, followed by the message “Connected to Operator”. 3. When the Personal Operator answers, let them know which of the above services you need assistance with. 4. To end the call, press the NO Button ( ) or close your Jitterbug. - Page 64 i INFO Ultimate Health & Safety Package customers get unlimited access to Personal Operator, 24/7, for no additional cost. For all other packages and plans, the Personal Operator service costs $0.99 per call. Standard airtime rates apply on all plans for the duration of a Personal Operator call. For more information on Health &...
-
Page 65: Emergency 9-1-1 Services
Emergency 9-1-1 Services To make an emergency call: 1. Open your Jitterbug and make sure it’s on and connected (you should hear a dial tone). 2. Dial 9-1-1 using the Keypad. 3. Press the YES Button ( ) when you see “CALL?” at the bottom of the... -
Page 66: Call Waiting
The following steps outline how to use Call Waiting on your Jitterbug: 1. When a second person calls your Jitterbug while you are already on a call with someone else, you will hear an audible beep and a message will appear on the Inside Display to notify you of a second incoming call. - Page 67 3. To switch between the two callers, press the YES Button ( ). The Inside Display will indicate the name and number of the person you are connected with. 4. To end a call at anytime, simply press the NO Button ( i INFO To ignore an incoming call while you are already on a call with someone else, simply press the NO Button (...
-
Page 68: International Dialing
International Dialing If you expect to make calls beyond the U.S. or Canada, consider our convenient International Calling option. Add the International Calling option to your account and you’ll be ready to call international in no time! To dial internationally, you may need to access the “+”... -
Page 71: Section 3: Camera
Section 3: Camera Topics • Taking a Photo • Viewing a Photo • Sending a Photo • Deleting a Photo • Receiving a Photo • Downloading Photos to Your Computer • Sharing Photos on Facebook... -
Page 72: Taking A Photo
4. When you are finished with using the Camera, press the NO Button ( until you see the Main Screen or close your Jitterbug. i INFO Any photo saved on your Jitterbug will be stored in a photo gallery called “My Photos”. -
Page 74: Viewing A Photo
YES Button ( 2. Use the Up/Down Buttons ( ) to scroll through your photos. 3. When finished viewing your photos, press the NO Button ( ) to return to the Main Screen or close your Jitterbug. -
Page 75: Sending A Photo
Sending a Photo 1. From the Main Screen, use the Up/Down Buttons ( ) until My Photos appears highlighted and press the YES Button ( 2. Use the Up/Down Buttons ( ) to scroll to the photo that you would like to send and press the YES Button ( ) to select it. - Page 76 ) and scroll until “Enter Recipient” appears. There you can enter a phone number using your keypad. Photos sent from your Jitterbug use your monthly text message allowance (one photo = one text message). Photos sent over your monthly text message...
-
Page 77: Deleting A Photo
Deleting a Photo 1. From the Main Screen, use the Up/Down Buttons ( ) until My Photos appears highlighted and press the YES Button ( 2. Use the Up/Down Buttons ( ) to scroll to the photo you would like to delete and press the YES Button ( 3. -
Page 78: Receiving A Photo
Receiving a Photo Your friends and family can send photos to your Jitterbug by using your phone number. If you receive a photo from them a notification on the Outside Display will read “New Photo”. This message will remain on the Outside Display until you open your Jitterbug. -
Page 79: Downloading Photos To Your Computer
Downloading Photos to Your Computer You can download photos from your Jitterbug to your personal computer using the included USB Cable. 1. Insert the smaller end of the USB Cable into the USB Connector on the side of your Jitterbug. -
Page 80: Sharing Photos On Facebook
Sharing Photos on Facebook You can share photos you have captured on your Jitterbug to your Facebook account. Before you can share photos on Facebook you will need to enable it on your MyGreatCall account. If you don’t have a MyGreatCall account yet, registration is easy at MyGreatCall.com. - Page 81 Sharing a Photo on Facebook Once Facebook photo sharing has been enabled on your MyGreatCall account, you will be able to use it when choosing to share your photos on your Jitterbug. 1. From the Main Screen, use the Up/Down Buttons (...
-
Page 83: Section 4: Text Messages
Section 4: Text Messages Topics • Text Message Notifications • Reading Text Messages • Replying to Text Messages • Deleting Text Messages • Sending Text Messages • Entering Text with the Keypad... -
Page 84: Text Message Notifications
• Outside Display – the words “New Text Message” will appear on the display found on the outside of your Jitterbug until you open your phone. • External Speaker – an audible alert will play every five minutes until you... -
Page 85: Reading Text Messages
After receiving a notification that you have a new Text Message, follow these steps to read the message: 1. Open your Jitterbug. You will see the words “You have a new text message” on the Inside Display and the word “VIEW?” in the Action Line at the bottom. Press the YES Button ( ) to continue. - Page 86 ) until you see the Text Message you want to view and press the YES Button ( When done reading the Text Message, you can close your Jitterbug or press the NO Button ( ) until you see the Main Screen.
-
Page 87: Replying To Text Messages
Replying to Text Messages Once you have read a Text Message, you have the option to reply to it. 1. When viewing a Text Message, you will see the word “REPLY?” in the Action Line. Press the YES Button ( ) to reply. - Page 88 INFO Your Jitterbug automatically saves the last 50 incoming and outgoing Text Messages. You cannot reply to outgoing Text Messages that you sent. It is recommended to have a monthly Text Message plan if you use this feature frequently. Text Messages sent or received over your monthly Text...
-
Page 89: Deleting Text Messages
Deleting Text Messages Once you have read a Text Message, you have the option to delete it. 1. When reading a Text Message, you will see the word “REPLY?” in the Action Line. Press the NO Button ( ) to delete. 2. -
Page 90: Sending Text Messages
Sending Text Messages 1. From the Main Screen, use the Up/Down Buttons ( ) until Text Messages appears highlighted and press the YES Button ( 2. Use the Up/Down Buttons ( ) until you see “Send” highlighted and press the YES Button ( 3. - Page 91 4. After selecting a pre-defined message or entering a customized message press the YES Button ( ) to continue. 5. Your Phone Book contacts will now be visible. Use the Up/Down Buttons ) until the contact you wish to send a Text Message to is highlighted and press the YES Button ( i INFO If you do not have the contact in your Phone Book, use the Up/Down...
-
Page 92: Entering Text With The Keypad
Entering Text with the Keypad The table below explains how to create a custom Text Message using the numeric keys on the Keypad to enter letters and special characters. Keyboard Function Enters the number “0” in any Text Message entry mode Add a space Press repeatedly to cycle through the 123, ABC, Abc-S, Abc-W and abc Modes... - Page 93 Press each number repeatedly to cycle through each thru letter printed below the number There are five modes to create a custom Text Message using the numeric keys on the Keypad to enter letters, numbers and symbols. 123 Mode (Numeric) This mode allows you to type numeric characters only.
- Page 94 ABC Mode (All Capitalized) In this mode every letter will be capitalized. To enter this mode, press the * Button ( ) until you see “ABC” at the top-right corner of the Inside Display. To begin typing, find the letter you wish to enter on the Keypad and press it repeatedly until it cycles to the desired letter.
- Page 95 Abc-S Mode (Sentences Capitalized) In this mode the first letter of each sentence is capitalized. To enter this mode, press the * Button ( ) until you see “Abc-S” at the top-right corner of the Inside Display. To begin typing, find the letter you wish to enter on the Keypad and press it repeatedly until it cycles to the desired letter.
- Page 96 Abc-W Mode (Words Capitalized) In this mode the first letter of each word is capitalized. To enter this mode, press the * Button ( ) until you see “Abc-S” at the top-right corner of the Inside Display. To begin typing, find the letter you wish to enter on the Keypad and press it repeatedly until it cycles to the desired letter.
- Page 97 abc Mode (All Lowercase) In this mode every letter will be lowercase. To enter this mode, press the * Button ( ) until you see “Abc-S” at the top-right corner of the Inside Display. To begin typing, find the letter you wish to enter on the Keypad and press it repeatedly until it cycles to the desired letter.
-
Page 99: Section 5: Additional Information
Section 5: Additional Information Topics • GreatCall Health & Safety Services • Brain Games • Flashlight • Reading Magnifier • Bluetooth • Phone Settings • Installing and Removing the Battery • Contact Us... -
Page 100: Greatcall Health & Safety Services
GreatCall Health & Safety Services Your Jitterbug is more than an easy-to-use cell phone, it’s also a network of health and safety experts. Combined with affordable talk minutes, GreatCall Health & Safety Packages make it easier than ever to choose the perfect mobile solution to support your active life. -
Page 101: Urgent Care
With 5Star Service, you and your family can worry less, knowing that someone you trust is always available to help, whenever you need it. Urgent Care With Urgent Care, you can speak with a live nurse or a doctor 24/7 and even get a prescription for common medications over the phone. - Page 102 The Wellness Call With this service, you’ll get a motivational 2-3 minute call once per week from wellness expert and best-selling author Brian Alman, Ph.D. Start feeling better and live a happier, healthier lifestyle with proven, interactive coaching and stress-management techniques that promote better relaxation and self-care. The Wellness Call works around your schedule.
- Page 103 notifications for assistance to your list of designated contacts. Daily Health Tips Stay healthy with daily health tips. Every day you’ll receive a new text message that includes helpful information on exercising, eating right and living a heart- healthy lifestyle. This service is brought to you in partnership with the American Heart Association®.
- Page 104 Brain Games BrainHQ®, from Posit Science®, is a suite of fun brain training games to improve your memory and sharpen your focus. Designed by the leading provider of clinically-proven brain fitness exercises, these games have been tested to show real benefits by using them. Make A Pair Make a Pair is designed to improve your memory.
- Page 105 match in objects within the allotted amount of time. Accessing Your Games 1. From the Main Menu, use the Up/Down Buttons ( ) until “Games” appears highlighted and press the YES Button ( 2. Use the Up/Down Buttons ( ) until the desired game you would like play appears highlighted and press the YES Button ( 3.
-
Page 106: Flashlight
Flashlight Your Jitterbug has a built-in Flashlight to help you see in low-light situations. To activate the Flashlight: 1. Open your Jitterbug and aim the Flashlight away from your face and Flashlight towards the area you would like to Flashlight Button illuminate. -
Page 107: Reading Magnifier
Reading Magnifier Your Jitterbug has a built-in Reading Magnifier to help you see small text and objects. With your phone opened, you can magnify anything within view of the Camera. You can also turn on the Flashlight while using the Reading Magnfier by pressing the Flashlight Button. -
Page 108: Bluetooth
Bluetooth For your convenience, your Jitterbug is equipped to utilize Bluetooth wireless headsets, hands-free speakers, and other Bluetooth compatible devices. There are many benefits to using Bluetooth devices. Along with improved ease-of-use and safety by eliminating wires, Bluetooth also offers you plenty of other advantages, such as having the ability to talk hands-free while your Jitterbug is in your pocket or purse. - Page 109 ) until you see “Bluetooth OFF” highlighted and press the YES Button ( When your Jitterbug is set to “Bluetooth ON,” you will see the Bluetooth symbol in the top-right corner of the Main Screen. Pressing the YES Button (...
- Page 110 Please ensure you turn off Bluetooth if you wish to receive calls from your Jitterbug handset and not your Bluetooth headset. You are unable to turn off your Bluetooth while on a call. When your Bluetooth is on and available for your use, you will notice a white Bluetooth icon, similar to the one on the right, appear at the top right corner of your Main Screen.
- Page 111 “Pairing” is typically a one-time set up process that allows the headset and your Jitterbug to automatically connect every time Bluetooth is turned on. The following will guide you on pairing a Bluetooth headset to your Jitterbug phone. 1. Refer to your Bluetooth headset manufacturer’s instructions on enabling “pairing”...
- Page 112 Press the YES Button ( ) to continue if your headset is already in pairing mode. 6. After a few seconds your Jitterbug should find your Bluetooth headset, and potentially additional Bluetooth devices within proximity. Use the Up/Down Buttons (...
- Page 113 Bluetooth Status Indicator You will notice different Bluetooth icons on your Jitterbug Main Screen that indicate when your Bluetooth is available to use: • Gray – Bluetooth is on, but not • White – Bluetooth is on, paired paired to your Bluetooth headset with your Bluetooth headset and available for you to use.
- Page 114 Answering a Call When Paired with a Bluetooth Headset Press the “Talk” button on the Bluetooth headset. Ending a Call When Paired with a Bluetooth Headset Press the “Talk” button on the Bluetooth headset or press the NO Button ) on your Jitterbug if the phone is open.
-
Page 115: Phone Settings
Phone Settings The “Settings” feature of your Jitterbug allows you to make minor customizations to your phone based on your personal preference. Under Settings you can: • Colors – Adjust the color scheme • Jingle – Turn the power up sound effect on or off •... -
Page 116: Installing And Removing The Battery
The battery has been pre-installed into your Jitterbug phone for your convenience. Removing the Battery 1. If your Jitterbug is on, turn it off by holding down the On/Off Button ( 2. With the back of the Jitterbug facing up, find the Battery Cover Release at the bottom-left corner. - Page 117 Installing the Battery 1. Align the gold metal contacts at the bottom of the Battery with the gold metal pins in the back of your Jitterbug. 2. Insert the Battery so that the gold metal contacts and pins touch first, and then push the rest of Battery into place until it sits flush inside the phone.
-
Page 118: Contact Us
Contact Us We’re here to help. If you have any questions about your Jitterbug or your service, please contact us by: • Email – CustomerService@GreatCall.com • Phone – 1-800-733-6632 • Mail – GreatCall Customer Service, P.O. Box 4428, Carlsbad, CA 9201... -
Page 121: Legal
Legal Safety and Use Please read before using your phone THE BATTERY IS NOT FULLY CHARGED WHEN YOU TAKE IT OUT OF THE BOX. DO NOT REMOVE THE BATTERY PACK WHEN THE PHONE IS CHARGING. YOUR WARRANTY IS INVALIDATED IF YOU DISASSEMBLE OR ATTEMPT TO DISASSEMBLE THE DEVICE. Privacy restrictions Some countries require full disclosure of recorded telephone conversations, and stipulate that you must inform the person with whom you are speaking that the conversation is being recorded. -
Page 122: Important Health Information And Safety Precautions
REGARDLESS OF THE LEGAL THEORY UNDER WHICH THE CAUSE OF ACTION IS BROUGHT. THE FOREGOING DOES NOT AFFECT ANY STATUTORY RIGHTS WHICH MAY NOT BE DISCLAIMED. Important health information and safety precautions When using this product, the safety precautions below must be taken to avoid possible legal liabilities and damages. Retain and follow all product safety and operating instructions. - Page 123 WARNING: Danger of explosion if battery is incorrectly replaced. To reduce risk of fire or burns, do not disassemble, crush, puncture, short external contacts, expose to temperature above 140˚F (60˚C), or dispose of in fire or water. Replace only with specified batteries. Recycle or dispose of used batteries according to the local regulations or reference guide supplied with your product.
-
Page 124: Prevention Of Hearing Loss
Safety precautions for direct sunlight Keep this product away from excessive moisture and extreme temperatures. Do not leave the product or its battery inside a vehicle or in places where the temperature may exceed 140˚F (60˚C), such as on a car dashboard, window sill, or behind a glass that is exposed to direct sunlight or strong ultraviolet light for extended periods of time. -
Page 125: Safety Precautions For Rf Exposure
Safety precautions for RF exposure • Avoid using your phone near metal structures (for example, the steel frame of a building). • Avoid using your phone near strong electromagnetic sources, such as microwave ovens, sound speakers, TV and radio. • Use only original manufacturer-approved accessories, or accessories that do not contain any metal. •... -
Page 126: General Precautions
• Do not attempt to disassemble the phone or its accessory. • Only qualified personnel must service or repair the phone or its accessory. General precautions You alone are responsible for how you use your phone and any consequences of its use. You must always switch off your phone wherever the use of a phone is prohibited. - Page 127 • There are noticeable signs of overheating. • The product does not operate normally when you follow the operating instructions. Avoid hot areas The product should be placed away from heat sources such as radiators, heat registers, stoves, or other products (including amplifiers) that produce heat. Avoid wet areas Never use the product in a wet location.
-
Page 128: Regulatory Agency Identifications
Repetitive motion injuries To minimise the risk of RSI, when Texting or playing games with your phone: • Do not grip the phone too tightly • Press the buttons lightly • Make use of the special features in the handset which minimize the number of buttons which have to be pressed, such as message templates and predictive text. •... - Page 129 This device complies with Part 15 of the FCC Rules. Operation is subject to the following two conditions: (1) This device may not cause harmful interference, and (2) this device must accept any interference received, including interference that may cause undesired operation. Important Note Radiation Exposure Statement: This equipment complies with FCC radiation exposure limits set forth for an uncontrolled environment.
-
Page 130: Sar Information
This methodology applies equally for T ratings. The M mark is intended to be synonymous with the U mark. The T mark is intended to be synonymous with the UT mark. The M and T marks are recommended by the Alliance for Telecommunications Industries Solutions (ATIS). The U and UT marks are referenced in Section 20.19 of the FCC Rules. -
Page 131: Fcc Rf Radiation Exposure Statement
antenna during operation of the equipment. Body-worn Operation This device was tested for typical body-worn operations. To comply with RF exposure requirements, a minimum separation distance of 1.5 cm must be maintained between the user’s body and the handset, including the antenna. Third-party belt-clips, holsters, and similar accessories used by this device should not contain any metallic components. -
Page 132: Hearing Aids
Telecommunications & Internet Association (TIA) safety information Pacemakers The Health Industry Manufacturers Association recommends that a minimum separation of 15 cm (6 inches) be maintained between a handheld wireless phone and a pacemaker to avoid potential interference with the pacemaker. These recommendations are consistent with the independent research by and recommendations of Wireless Technology Research. -
Page 133: Customer Agreement
Customer Agreement 1. Welcome To The GreatCall Family ® Please read this agreement regarding your phone and service. When you accept this agreement, you’re bound by its conditions. It applies to all of your services from GreatCall and covers important topics such as: •... - Page 134 3.1 30-Day Return Policy If for any reason, within 30 days from date of purchase, you are not completely satisfied with your phone, we will refund the activation fee, the first month’s service charge and the cost of the phone, plus applicable taxes if you: •...
- Page 135 • Approved returns must be shipped back at the customer’s expense in the original packaging. • Refunds, if applicable, will be processed back to the party that paid in the same manner that payment was received. Please allow 21 business days for processing. You will be charged a $10 restocking fee. 3.2 Service Cancellation If for any reason you are not completely satisfied with your service and you wish to cancel, you’ll be able to do so as described below.
- Page 136 international calling rates will apply. 4.3 Taxes, Fees And Assessments We are required by law to charge you certain taxes, surcharges and assessments that will be included on your bill. You are responsible for paying all taxes, surcharges and assessments associated with your GreatCall products and services. These may change from time to time, and we may not be able to give you advance notice about how these changes may affect you.
- Page 137 4.5 Payments, Deposits, Credit Cards, And Checks Payment is due in full as stated on your bill. IF WE DON’T RECEIVE PAYMENT IN FULL WHEN DUE, WE MAY, TO THE EXTENT PERMITTED BY THE LAW OF THE STATE OF THE BILLING ADDRESS WE HAVE ON FILE FOR YOU AT THE TIME, CHARGE YOU A LATE FEE UP TO 1.5 PERCENT A MONTH (18 PERCENT ANNUALLY) OR A FLAT $5 A MONTH, WHICHEVER IS GREATER, ON UNPAID BALANCES.
- Page 138 6. Rights In Numbers And Electronic Addresses We Assign To You You do not have any rights in the personal identification number, email address or identifier we assign to you. The same is true for your wireless phone numbers, except for your right to transfer it. In the event we need to change or reassign them, we’ll let you know.
- Page 139 charges, including those related to the use of services, even if used by another party. We may require a sworn statement about the loss or theft. 10. Our Rights To Limit/End Service Or This Agreement You agree not to resell our service to someone else without prior written permission from GreatCall. You also agree that your wireless phone won’t be used for any purpose that is illegal, isn’t allowed by this agreement or by your User Guide.
- Page 140 11. Your Privacy You agree to the terms of our Privacy Policy, available on our website at www.GreatCall.com/privacypolicy, when you use our services. It may change from time to time, so please review this policy with regularity and care. Among other things, the policy outlines the information we collect about you, how we use that information and with whom we share that information.
- Page 141 REGARDLESS OF THE THEORY OF LIABILITY, WHETHER FRAUD, MISREPRESENTATION, BREACH OF CONTRACT, PERSONAL INJURY, PRODUCTS LIABILITY, OR ANY OTHER THEORY. THIS MEANS THAT NEITHER OF US WILL SEEK ANY INDIRECT, SPECIAL, CONSEQUENTIAL, TREBLE, OR PUNITIVE DAMAGES FROM THE OTHER. THIS LIMITATION AND WAIVER ALSO APPLIES TO ANY CLAIMS YOU MAY BRING AGAINST ONE OF OUR SUPPLIERS, TO THE EXTENT THAT WE WOULD BE REQUIRED TO INDEMNIFY THE SUPPLIER FOR SUCH CLAIM.
- Page 142 RELATED DISPUTES, WHICH ARE AVAILABLE BY CALLING THE AAA AT 800-778-7879 OR VISITING ITS WEB SITE AT WWW.ADR.ORG. THE AAA HAS A FEE SCHEDULE FOR ARBITRATIONS. YOU WILL PAY YOUR SHARE OF THE ARBITRATOR’S FEES AND ADMINISTRATIVE EXPENSES (“FEES AND EXPENSES”) EXCEPT THAT: a.
- Page 143 TRIAL WAIVER, WHETHER ANY CLAIM IS IN ARBITRATION OR IN COURT, YOU AND WE WAIVE ANY RIGHT TO JURY TRIAL INVOLVING ANY CLAIMS OR DISPUTES BETWEEN YOU AND US. 16. About You You represent that you’re at least 18 years old and have the legal capacity to accept this agreement. If you are ordering for a friend or a member of your family, you are bound by the terms of this agreement, unless and until, your friend or family member has agreed to the terms of this agreement.
- Page 144 18. Additional Terms For Text Messaging The message rates that we charge depend on the GreatCall service plan that you selected. You will incur message charges when you send or receive a message, whether the message has been read or unread, viewed or unviewed, solicited or unsolicited.
-
Page 147: Index
Index Symbols 5Star 7 5Star Button 27 5Star Service 90 9-1-1 Services 55 123 Mode (Numeric) 83 ABC Mode (All Capitalized) 84 abc Mode (All Lowercase) 87 Abc-S Mode (Sentences Capitalized) 85 Abc-W Mode (Words Capitalized) 86 accessories 9... - Page 148 Action Line 21 Activating 10 Adding a Contact 40 Additional Information Exists 21 Adjusting the Volume 38 Answering a Call 35 Battery 106 Battery Cover 9 Battery Cover Release 9 Battery Critical 17 Battery Level 17 Battery Low 17 Bluetooth 24 Bluetooth Status Indicator 103...
- Page 149 Brain Games 94 Call History 23 Call Waiting 56 Camera 5 Charging 14 Charging Dock 14 colors 24 Colors 105 Contact Us 108 Daily Health Tips 93 Deleting a Contact 43 Deleting a Photo 67...
- Page 150 Deleting Text Messages 79 Detail Area 21 Dock Connector 5 Downloading Photos 69 Earpiece Speaker 7 Entering Text 82 External Speaker 9 Feature Area 21 Flash 5 Flashlight 5 Flashlight Button 9...
- Page 151 Games 94 GreatCall Health & Safety Services 90 Headset Jack 5 Ignoring Incoming Calls 36 Incoming 45 Incoming Phone Calls 33 Indicator Light 5 Inside Display 7 Installing the Battery 107 International Dialing 58...
- Page 152 Jingle 105 jingle on/off 24 Keypad 7 Magnifier 97 Main Screen 22 Make A Pair 94 Making a Phone Call 32 MedCoach 91 Microphone 7 Missed 45...
- Page 153 Modifying a Contact 42 MyGreatCall.com 39 My Photos 24 NO Button 7 No Service 32 On/Off Button 7 Outgoing 45 Outside Display 5 Pairing a Bluetooth Headset 101 Personal Operator 26...
- Page 154 Phone Book 23 Phone Info 23 Phone Settings 105 Quick Match 94 Reading Magnifier 97 Reading Text Messages 75 Receiving a Photo 68 Removing the Battery 106 Replying to Text Messages 77 Restricted 33 Ringer Volume 38 ring tones 24...
- Page 155 Ring Tones 105 Sending a Photo 65 Sending Text Messages 80 Settings 24 Setting Up Voicemail 48 Sharing Photos 70 Speakerphone 7 Speakerphone Button 7 Taking a Photo 62 Text Message Notifications 74 The Check-in Call 92 The Wellness Call 92...
- Page 156 Turning Bluetooth On and Off 99 Turning Your Jitterbug Off 19 Turning Your Jitterbug On 18 Unavailable 33 Up/Down Button 7 Urgent Care 91 USB Cable 14 USB Connector 5 Viewing a Photo 64 Voice Dial 46 Voicemail 36 Voicemail Greeting 49...
- Page 157 Voicemail Messages 50 Volume 38 Volume Button 9 Wall Charger 14 YES Button 7...
- Page 158 Copyright ©2016 GreatCall, Inc. GreatCall®, 5Star®, and GreatCall Link™ are trademarks of GreatCall, Inc. registered and/or pending in the United States and other countries. ©2016 ALCATEL is a trademark of Alcatel- Lucent used under license by TCL Communication LTD. Screen images simulated. Appearance of device may vary. Other marks are property of their respective owners and may be trademarks.
- Page 159 www.greatcall.com JB6-USERGUIDE-V2...
Need help?
Do you have a question about the Flip and is the answer not in the manual?
Questions and answers
When I hang up from my phone call my phone is still connected why
Is there a way to stop the the volume from going to mute
To prevent the volume from muting on the Jitterbug Flip, ensure the volume is set to the highest level (Max for ringer, High for speaker) using the Volume Button. Since the phone does not have a built-in way to lock the volume, you can physically block access to the Volume Button by attaching a rigid cover over it. This prevents accidental presses that might lower the volume. Be cautious with permanent solutions like glue, as this may disable volume control entirely.
This answer is automatically generated
How do you type a new contact into a jitterbug flip 2
Battery seems to deplete faster and signal strength is suddenly weak.Can battery be replaced?Also can I upgrade with a SIM card.
My phone just buffers when I try to send a photo. It never gets sent.