Table of Contents
Advertisement
Quick Links
Advertisement
Table of Contents

Related Manuals for Seca 525


Summary of Contents for Seca 525
- Page 1 525 Instructions for Use Software version 1.0...
-
Page 2: Table Of Contents
Recording weight and height ... . . 5 5.2 Preparing seca patient file ....29 Administration of user accounts . - Page 3 ......72 Editing a seca patient file ....59 Setting up a seca 360°...
-
Page 4: Instructions For Use For Seca 525
INSTRUCTIONS FOR USE FOR SECA 525 English ➔ ➔ Device description What do I do if ...? ➔ ➔ Safety precautions Technical data ➔ ➔ Device overview Optional accessories ➔ ➔ Making the device operational Spare parts ➔ ➔ Operation Disposal ➔... -
Page 5: Description Of Function
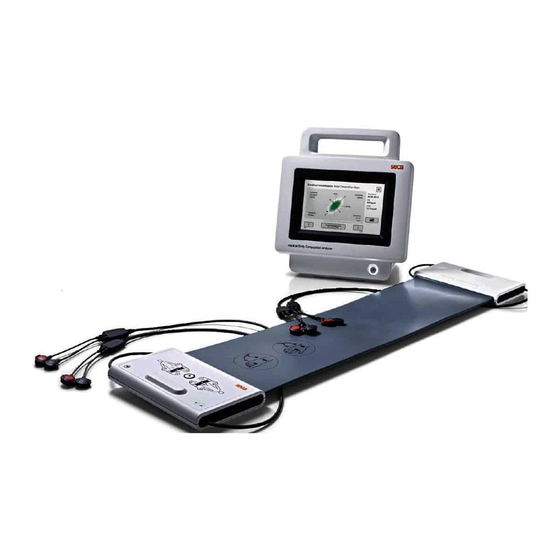
➔ Bioimpedance measurement ➔ Recording weight and height ➔ Administration of user accounts ➔ Administration of seca patient files ➔ Evaluating measured results ➔ Data transmission and network functions ➔ Compatibility The device consists of a monitor and a measuring mat. -
Page 6: Administration Of Seca Patient Files
With administrator rights, seca patient files can be edited directly on the device. The device can be configured so that the seca patient files of the device are automatically synchronized with the patient files of the seca analytics 115 software. -
Page 7: Contraindications
English 1.4 Contraindications Bioimpedance measurements may be performed on individuals exhibiting the following characteristics: • electronic implants, e.g. cardiac pacemakers • active prostheses Bioimpedance measurements may be performed on persons who are connected to one of the following devices: • electronic life-support systems, e.g. artificial heart, artificial lung •... -
Page 8: Basic Safety Precautions
Only have ser- vicing and repairs performed by an authorized seca service partner. You can find service partners in your area at www.seca.com or by sending an e-mail to service@seca.com. -
Page 9: Preventing Electric Shock
1 meter away to prevent incorrect measurements or wireless transmission interference. ► The actual transmission output of HF equipment may require mini- mum distances of more than 1 meter. Details can be found at www.seca.com. Preventing electric shock WARNING! Electric shock ►... -
Page 10: Preventing Device Damage
Preventing device damage NOTICE! Damage to device ► Ensure that no liquids enter the device. They can damage the elec- tronics. ► Switch off the device before you take the power supply connector out of the power supply socket. ► If you are not going to use the device for an extended period, dis- connect the power supply connector from the power supply socket and remove the rechargeable battery (if present and removable). -
Page 11: Dealing With Packaging Material
NOTICE! Inconsistent measuring results ► Before you electronically save measurement values determined us- ing this device and use them further (e.g. in seca PC software or in a hospital information system), make sure that the measurement values are plausible. ► If measurement values are transmitted to seca PC software or a... -
Page 12: Device Overview
Inductive charging interface For charging measuring mat rechargeable battery with magnetic catch Internal wireless For connecting scales and length measuring devices from the seca 360° module system seca 360° wireless Internal WiFi module For automatic transmission of data, monitor/measuring mat 12 •... -
Page 13: Measuring Mat Controls
LED green, flashing: measurement in progress LED red: electrode contact poor Enter patient position Button with LED, LED green: seca patient file loaded, patient position selected patient position left LED green, flashing: end of measurement LED red: no seca patient file loaded... -
Page 14: Login/Navigation: Buttons And Symbols In The Touchscreen Display
3.3 Login/navigation: buttons and symbols in the touchscreen display Button/symbol Meaning Open Instructions for Use Instructions for Use: return to chapter summary Enter text or numbers No input or input faulty Select user account Enter password Confirm entry Process running Button available Button pressed Button not available... -
Page 15: Operating State: Symbols
English 3.4 Operating state: symbols ➔ Operating state: symbols in the touchscreen display ➔ Operating state: symbols on the measuring mat Operating state: symbols in the touchscreen display Symbol Operating state Monitor: controls permanently on: rechargeable battery charging status (%) controls flashing: rechargeable battery charging Measuring mat:... -
Page 16: Operating State: Symbols On The Measuring
Searching for seca patient file Switch sort direction Enter weight Enter height Enter waist circumference Enter Physical Activity Level (PAL) Adopt value seca 360° wireless Adopt value from previous measurement Close seca patient file, changes will not be saved 16 •... -
Page 17: Measure" Tab
Measurement successful Write comment Measuring mat Button/symbol Meaning Enter patient position LED green: seca patient file loaded, patient position selected LED green, flashing: end of measurement LED red: no seca patient file loaded Starting measurement Electrode LEDs LED green: electrode OK... -
Page 18: Evaluation" Tab
"evaluation" tab Button/symbol Meaning View history Print results report ( : function seca directprint PC software) seca 115 Position indicator for evaluation modules, in this case: second module of 5 Position indicator for evaluation parameters, in this case: second evaluation parameter of 4... -
Page 19: Identification On The Device And On The Type Plate
English 3.6 Identification on the device and on the type plate Text/symbol Meaning Manufacturer Fabr Model number Serial number, consecutive Follow Instructions for Use Do not use device on individuals with cardiac pacemakers or implanted defibrillators Medical electrical device, type BF Lithium-ion rechargeable battery Li-ion Device complies with EC directives... -
Page 20: Identification On The Packaging
Text/symbol Meaning USB interface Do not dispose of device with household waste 3.7 Identification on the packaging Protect from moisture Arrows indicate top of product. Transport and store in an upright position. Fragile Do not throw or drop. Permitted min. and max. temperature for transport and storage Permitted min. -
Page 21: Making The Device Operational
Power supply cable (country-specific) "Quick Start" brief instructions, printed DVD with PC software and license for seca analytics 115 one permanent workstation Push-button electrodes for affixing to patient, pack of 30 4.2 Establishing power supply 1. Plug the device connector of the power supply cable into the connecting socket of the device. -
Page 22: Suspending Measuring Mat In Storage Compartment
4.3 Suspending measuring mat in storage compartment The monitor's storage compartment contains the following functional ele- ments: • inductive charging interface: for charging the measuring mat recharge- able battery • infrared interface: for communicating between the monitor and the measuring mat ATTENTION Malfunction The measuring mat rechargeable battery can only be charged by... -
Page 23: Setting The Date And Time
► leave device switched on, charge rechargeable battery (recommended): ➔ Charging rechargeable batteries ► perform bioimpedance measurement using the power supply: ➔ Operation ► configure device using the power supply: ➔ For administrators: configur- ing seca 525 Making the device operational • 23... -
Page 24: Charging Rechargeable Batteries
➔ Network functions ➔ User role model ➔ For administrators: configuring seca 525 NOTE: This section is for your information. The device can only be configured by a user with administrator rights. • = possible, - = not possible Network functions... -
Page 25: User Role Model
• = possible, - = not possible User role model Function Administrator User seca Create patient files • • seca Call up patient files • Enter basic parameters • seca Edit patient files • seca Delete patient files • seca Restore patient files •... -
Page 26: Operation
5. OPERATION ➔ Switching system on/off ➔ Preparing seca patient file ➔ Measurement ➔ Evaluating the measurement 5.1 Switching system on/off ➔ Switching on ➔ Logging in ➔ Logging out/switching user ➔ Automatic standby ➔ Switching the monitor to standby ➔... -
Page 27: Logging In
5. Continue depending on your login. ► Logged in as a user: the patient tab is displayed. Continue with ➔ Preparing seca patient file ► Logged in as administrator: the administrator area is displayed. Continue with ➔ For administrators: configuring seca 525 Operation • 27... -
Page 28: Logging Out/Switching User
► Press the Logout button. Logging out/switching user Logout You will be logged out. The login window is displayed. Another user can log in ➔ Logging The device automatically switches to standby if there are no entries on the Automatic standby device for 5 minutes. -
Page 29: Preparing Seca Patient File
➔ Creating a seca patient file ➔ Entering basic parameters Before every measurement, you have to prepare a seca patient file in the Introduction patient tab. The prepared seca patient file is transmitted to the measuring mat. Preparation of the seca patient file includes the following items: •... -
Page 30: Creating A Seca Patient File
If you create seca patient files several times, this can lead to incorrect assignment of measured results and falsify the evaluation. ► If there is no seca patient file on the device for the current patient, check whether there is already a seca patient file in the seca 115 software. - Page 31 English ATTENTION! Restricted function If you press the Anonymous Patient field, the first input screen is skipped and an anonymous patient file is created. It is not possible to display any measured value graphs (histories) in anonymous patient files. ► Always fill in both input screens in order to be able to show mea- sured value graphs (histories).
-
Page 32: Entering Basic Parameters
Creating Entering basic parameters a seca patient file a new seca patient file, you must enter basic parameters so that the device can evaluate the measurement correctly. You can enter the values for basic parameters manually or take them from other sources: •... - Page 33 4. Repeat steps 2. and 3. for the remaining basic parameters. 5. Press the button. The seca patient file is prepared and is displayed. 6. Press the bia tab. The seca patient file is transmitted to the measuring mat. You can start with the measurement ➔ Measurement. Operation • 33...
-
Page 34: Measurement
3. Prepare the seca patient file ➔ Preparing seca patient file. 4. Press the bia tab. The seca patient file is transmitted to the measuring mat. 5. Enter the patient position using the button of the monitor. The patient position entered is displayed on the monitor. - Page 35 Progress Process step symbol symbol Electrodes being tested Measurement in progress seca patient file being updated on the measuring mat Updated seca patient file being transmitted to the monitor Measuring process complete 11. Remove the electrode cables from the electrodes.
-
Page 36: Performing Offline Measurement (Wifi Not Available)
3. Prepare the seca patient file ➔ Preparing seca patient file. 4. Press the bia tab. The seca patient file is transmitted to the measuring mat. 5. Enter the patient position using the button of the monitor. The patient position entered is displayed on the monitor. - Page 37 11. Suspend the measuring mat in the storage compartment of the monitor. The measuring mat symbol switches from The updated seca patient file is transmitted to the monitor. The measuring process is complete. You can now continue as outlined below.
-
Page 38: Connecting The Measuring Mat
8-point Connecting the measuring mat seca 525 method (measuring the whole body) with the patient in a lying position. Mea- surement by the 4-point method (right half of the body) is likewise possible. -
Page 39: Evaluating The Measurement
➔ Viewing the history of an evaluation parameter determines a series of evaluation parameters from the bio- Viewing the evaluation seca 525 impedance measurement and groups these in evaluation modules. 1. Press the evaluation tab. The module summary is displayed. -
Page 40: Viewing The History Of An Evaluation Parameter
3. Press an evaluation parameter. The detail view is displayed, in this case: Body Composition Chart. You have the following navigation options. ► Press the button to view the history of this evaluation parameter ➔ Viewing the history of an evaluation parameter ►... - Page 41 English 2. Press the button. All measurements for the current patient are displayed. The latest measurement is highlighted automatically. You have the following navigation options. ► Press the checkboxes : select values for history: continue with Step 3. ► Press the button: add a comment.
-
Page 42: Hygiene Treatment
6. HYGIENE TREATMENT ➔ Cleaning ➔ Disinfecting ➔ Sterilizing WARNING! Electric shock The device is not de-energized when the on/off key is pressed and the display goes out. Use of fluids on the device may cause electric shock. ► Ensure that the device is switched off before performing any hygiene treatment. -
Page 43: Function Check
“What do I do if ...” in this document, you may not use the device. ► Have the device repaired by seca service or by an authorized service partner. ► Follow the section entitled “Servicing” in this document. -
Page 44: What Do I Do If
No power supply Check whether power is being supplied Touchscreen display faulty Inform seca service • Switch off the device (press and hold the Device in undefined state following Touchscreen display not ON/OFF button for approx. 15 seconds) -
Page 45: Bioimpedance Measurement
• Suspend the measuring mat in the stor- age compartment of the device seca patient files cannot No WiFi connection • Call up seca patient file again, data will be be transmitted to the transmitted via the infrared interface measuring mat... -
Page 46: Data Connection
Creating a No seca patient file set up yet seca patient file seca patient file cannot be seca patient file is not assigned to the Check whether the seca patient file can be found when searching for a user in the... -
Page 47: Technical Data
Medical device in accordance with Directive 93/42/EEC Class IIa EN 60601-1: Medical electrical device, type BF Type of protection IP20 Operating mode Continuous duty seca 360° wireless USB 2.0 (max 500 mA) LAN: Ethernet (10/100 Base-T) Interfaces WiFi Infrared Inductive charging of rechargeable battery for measuring mat ®... -
Page 48: Measuring Mat
10.2 Measuring mat Measuring mat Dimensions • Depth 783 mm • Width 170 mm • Height 20 mm Net weight approx. 1 kg Ambient conditions, operation • Temperature +10 °C to +40 °C (50 °F to 104 °F) • Air pressure 700 hPa - 1060 hPa •... -
Page 49: Evaluation Parameters
English Evaluation parameters Evaluation parameters Display Evaluation module • Normal range display of R and X in co-ordi- Bioimpedance vector analysis Fluid nate system in relation to height (BIVA) Health risk • 50 %, 75 %, 95 % percentiles in the form of tolerance ellipses •... -
Page 50: Evaluation Modules
For some evaluation parameters, the reference used depends on the patient's ethnicity. The device automatically uses ethnicity-dependent refer- ences to suit the corresponding entry in the seca patient file ➔ Preparing seca patient file. -
Page 51: Accuracy Of Predictive Formulas
In the USA, a study was conducted with 130 healthy adults of different ethnicities. The aim of the study was to validate the pa- rameters determined using seca's in-house formulas against clinically-established reference methods. The results of this compar- ative study are shown in the table above. -
Page 52: Optional Accessories
11.OPTIONAL ACCESSORIES Accessory Article number devices: seca 360° wireless Measuring stations • Country-specific versions seca 285 seca 284 Length measuring devices • Country-specific versions seca 274 • Country-specific versions seca 264 Personal scales • Country-specific versions seca 704 seca 703 Multifunctional and platform scales •... -
Page 53: Warranty
The warranty shall become null and void where the device is opened by per- sons not expressly authorised to do so by seca. We ask customers based abroad to contact their local sales agent directly in the case of warranty claims. -
Page 54: For Administrators: Configuring Seca 525
➔ Preparing configuration System data ➔ ➔ Measuring mode Instructions for use for seca 525 ➔ Data connection NOTE: • This part of the user documentation contains information about configuring the device for measuring mode and for integration in a PC network. -
Page 55: Measuring Mode
English 2. MEASURING MODE ➔ Administering the user database ➔ Administering the seca patient database ➔ Deactivating evaluation modules ➔ Modifying default settings ➔ Setting units of measurement 2.1 Administering the user database ➔ Setting up a user account ➔... - Page 56 User accounts without password protection should only be set up for special applications (e.g. configuring inter- faces to practice or hospital information systems). seca service would be pleased to help you if you have any questions relating to "interface configuration".
-
Page 57: Editing A User Account
4. Edit the user account to the extent necessary. NOTE: • If automatic synchronization is activated, changes which you make to user accounts are automatically adopted into the seca 115 software ➔ Activating automatic synchronization. • The user name cannot be changed. If you want to change the user name, first set up a user account with the new user name and then delete the original user account ➔... -
Page 58: Deleting A User Account
If you create seca patient files several times, this can lead to incorrect assignment of measured results and falsify the evaluation. ► If there is no seca patient file on the device for a patient, check whether there is already a seca patient file in the... -
Page 59: Creating A Seca Patient File
3. Create a seca patient file as described in the relevant section of the Instructions for Use ➔ Creating a seca patient file. 1. Call up a seca patient file as described in the relevant section of the Editing a seca patient file Instructions for Use ➔... -
Page 60: Restoring A Seca Patient File
3. Press the checkboxes of all seca patient files you would like to restore. 4. Press the button. restore The marked seca patient files will be moved to the patient list and be available for measuring mode again. 60 •... -
Page 61: Deactivating Evaluation Modules
Health risk the basic parameters Waist circumference Physical Activity will not be interrogated ➔ Preparing seca patient file. Level • Settings you make in this tab are active directly. You do not need to save or confirm them. Measuring mode • 61... -
Page 62: Modifying Default Settings
The settings for date and time are not automatically synchronized with the settings in the PC software. Different date and time seca 115 information may lead to measurements being misinterpreted. ► Ensure that the same settings for date and time are made both on the device and in the PC software. -
Page 63: Calibrating Touchscreen Display
English 1. Press the tab. Calibrating touchscreen display settings 2. Press the button. calibrate touchscreen 3. Confirm that you wish to proceed. The calibration display appears. 4. Press the symbol. The symbol changes position. 5. Press the symbol again. The symbol changes its position again. 6. -
Page 64: Setting Display Brightness And Volume
1. Press the tab. Setting display brightness and settings volume 2. Press the button. Brightness/volume 3. Press the buttons as appropriate. ► Set display brightness ► Set volume for warning and information sounds ► Set volume for button sounds Amended settings can immediately be seen/heard each time a button is pressed. -
Page 65: Setting Units Of Measurement
English 2.5 Setting units of measurement CAUTION! Patient hazard In order to avoid misinterpretations, test results for medical use must be displayed and used in SI units (weight: kilogrammes, length: metres) only. Some devices offer the ability to display test results in other units. -
Page 66: Data Connection
Setting up LAN connection (stationary operation) ➔ Setting up WiFi connection (mobile operation) ➔ Setting up a connection to the seca analytics 115 PC software ➔ Setting up the seca 360° wireless network 3.1 Setting up LAN connection (stationary operation) ➔... -
Page 67: Checking Direct Wifi Connection To Measuring Mat
English 3. Make the relevant settings for your network. ► Enter IP address ► Enter netmask ► Enter default gateway symbol is displayed on the monitor. The LAN connection is set up. NOTE: Settings you make in this tab are active directly. You do not need to save or confirm them. -
Page 68: Setting Up Wifi Connection (Mobile Operation)
525 Monitor WiFi: Monitor/Measuring mat WiFi: seca 525/seca 115 The monitor and the PC software communicate via the WiFi connection. The monitor and the measuring mat likewise communicate via the WiFi connec- tion. It is not possible for the measuring mat and the PC software to commu- nicate directly. -
Page 69: Deactivating/Activating Wifi
English 4. Make the applicable setting for your WiFi network. ► Visible network: press the button. scan WiFi ► Hidden network: press the button Hidden Network 5. Enter the SSID for your network. ► Visible network: select SSID from dropdown menu ►... -
Page 70: Setting Up A Connection To The Seca Analytics 115 Pc Software
3.3 Setting up a connection to the seca analytics 115 PC software ➔ Introduction ➔ Setting up PC connection on an automated basis (UDP) ➔ Setting up PC connection manually On the tab, you can connect the device to the... -
Page 71: Setting Up Pc Connection Manually
IP address. Communication Server IP Configuration IP address The IP address of the PC on which PC software as a PC software was seca 115 seca 115 client/server solution installed with the options Server Complete PC software as a... -
Page 72: Setting Up The Seca 360° Wireless Network
3.4 Setting up the seca 360° wireless network ➔ Activating/deactivating the seca 360° wireless module ➔ Setting up a seca 360° wireless connection If you use devices from the system in your institution, e.g. Introduction seca 360° wireless a measuring station, you can link them to the . -
Page 73: Setting Up A Seca 360° Wireless Connection
English 1. Ensure that the modules of the and all the Setting up a seca 360° wireless seca 360° wireless seca 525 devices you want to connect to the are activated. connection seca 525 2. Switch off all the devices you want to connect to the seca 525 3. -
Page 74: System Data
2. Press the checkbox. Synchronize automatically with seca PC software Automatic synchronization is activated. NOTE: • The data are synchronized as soon as they are changed either on the device or in the PC software. No further settings are required. -
Page 75: Setting Up Automatic Export
Activating automatic synchronization. seca 115 • Note the user documentation for the practice or hospital information system used. • seca service would be pleased to help you if you have any questions relating to "interface configuration". System data • 75... -
Page 76: Exporting Patient And User Data Manually
This function allows you to export seca patient files and user accounts in Exporting patient and user data order to create a backup copy, for example. manually 1. Press the tab. synchr. 2. Connect a USB memory stick to the monitor. -
Page 77: System Information
This function allows you to update the software of the monitor and the Updating software measuring mat. ATTENTION! Loss of data The device will be reset to factory settings. seca patient files and user accounts will be deleted. ► Export seca patient files and user accounts manually updat- before ing the software (operate without PC software). -
Page 78: Exporting The System Log
8. Follow the on-screen instructions. This function allows you to export the system log and make it available to Exporting the system log seca service for support purposes, for example. 1. Press the tab. system 2. Press the button. -
Page 79: Resetting Gui
(GUI) to factory Resetting GUI system settings ➔ Factory settings. NOTE: This function retains seca patient files and user accounts. If you want to reset the device completely, proceed as described in the section entitled ➔ Resetting device. 1. Press the tab. -
Page 80: Factory Settings
North America Decimal point Energy Reference resting energy expenditure FAO/WHO/UNU Connection data None WiFi Direct WiFi Connection data None seca 360° wireless Connection data None PC softw. Communication Server IP 0.0.0.0 TCP Port 20010 UDP Port 20011 File Transfer Port... -
Page 81: Resetting Device
PC software). seca 115 ► Synchronize the data resetting (operate with seca 115 before software). ► If you want to retain the seca patient files and user accounts, simply reset the GUI ➔ Resetting GUI. 1. Press the tab. reset 2. -
Page 82: Declarations Of Conformity
Changes or modifications made to of the FCC Rules and with RSS- this equipment not expressly 210 of Industry Canada. Operation approved by seca may void the is subject to the following two FCC authorization to operate this conditions: equipment. -
Page 83: For Europe
For Europe Konformitätserklärung Declaration of conformity Certificat de conformité Dichiarazione di conformità Declaratión de conformidad Overensstemmelsesattest Försäkran om överensstämmelse Konformitetserklæring Vaatimuksenmukaisuusvakuutus Verklaring van overeenkomst Declaração de conformidade Δήλωση Συμβατότητας Prohlášení o shodĕ Vastavusdeklaratsioon Megfelelőségi nyilatkozat Atitikties patvirtinimas Atbilstības apliecinājums Deklaracja zgodnościi Izjava o skladnosti Vyhlásenie o zhode Onay belgesi... - Page 84 Ezen kívül többek között a következő normák alkalmazhatók: ... erfüllt die geltenden Anforderungen folgender Richtlinien: EN 300 328, EN 301 489-1 és -17 az elektromágneses összeférhetőségi- és 93/42/EWG über Medizinprodukte, 2011/65/EU zur Beschränkung der Ver- rádióspektrum ügyekről. wendung bestimmter gefährlicher Stoffe in Elektro- und Elektronikgeräten, 1999/5/EG über Funkanlagen und Telekkommunikationsendeinrichtungen ...
- Page 85 EN 300 328, tostiach rádiového spektra. EN 301 489-1 ve -17. Hamburg, December 2015 Frederik Vogel CEO Development and Manufacturing seca gmbh & co. kg Hammer Steindamm 9-25 22089 Hamburg Germany Phone: +49 40 20 00 00 0...
Need help?
Do you have a question about the 525 and is the answer not in the manual?
Questions and answers