
Related Manuals for Avaya UC


Summary of Contents for Avaya UC
- Page 1 IP Office Unified Communications Module Installation and Maintenance 15-601011 Issue 03l – (28 August 2012)
- Page 2 Avaya is not responsible for the contents or reliability of any linked Web sites consent of Avaya can be a criminal, as well as a civil, offense under the referenced within this site or documentation(s) provided by Avaya. Avaya is applicable law.
-
Page 3: Table Of Contents
Contents Contents Server Menus 6.1 Home ..............63 The Unified Communications Module 6.2 Logs ..............64 6.2.1 View ................64 1.1 Unified Communications Module ..............8 6.2.2 Download ................65 1.2 Using Linux ..............10 6.3 Updates ..............66 1.3 Additional Documentation .............. -
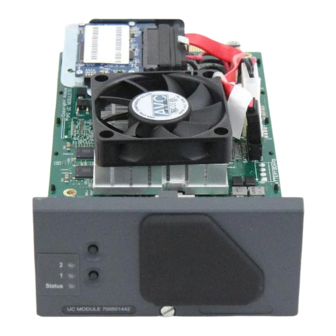
Page 5: The Unified Communications Module
Chapter 1. The Unified Communications Module Unified Communications Module Installation and Maintenance Page 5 IP Office 15-601011 Issue 03l (28 August 2012) - Page 7 The Unified Communications Module: 1. The Unified Communications Module The Unified Communications Module is an IP500 base card supported by IP500 V2 systems running IP Office Release 8.0 or higher software. The module is supported by systems running in IP Office Essential Edition, IP Office Preferred Edition or IP Office Advanced Edition mode and acts as an automatic PREFERRED EDITION license for such systems.
-
Page 8: Unified Communications Module
1.1 Unified Communications Module This module is supported for IP Office Release 8.0 Q1 2012 Service Pack and higher. The module is an embedded server that allows Linux based IP Office applications to be run within the IP Office control unit rather than requiring a separate ·... - Page 9 The Unified Communications Module: Unified Communications Module LEDs The Unified Communications Module provides the following LEDs: · Upper LEDs · Orange: Module BIOS starting. · Lower LED · Solid Red: Unpacking and initializing. · Flashing Red: Module initialization. · Flashing Green: Module operating system starting or shutting down. ·...
-
Page 10: Using Linux
. Using the Linux command line to perform any other actions may cause unexpected operation of the Unified Communications Module and is not supported except when specifically instructed by Avaya. 1.3 Additional Documentation In addition to reading this manual, you should also have, have read and be familiar with the following manuals before attempting to install a Unified Communications Module system. -
Page 11: Network Configuration Limitations
The Unified Communications Module: Additional Documentation 1.4 Network Configuration Limitations The IP Office control unit has two physical LAN interfaces: LAN1 and LAN2. The ports labeled LAN and WAN respectively. Traffic between the IP Office control unit and the Unified Communications Module is on LAN1 of the IP Office system. Scenarios where users of the Unified Communications Module applications, especially one-X Portal for IP Office, are accessing the IP Office and thus the Unified Communications Module via the IP Office system's LAN2 (WAN) port should be avoided for more than 30 users. -
Page 12: Licenses
1.6 Licenses The use of various features are licensed, for example, which users are able to use the one-X Portal for IP Office application. These licenses are entered into the IP Office configuration. For the Unified Communications Module it is important to understand the role of the following system licenses: ·... -
Page 13: Module Installation
Chapter 2. Module Installation Unified Communications Module Installation and Maintenance Page 13 IP Office 15-601011 Issue 03l (28 August 2012) -
Page 14: 2. Module Installation
2. Module Installation Pre-Requisites · This manual assumes that the installer is already experienced with the installation of an IP500 V2 system, including the installation of IP500 base cards. It also assumes that the installer is familiar with the configuration of a IP Office system using IP Office Manager and System Status Application. -
Page 15: Ip Address Notes
Module Installation: 2.1 IP Address Notes During installation the Unified Communications Module is assigned an IP address. The Unified Communications Module can also use DHCP to obtain an address. It can also be given a DNS name. The IP500 V2 system has two physical LAN interfaces: LAN1 and LAN2. The ports labeled LAN and WAN respectively. The Unified Communications Module is physically connected to the LAN1 network of the system and needs to have an address on that subnet. -
Page 16: Ip Office Configuration
Change the setting to SNTP. The additional fields for setting the address of the time server or servers to use are displayed. · To Set the Time Manually Change the setting to None. The system's time and date are now set through the menu of an Avaya phone user who has System Phone Rights. 4. Click on the save icon to send the configuration back to the IP Office. -
Page 17: System Shutdown
Module Installation: IP Office Configuration 2.3 System Shutdown Before adding or removing any hardware from the IP Office system, it must be shutdown using one of the shutdown methods below. Failing to shutdown the system correctly may cause lose of configuration data. WARNINGS ·... -
Page 18: Inserting The Module
2.4 Inserting the Module Once the system has been shutdown , the module can be inserted. WARNINGS · · Correct anti-static protection steps should be taken while handling circuit boards. · Cards must never be added to or removed from the control unit while it has power connected. ·... -
Page 19: Initializing The Module Services
Module Installation: Inserting the Module 2.5 Initializing the Module Services Following installation and start up of the newly installed module, the services provided by the module need to be started and initialized. This is done via web browser access to the module. 1. - Page 20 5. Enter the IP address and DNS settings that the module should use. These will be used for future access to the module and its applications. 6. Select the services that you want the Unified Communications Module to provide for the Unified Communications Module system.
- Page 21 Module Installation: Initializing the Module Services 8. Click Next. Enter basic details for the module. · The default setting for the NTP Server is 169.254.0.1. This is an internal address for the IP Office system. If this address is used, the IP Office system must be configured to gets its time from an external source or to have its time set manually.
- Page 22 11.Once configuration is complete, the module will restart with the new settings. 12.The module will attempt to redirect your browser to the module's new IP address. If this does not succeed you will have to enter the new address manually. However, whichever way you will need to login again. You should now see server configuration menus 13.Though the module and the selected services have been started, additional configuration to support those services may be required.
-
Page 23: System And Module Start Up
2. Select System. The System Hardware Summary includes the UC Module. 3. Under System in the navigation tree, click on UC Module. Details of the module are displayed. The buttons at the bottom of the display can be used to shutdown and startup the module. -
Page 24: Logging On To The Web Menus
2.7 Logging on to the Web Menus 1. From a client PC, start the browser and enter http:// followed by the address of the Unified Communications Module and :7070. The port number used can be changed through the Settings | General page after logging 2. - Page 25 Module Installation: Logging on to the Web Menus 5. If the login was successful, the Home page for the server is displayed. Unified Communications Module Installation and Maintenance Page 25 IP Office 15-601011 Issue 03l (28 August 2012)
-
Page 26: Changing The Web Password
2.8 Changing the Web Password From the Logon menu you can select the Change Password option to perform a password change. When selected, fields are displayed to entry the current password and for entry and confirmation of the new password. This password is also used for SSH file access to the server. -
Page 27: Upgrading Software
· Read the Technical Bulletins Ensure that you have read and understood all Avaya Technical Bulletins relevant to the software release. These will include notes and information that was not available at the time this document was created. Unified Communications Module Installation and Maintenance... - Page 28 Upgrading Software Login to the server's web configuration pages. 2. Select the Settings menu and then the General sub-menu. 3. Check that the Local checkbox for Applications is selected. 4. Click on the Browse button and browse to the location of the file that you want to load and select the file.
-
Page 29: Voicemail Pro Configuration
Chapter 3. Voicemail Pro Configuration Unified Communications Module Installation and Maintenance Page 29 IP Office 15-601011 Issue 03l (28 August 2012) -
Page 30: 3. Voicemail Pro Configuration
3. Voicemail Pro Configuration By default the Voicemail Pro application will provide basic mailbox services for all users and hunt groups created in the IP Office configuration. For installations with just a single IP Office and Voicemail Pro server this will normally occur without any further configuration. -
Page 31: Adding Voicemail Licenses
Voicemail Pro Configuration: 3.1 Adding Voicemail Licenses The Unified Communications Module automatically enables 4 port for Voicemail Pro operation. Additional ports can be licensed for up to 20 users when running Voicemail Pro and one-X Portal for IP Office, or up to 40 when running just Voicemail Pro. -
Page 32: Ip Office Configuration
3.2 IP Office Configuration When a new Unified Communications Module running Voicemail Pro is added to a new system, the system configuration is automatically adjusted to use that voicemail server. However, this should be confirmed by checking the Voicemail Type and Voicemail IP Address settings in the IP Office configuration. -
Page 33: Installing The Voicemail Pro Client
Voicemail Pro Configuration: IP Office Configuration 3.3 Installing the Voicemail Pro Client The client for the Voicemail Pro server must be installed on a Windows PC. It can then be used to remotely administer the voicemail server. The software package for installing the client can be downloaded from the Unified Communications Module using the following process. -
Page 34: Logging In To The Voicemail Server
3.4 Logging in to the Voicemail Server To connect to a remote voicemail server you will need to login using the name and password of an administrator account already configured on that server. The default account is Administrator and Administrator. To Login with the Voicemail Pro Client 1. -
Page 35: Changing The Voicemail Server Password
Voicemail Pro Configuration: Logging in to the Voicemail Server 3.5 Changing the Voicemail Server Password While logged in to the server using the Voicemail Pro client, you can change the password of the Voicemail Pro administrator account being used. The default password of the default account must be changed. You can also create additional administrator accounts, refer to the Voicemail Pro Administrator manual. -
Page 36: Transferring Voicemail Server Settings
The backup location can be selected before starting the backup. The default location for backup files is C: \Program Files\Avaya\IP Office\Voicemail Pro\Backup\Scheduled. 1. Using My Computer, locate the manual backup taken above. The date and time is part of the folder name for the backup. - Page 37 Voicemail Pro Configuration: Transferring Voicemail Server Settings · Linux Server The default location for backup files on a Linux server is /opt/vmpro/Backup/Scheduled/OtherBackups. 1. Using an SSH file transfer tool , connect to the old server and browse to is /opt/vmpro/Backup/ Scheduled/OtherBackups.
-
Page 38: Backup/Restore Limitations
3.7 Backup/Restore Limitations If extra folders have been manually created on the voicemail server, on Linux based voicemail servers these folders are not included in the restore process. Instead the extra folders need to be copied manually. For example, if a folder containing custom prompts for use in call flows has been created separate from the default language folders used for prompts, that folder will not be backed up or restored. -
Page 39: One-X Portal For Ip Office Configuration
Chapter 4. one-X Portal for IP Office Configuration Unified Communications Module Installation and Maintenance Page 39 IP Office 15-601011 Issue 03l (28 August 2012) -
Page 40: 4. One-X Portal For Ip Office Configuration
4. one-X Portal for IP Office Configuration At this stage, the one-X Portal for IP Office server software has been installed on the IP Office Application Server and its service started. However, both the IP Office and the one-X Portal for IP Office still require some configuration. The following sections are a summary applicable to most installations. -
Page 41: Adding Licenses
one-X Portal for IP Office Configuration: 4.1 Adding Licenses In order to log into and use the one-X Portal for IP Office application, a user must have their Profile setting in the IP Office configuration set to one of the following user profile roles: Office Worker, Teleworker or Power User. To do that first requires a matching Office Worker, Teleworker or Power User license to be available. -
Page 42: Enabling One-X Portal For Ip Office Users
4.2 Enabling one-X Portal for IP Office Users Those users who want to use the one-X Portal for IP Office application need to have their Profile set to Office Worker, Teleworker or Power User and the Enable one-X Portal Services option selected. This requires available licenses for those roles. -
Page 43: Initial One-X Portal For Ip Office Login
one-X Portal for IP Office Configuration: Enabling one-X Portal for IP Office Users 4.3 Initial one-X Portal for IP Office Login The method of initial one-X Portal for IP Office configuration may vary: · If both one-X Portal for IP Office and Voicemail Pro applications were selected as part of a module initialization, no further configuration is required. -
Page 44: Initial Afa Login
4.4 Initial AFA Login The AFA menus provided by one-X Portal for IP Office are used to perform backup and restoration operations for the application. The default password used for the menus should be changed. AFA Login 1. Open a web browser and enter the IP address of the Unified Communications Module followed by :8080/ onexportal-afa.html. -
Page 45: Server Maintenance
Chapter 5. Server Maintenance Unified Communications Module Installation and Maintenance Page 45 IP Office 15-601011 Issue 03l (28 August 2012) - Page 46 5. Server Maintenance The main configuration and control of the Unified Communications Module is done via web browser access. After logging in using the administrator name and password, you are able to view the status of the services provided by the server and to perform actions such as stopping or starting those services.
-
Page 47: Logging In
Server Maintenance: 5.1 Logging In 1. From a client PC, start the browser and enter http:// followed by the address of the Unified Communications Module and :7070. The port number used can be changed through the Settings | General page after logging 2. - Page 48 5. If the login was successful, the Home page for the server is displayed. Unified Communications Module Installation and Maintenance Page 48 IP Office 15-601011 Issue 03l (28 August 2012)
-
Page 49: Changing The Web Password
Server Maintenance: Logging In 5.2 Changing the Web Password From the Logon menu you can select the Change Password option to perform a password change. When selected, fields are displayed to entry the current password and for entry and confirmation of the new password. This password is also used for SSH file access to the server. -
Page 50: Starting/Stopping Application Services
5.3 Starting/Stopping Application Services The application services installed on the Unified Communications Module can be started and stopped individually. This may be necessary for maintenance or if a particular service is not currently required, for example if one-X Portal for IP Office has been installed but is not wanted or currently licensed. -
Page 51: Server Shutdown
Server Maintenance: Starting/Stopping Application Services 5.4 Server Shutdown This process should be used when it is necessary to switch off the Unified Communications Module for any period. Once the process has been completed, power to the server can be switched off. To restart the server, switch the server power back on. -
Page 52: Changing The Ip Address Settings
5.6 Changing the IP Address Settings The IP address and other network settings used by the server can be changed through the server's web configuration pages. · Warning Changing IP address and other network settings will require you to login again. If the server is using DHCP or is switched to DHCP, the address obtained for the server is displayed on the server's command line display. -
Page 53: Date And Time Settings
Server Maintenance: Changing the IP Address Settings 5.7 Date and Time Settings The date and time settings used by the server PC can be changed through the server's web configuration pages. By default the Unified Communications Module is set to use NTP with the NTP server address set to 169.254.0.1 which is the IP Office system. -
Page 54: Upgrading Applications
Before upgrading or changing the version of any installed application or operating system components, you must ensure that you have read the appropriate Avaya Technical Bulletins for the software release. The Technical Bulletins detail supported versions of software and known issues or additional actions required for upgrading. -
Page 55: Upgrading Application Files
Server Maintenance: Upgrading Applications 5.8.2 Upgrading Application Files Where multiple versions of a software component are available to the server, the web menus can be used to update or change the current version installed. Login to the server's web configuration pages. 2. -
Page 56: Uninstalling An Application
5.9 Uninstalling an Application The Updates menu can also be used to uninstall an application service. When uninstalled the application is removed from the list of available service unless files for reinstallation are present in the configured file repository. Login to the server's web configuration pages. -
Page 57: File Repositories
Before upgrading or changing the version of any installed application or operating system components, you must ensure that you have read the appropriate Avaya Technical Bulletins for the software release. The Technical Bulletins detail supported versions of software and known issues or additional actions required for upgrading. -
Page 58: Uploading Local Files
5.10.3 Uploading Local Files The processes below can be used to upload files to the server if it is being used as a repository for that type of file. 5.10.3.1 Uploading Application Files This method uploads the .rpm file for an application onto the Unified Communications Module. The files can then be used to update the applications. -
Page 59: Creating Remote Software Repositories
Server Maintenance: File Repositories 5.10.4 Creating Remote Software Repositories Alternatively to using local files uploaded to the server for updates, the server can be configured to display the versions of files available for use in remote file folders hosted on an HTTP server. Creating an Application Update Repository 1. -
Page 61: Server Menus
Chapter 6. Server Menus Unified Communications Module Installation and Maintenance Page 61 IP Office 15-601011 Issue 03l (28 August 2012) -
Page 62: Unified Communications Module Installation And Maintenance
6. Server Menus The Unified Communications Module web configuration pages are as follows: Home · This menu gives an overview of the current status of the server and the application services it is hosting. Logs · This menu has sub-menus for viewing and managing log records and log files. View ·... -
Page 63: Home
Server Menus: 6.1 Home The Home menu provides an overview of the server status including the status of the application services running on the server. · Services This table lists the services being supported by the server. In addition to showing the status of the service, it also contains buttons to start/stop each service and to select whether the service should be automatically started whenever the server is started. -
Page 64: Logs
6.2 Logs The logs menu is divided into two sub-menus: View · View the current log files for the server and the application services hosted by the server. Download · Create and download archive files of existing log records. 6.2.1 View This page of the web browser interface can be used to view application logs and audit log records. -
Page 65: Download
Server Menus: Logs 6.2.2 Download This page is used to create, manage and download archives of previous log files. The log files are compressed into an archive file which can then be downloaded by clicking on the link. The archive files are in .tar.gz format. The log files within this type of archive file can be extracted by a range of utility applications including WinZip. -
Page 66: Updates
Before upgrading or changing the version of any installed application or operating system components, you must ensure that you have read the appropriate Avaya Technical Bulletins for the software release. The Technical Bulletins detail supported versions of software and known issues or additional actions required for upgrading. -
Page 67: Services
Server Menus: Updates 6.3.1 Services This section shows details of the current version of each application installed and the latest version available. · The behavior of the Change Version, Update and Update All buttons in the panel are not useable unless appropriate update files are available in the applications software repository . -
Page 68: System
6.3.2 System This section shows details of the operating system and whether there are updates available. · Check Now Clicking this button makes the Unified Communications Module recheck the version of update files available in the file repository. Normally it does this automatically when the Updates page is loaded. ·... -
Page 69: Settings
Server Menus: Updates 6.4 Settings This menu has sub-menus for various areas of server configuration and operation. General · General server settings such as the locations of software update repositories. System · View and manage the server setting for date, time and IP address details. 6.4.1 General Unified Communications Module Installation and Maintenance Page 69... - Page 70 Software Repositories The Unified Communications Module can use either remote or local software repositories to store software update files. Separate repositories are configured for operating system updates, IP Office application installation files and Windows client files. The files uploaded or present in the file repositories are used by the Updates Windows Clients menus.
-
Page 71: System
Server Menus: Settings 6.4.2 System These settings allow the IP address and time settings specified during installation to be changed. Network · Network Interface This field is fixed to eth0.1. · Host Name Sets the host name that the Unified Communications Module should use. This setting requires the local network to support a DNS server. - Page 72 Date Time These settings are used to set or obtain a UTC date and time value for use by the Unified Communications Module and services. · Date Shows the current date being used by the server. If Enable Network Time Protocol is selected, this is the date obtained from the NTP server and cannot be manually changed.
-
Page 73: Windows Clients
Server Menus: Settings 6.5 Windows Clients This page is used to download files for use on the local PC. For example, the Voicemail Pro client used to administer the Voicemail Pro server application. The file repository location is configured through the Settings | General page. -
Page 75: Module Maintenance
Chapter 7. Module Maintenance Unified Communications Module Installation and Maintenance Page 75 IP Office 15-601011 Issue 03l (28 August 2012) - Page 76 7. Module Maintenance The following sections cover various Unified Communications Module maintenance processes: Module LEDs · Module Buttons · Module Removal · Attaching a Monitor and Keyboard · Loading Windows Voicemail Server Settings · Module Battery · Module Software Reinstall ·...
-
Page 77: Module Leds
Module Maintenance: 7.1 Module LEDs The Unified Communications Module provides the following LEDs: · Upper LEDs · Orange: Module BIOS starting. · Lower LED · Solid Red: Unpacking and initializing. · Flashing Red: Module initialization. · Flashing Green: Module operating system starting or shutting down. ·... -
Page 78: Module Removal
7.3 Module Removal Before adding or removing any hardware from the IP Office system, it must be shutdown using one of the shutdown methods below. Failing to shutdown the system correctly may cause lose of configuration data. WARNINGS · · A shutdown must always be used to switch off the system. Simply removing the power cord or switching off the power input may cause the loss of configuration data. -
Page 79: Attaching A Monitor And Keyboard
Module Maintenance: Module Removal 7.4 Attaching a Monitor and Keyboard The Unified Communications Module and its applications are designed for remote maintenance only, via web browser and or client applications running on a PC networked to the IP Office system. However, during some processes may require direct attachment of a monitor and keyboard. -
Page 80: Transferring Voicemail Server Settings
The backup location can be selected before starting the backup. The default location for backup files is C: \Program Files\Avaya\IP Office\Voicemail Pro\Backup\Scheduled. 1. Using My Computer, locate the manual backup taken above. The date and time is part of the folder name for the backup. - Page 81 Module Maintenance: Transferring Voicemail Server Settings · Linux Server The default location for backup files on a Linux server is /opt/vmpro/Backup/Scheduled/OtherBackups. 1. Using an SSH file transfer tool , connect to the old server and browse to is /opt/vmpro/Backup/ Scheduled/OtherBackups. 2.
-
Page 82: Module Battery
7.6 Module Battery The Unified Communications Module includes a Lithium coin cell battery. If the module is no longer required, care must be taken to ensure that the battery is removed and disposed of correctly. The battery can be removed from its holder by bending the tab out the way and then pulling the battery upwards. -
Page 83: Upgrading Software
· Read the Technical Bulletins Ensure that you have read and understood all Avaya Technical Bulletins relevant to the software release. These will include notes and information that was not available at the time this document was created. Unified Communications Module Installation and Maintenance... - Page 84 Upgrading Software Login to the server's web configuration pages. 2. Select the Settings menu and then the General sub-menu. 3. Check that the Local checkbox for Applications is selected. 4. Click on the Browse button and browse to the location of the file that you want to load and select the file.
-
Page 85: Module Software Reinstallation
.iso file. When necessary, Avaya will make such images available along with appropriate installation notes for setting up the USB2 memory device. This method of upgrading should only be used when absolutely necessary. Upgrading by uploading and installing new .rpm files... - Page 86 Click Initiate. 3. Load the image file: a. From the Avaya support web site (http://support.avaya.com) download the new .iso image file for the Unified Communications Module. b. View the files on the USB2 memory device using file manager or similar. Open the C110iso folder.
- Page 87 Module Maintenance: Module Software Reinstallation Preparing a USB2 Memory Device using Linux The USB Initiator application includes the files necessary to also manually prepare a USB2 memory device on a Linux PC. Within the zip file for the application download, copy the contents of the /Manual folder. This contains the files ks.cfg and syslinux.cfg.
- Page 88 Booting and Loading a New Image from a USB2 memory device 1. Using either of the processes above prepare a USB2 memory device with the required .iso file. 2. Remove the plastic cover from the front of the faceplate of the card. The cover must be retained and must be reattached after this process is completed.
-
Page 89: Additional Processes
Chapter 8. Additional Processes Unified Communications Module Installation and Maintenance Page 89 IP Office 15-601011 Issue 03l (28 August 2012) -
Page 90: Changing The Root Password
3. Enter root. At the password prompt, enter the current root user password. 4. The prompt should have changed to something similar to root@uc~, indicating that you are now logged in as the root user. You can now change the password used for the root user. -
Page 91: Ssh File Transfers
Additional Processes: Changing the Root Password 8.2 SSH File Transfers The directory structure of files on the server can be accessed using any file transfer tool that supports SFTP/SSH. For example WS_FTP or SSH Secure Shell. 1. Start your SFTP or SSH file application and connect to the Unified Communications Module PC. The exact method will depend on the application being used. -
Page 92: Command Line
8.3 Command Line There are a range of Unified Communications Module commands that can be performed from the server's command line when logged in as the webcontrol user. The commands are grouped into three tiered sets, each set protected by a separate password. -
Page 93: General Commands
/opt/vmpro/Backup/Scheduled/Immediate/VMPro_Backup_07122011075040|Immediate|Immediate|2011-12-07 </Backups> · show config Show a summary of the applications being supported by the Unified Communications Module. > show config Services Repository: http://www.avaya.com/support/ipoffice/ OS Repository: http://www.avaya.com/support/centos/ Applications Version Boot at startup Voicemail Pro: 6.0.20.1, on. one-X Portal: 6.0.20.1, off. - Page 94 · show time Show the current date and time on the server. > show time Current date and time: 15:30:00 - 21 Apr 2010 · show updates <application> Show the current version of the application and the versions available in the updates repository. >...
-
Page 95: Administrator Commands
Additional Processes: Command Line 8.3.2 Administrator Commands The Admin> prompt is accessed by entering admin at the > general command prompt and then entering the administrator password (the default password is Administrator). In the commands below, <application> is replaced with name of the required application: voicemail, onexportal, watchdog or all. -
Page 96: Configuration Commands
8.3.3 Configuration Commands The Configure> prompt is accessed by entering configure at the Admin> prompt and then entering the configurator password (the default password is Configurator). In the commands below, <application> is replaced with name of the required application: voicemail, onexportal, watchdog or all. - Page 97 Additional Processes: Command Line Unified Communications Module Installation and Maintenance Page 97 IP Office 15-601011 Issue 03l (28 August 2012)
-
Page 99: Index
Index Local 69 Index Log Files Age 69 Logging In 47 Address Login 34 52, 71 Administrator 52, 71 Logs 64 Administrator Application Login Archive Application Audit Install Download Uninstall Log Files Age Upgrade Application Logs 64 Mask 52, 71 Archive 65 Memory Audit Log 64... -
Page 100: Issue 03L (28 August
Service Uninstall Upgrade Services 67 Start Starting Status Stop Stopping Settings 69 SFTP 91 Show 93 Shutdown 51, 63 SNMP 69 SNMP Support 69 Software 34 Repositories Software Repositories 69 SSH access 91 Start 95 Start Services 63 Startup 96 Status 63 Stop 95 Stop Services 63... - Page 101 Unified Communications Module Installation and Maintenance Page 101 IP Office 15-601011 Issue 03l (28 August 2012)
- Page 102 Performance figures and data quoted in this document are typical, and must be specifically confirmed in writing by Avaya before they become applicable to any particular order or contract. The company reserves the right to make alterations or amendments to the detailed specifications at its discretion. The publication of information in this document does not imply freedom from patent or other protective rights of Avaya or others.
Need help?
Do you have a question about the UC and is the answer not in the manual?
Questions and answers