Maxxair MAXXFAN 4401K Installation Instructions, Information And Operating Manual
Hide thumbs
Also See for MAXXFAN 4401K:
Table of Contents
Advertisement
MAXXFAN
INSTALLATION INSTRUCTIONS,
INFORMATION AND OPERATING GUIDE
FOR MAXXFAN
4000K • 4001K • 4050K • 4301K • 4401K • 4500K • 4501K • 4801K
READ AND SAVE THESE INSTRUCTIONS
NOTE: Refer to Installation Instructions, Information and Operation Guides regarding the
model you have purchased.
The MAXXFAN installs into a standard RV roof opening of 14 by 14 inches.
To determine if your roof opening is correctly sized, simply remove the interior ceiling garnish
trim ring of your existing roof vent and measure the ceiling opening or verify the opening is
large enough by sliding the MAXXFAN interior Garnish trim ring into the opening.
The MAXXFAN is designed for a minimum roof thickness of 2 inches to a maximum of
6 1/2 inches. If your roof thickness is less than 2 inches, build additional thickness at the
ceiling opening using wood or other suitable material.
The MAXXFAN requires a minimum 12 Volt DC, 5 amp service. Confirm that the circuit
you intend to use will accommodate the additional load. Use the proper gauge stranded
wire for electrical connections.
WARNING!
in the manner intended by AIRXCEL, INC. Should you have questions, please contact
AIRXCEL/MAXXAIR VENTILATION SOLUTIONS Customer Service at 316.832.4357.
and MAXXFAN
®
To reduce risk of fire, injury to persons or damage to property, use only
Plus MODELS
®
®
P/N: 11B90000K
REV B, 01-2016
Advertisement
Table of Contents

Related Manuals for Maxxair MAXXFAN 4401K


Summary of Contents for Maxxair MAXXFAN 4401K
-
Page 1: Installation Instructions
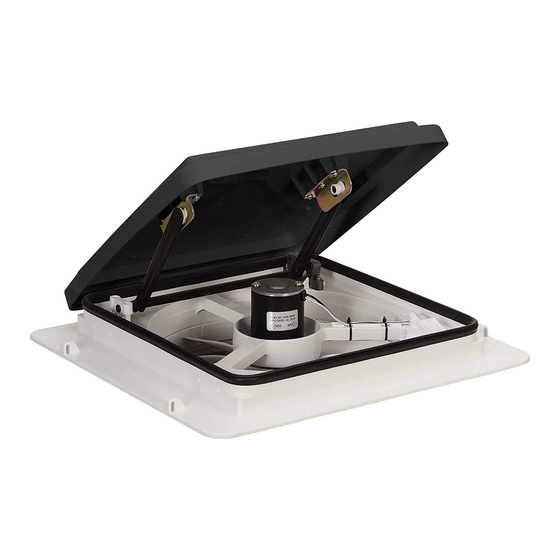
WARNING! To reduce risk of fire, injury to persons or damage to property, use only in the manner intended by AIRXCEL, INC. Should you have questions, please contact AIRXCEL/MAXXAIR VENTILATION SOLUTIONS Customer Service at 316.832.4357. P/N: 11B90000K REV B, 01-2016... - Page 2 INSTALLATION INSTRUCTIONS - ALL MODELS STEP 3 STEP 1 MAXXFAN requires a 14” x 14” roof opening, if Using the insulated 16 gauge electrical connectors you are replacing another type already installed, provided, connect the vehicle’s 12 volt power to the two MAXXFAN power wires located on the remove the old existing roof vent.
- Page 3 STEP 6 IR RECEIVER The interior Garnish Trim Ring must be trimmed to fit your particular RV roof thickness. accomplish this, measure the distance from the vehicle ceiling surface to each corner of the MAXXFAN Control Plate. 3 1/2” Most RV roofs have some slope, so measuring each corner is necessary.
- Page 4 We invite your comments and suggestions regarding our products. information you supply is for AIRXCEL / MAXXAIR’s internal use and will not be shared or sold to others. The Serial Number for your MAXXFAN is located on the fan control plate under the round insect screen frame.
- Page 5 INFORMATION AND OPERATING GUIDE FOR MAXXFAN MANUAL OPENING KEYPAD MODELS ® 4301K • 4401K KNOB, VENT LID OPEN/CLOSE Manual Opening Pull to unlock prior to turning. Rotate Knob clockwise to Close Vent Lid; Rotate Knob counter-clockwise to Open Vent Lid. Push “IN”...
- Page 6 INFORMATION AND OPERATING GUIDE FOR MAXXFAN Plus MODELS ® 4000K • 4001K • 4050K • 4500K • 4501K • 4801K KNOB, VENT LID OPEN/CLOSE Manual Opening Models Pull to unlock prior to turning. Rotate Knob clockwise to Close Vent Lid; Rotate Knob counter-clockwise to Open Vent Lid.
- Page 7 KEYPAD CONTROLS MAXXFAN Plus MODELS ® 4000K • 4001K • 4050K 4500K • 4501K • 4801K NOTE: A beeping sound will confirm each key press ON/OFF: Use this key to start the fan or to tum off the fan. On Automatic Opening Models the lid will also open or close when the fan is turned on or off.
- Page 8 NEW FANMATE featuring EZClip Hardware for ® TOOL FREE INSTALLATION. Visit AIRXCEL.com for details. For additional product information please visit www.AIRXCEL.com AIRXCEL, INC. - RV Products Division / MAXXAIR 3050 N. St. Francis St. • Wichita, KS 67219 • 316-832-3400...
Need help?
Do you have a question about the MAXXFAN 4401K and is the answer not in the manual?
Questions and answers