Table of Contents
Advertisement
Quick Links
Download this manual
See also:
User Manual
JU-06
SOUND MODULE
Introduction
The JU-06 is a sound module that can be used in conjunction with the K-25m keyboard unit (sold separately).
The sound can be heard through the built-in speakers.
* The JU-06 can operate on batteries or on USB bus power. If you are using batteries, insert four AA batteries,
making sure that the batteries are oriented correctly.
* When turning the unit over, be careful so as to protect the buttons and knobs from damage. Also, handle
the unit carefully; do not drop it.
* When the batteries run low, the LED above the Ribbon Controller C1 (
2
) blinks. Install new batteries.
Using the JU-06 in conjunction with the K-25m keyboard unit (sold
separately)
& For installation, refer to the K-25m's Owner's Manual.
Playing the JU-06 via MIDI or USB
You can also play the JU-06 via MIDI or USB. For details, refer to "Connecting Your Equipment. "
Connecting Your Equipment
* To prevent malfunction and equipment failure, always turn down the volume, and turn off all the units
before making any connections.
A
B
C
D
E
F
G
A
Micro USB (O) port
Use a commercially available USB 2.0 cable (A-microB) to connect this port to your computer. It can be used
to transfer USB MIDI and USB audio data. You must install the USB driver when connecting the JU-06 to
your computer. Download the USB driver from the Roland website. For details, refer to Readme.htm which is
included in the download.
& http://www.roland.com/support/
B
[VOLUME] knob
Adjusts the volume.
C
PHONES jack
Connect headphones (sold separately) here.
D
OUTPUT jack
Connect this jack to your amp or monitor speakers.
E
INPUT jack
This is the audio input jack. Sound from the connected device is output
MIDI OUT
from the OUTPUT jack and PHONES jack.
F
MIDI connectors
You can play the JU-06 by connecting a MIDI device via a commercially
available MIDI cable.
MIDI keyboard
Turning the Power On
G
[POWER] switch
This turns the power on/off.
* After you've made connections correctly, be sure to turn on the power in the order of the JU-06 first, and
then the connected system. Powering-on in the incorrect order may cause malfunctions or damage. When
turning the power off, power-off the connected system first, and then the JU-06.
* This unit is equipped with a protection circuit. A brief interval (a few seconds) after turning the unit on is
required before it will operate normally.
* Before turning the unit on/off, always be sure to turn the volume down. Even with the volume turned down,
you might hear some sound when switching the unit on/off. However, this is normal and does not indicate
a malfunction.
Restoring the Factory Settings (Factory Reset)
Here's how to return the JU-06 to its factory-set state.
1.
While holding down the BANK [1] button, turn on the power.
The [MANUAL] button blinks.
If you decide to cancel the factory reset, turn off the power.
2.
Press the [MANUAL] button to execute the factory reset.
3.
When all buttons blink, turn the JU-06's power off, then on again.
Data Backup/Restore
Backup
1.
While holding down the BANK [2] button, turn on the power.
2.
Connect your computer to the JU-06's USB port via USB cable.
3.
Open the "JU-06" drive on your computer.
The backup files are located in the "BACKUP" folder of the "JU-06" drive.
4.
Copy the backup files into your computer.
5.
After copying is completed, eject the USB drive and then disconnect the USB cable.
Windows 8/7
Right-click on the "JU-06" icon in "My Computer" and execute "Eject. "
Mac OS
Drag the "JU-06" icon to the Trash icon in the Dock.
6.
Turn the JU-06 power off.
Restore
1.
As described in the procedure for "Backup" Step 1–3, open the "JU-06" drive on your computer.
2.
Copy the JU-06 backup files into the "RESTORE" folder of the "JU-06" drive.
3.
After copying is completed, eject the USB drive and then press the [MANUAL] button.
4.
After the LEDs have completely stopped blinking, turn off the power.
Owner's Manual
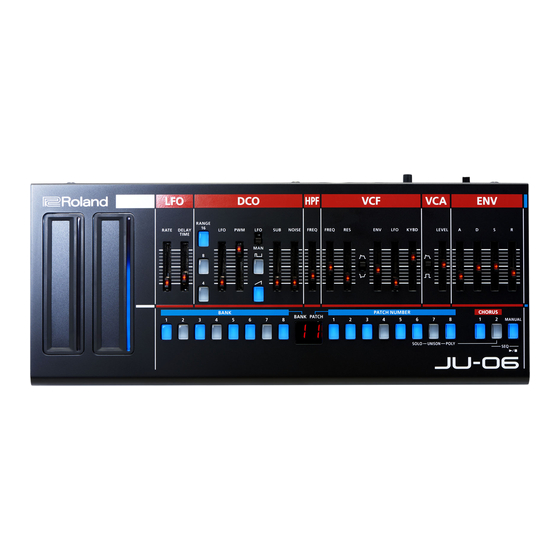
Panel Descriptions
2
3
4
5
1
1
Common section
Here you can switch the sound (patch/bank).
Controller
Explanation
What is "Patch/Bank"?
You can store/recall up to 64 sets (8 patches x 8 banks) of sound settings.
To switch the bank/patch
1.
Press the BANK [1]–[8] buttons to switch the bank.
BANK [1]–[8] buttons
2.
Press the PATCH NUMBER [1]–[8] buttons to switch the patch.
* For each sound, refer to "JU-06 Sound List" (PDF).
PATCH NUMBER [1]–[8]
& http://www.roland.com/manuals/
buttons
To store the patch
* When you edit a patch, a dot appears in the display.
1.
Press the save-destination BANK [1]–[8] button.
2.
Long-press the save-destination PATCH NUMBER [1]–[8] button.
[CHORUS 1] button
Turns the chorus effect-1/2 On/Off.
[CHORUS 2] button
[MANUAL] button
Causes sound to be produced according to the current settings of the sliders.
2
Ribbon controller (C1/C2)
These are touch-type ribbon controllers. C1 (left) is pitch bend, and C2 (right) is modulation.
* If a K-25m keyboard unit, USB, or MIDI are not connected, touching the C1 controller plays a preview sound.
3
MIDI IN
LFO
Here you can create cyclic change (modulation) in the sound.
Controller
Explanation
[RATE] slider
Determines the speed of the LFO.
Specifies the time from when the tone sounds until the LFO reaches its maximum
JU-06
[DELAY TIME] slider
amplitude.
4
DCO
Here you can select the waveform that determines the character of the sound, and specify its pitch.
Controller
Explanation
RANGE [16] [8] [4]
Specifies the octave of the oscillator.
buttons
[LFO] slider
Allows the LFO to modulate the pitch, producing a vibrato effect.
When the [LFO/MAN] switch is "MAN" (MANUAL):
Adjusts the value of the pulse width.
When the [LFO/MAN] switch is "LFO":
Adjusts the modulation depth.
[PWM] slider
What is "Pulse Width"?
Pulse width is the amount of the upper portion of the pulse wave, expressed as a
percentage of the overall wavelength. If the upper and lower widths are not the same,
the waveform is called an asymmetric pulse wave.
Selects whether the pulse width value is a fixed value specified manually by the [PWM]
[LFO/MAN] switch
3
slider (MAN) or is varied by the
LFO (LFO).
[
] button
Selects the waveform that is the basis of the sound.
(Square wave/Asymmetrical pulse wave),
[
] button
[SUB] slider
Adjusts the volume of the sub oscillator.
[NOISE] slider
Adjusts the volume of the noise.
5
HPF
This is a high-pass filter that passes the high frequencies and cuts the low frequencies.
Controller
Explanation
Specifies the cutoff frequency of the high-pass filter. Frequency components below
[FREQ] slider
the cutoff frequency are cut.
6
VCF
This is a low-pass filter that passes the low frequencies and cuts the high frequencies.
Controller
Explanation
Specifies the cutoff frequency of the low-pass filter. Frequency components above
[FREQ] slider
the cutoff frequency are cut, making the sound mellower.
Resonance boosts the sound in the region of the filter's cutoff frequency.
[RES] slider
Higher settings produce stronger emphasis, creating a distinctively "synthesizer-like"
sound.
Selects the polarity (direction) of the envelope.
[
] switch
[ENV] slider
8
Adjusts the depth by which the
ENV (envelope) controls the cutoff frequency.
[LFO] slider
Uses the
3
LFO to vary the cutoff frequency.
Adjusts the way in which the pitch of the note affects the cutoff frequency (key
[KYBD] slider
follow) when using the keyboard to control cutoff frequency. Moving the slider
downward causes the cutoff frequency to fall as you play higher on the keyboard.
English
In order to use this device correctly, please carefully read "USING THE UNIT SAFELY" and "IMPORTANT NOTES" (the "USING THE UNIT SAFELY" leaflet) before use.
After reading, keep these instructions at hand for immediate reference.
6
7
8
7
VCA
Here you can adjust the amount of time-varying change (envelope) for the volume.
Controller
Explanation
Selects whether the volume is controlled by
[
] switch
signal (
).
[LEVEL] slider
Adjusts the volume of the patch.
8
ENV
Here you can create time-varying change (envelope).
Controller
Explanation
[A] slider
Attack time
[D] slider
Decay time
[S] slider
Sustain level
[R] slider
Release time
Step Sequencer
The step sequencer lets you input a note at each of up to 16 steps, and play back the notes as a loop.
You can change the number of steps between 1 and 16. Up to 16 patterns can be stored.
1.
Press the [CHORUS 2] and [MANUAL] buttons (SEQ) simultaneously to enter the Step Sequencer mode.
The [s] button blinks.
* To exit the Step Sequencer mode, press again [CHORUS 2] and [MANUAL] buttons simultaneously.
Step buttons [1]–[16]
In Step Sequencer mode, the 16 numeric buttons shown in
the illustration are called [1]–[16] (Step buttons).
Function
Controller
Play start/stop
[MANUAL] (s)
Tempo
[CHORUS 2] + C1
On/off status of each step
[1]–[16]
Enter a note
[1]–[16] + C1 (or keyboard)
(Sawtooth wave)
Enter a tie
Step button + Next step button (e.g.: [1] + [2])
Enter a gate time
[1]–[16] + C2
Set the gate time of all steps [CHORUS 2] + C2
Select a pattern (1–16)
[CHORUS 2] + [1]–[16]
Write the pattern (1–16)
[CHORUS 2] + [1]–[16] (long-press)
Pattern settings
[MANUAL] + [1] & [1]–[16]
Number of steps (1–16)
[MANUAL] + [2] & [4]–[12] (default: [8])
Shuffle
[MANUAL] + [3] &
Scale
Sequencer settings *1
[MANUAL] + [15] &
Step order type
[MANUAL] + [16] & [1] Rest (default), [2] Skip
Off step mode
*1 Sequencer settings return to the default setting when the power is turned off.
Inputting steps
1.
Hold down the step button ([1]–[16] buttons) at which you want to enter a note.
2.
While holding down the step button, play the keyboard. Alternatively, use the C1 ribbon controller to
specify the note.
3.
Release the step button.
4.
Press the [s] button to play back.
* To delete the note at a step, turn off a step button ([1]–[16]) that contains a note (making the button go dark).
Settings
Numeric buttons [1]–[16]
In Settings mode, the 16 numeric buttons shown in the
illustration are called the [1]–[16] buttons.
SOLO/UNISON/POLY/Octave Shift/Portamento
8
ENV (envelope) (
) or by the gate
1.
While holding down the [CHORUS 2] button, specify the value by using the numeric buttons shown in
the following table or the C1/C2 ribbon controller.
Parameter
Value setting Explanation
[14]
SOLO/
UNISON/
[15]
POLY mode
[16]
Octave Shift
[4]–[13]
*1
(-4–+5)
Portamento
C1
Switch
(OFF/ON)
Portamento
C2
Time
(0–100)
System Settings
1.
While holding down the [MANUAL] button, press one of the numeric buttons shown in the following
table to select the parameter.
* Keep holding down the [MANUAL] button.
2.
Press a numeric button to select the value, and release the [MANUAL] button to confirm the value.
Parameter
Select
[MANUAL]
Master Tune
+ [1]
MIDI
[MANUAL]
Channel
+ [2]
MIDI Clock
[MANUAL]
Source
+ [3]
Transpose
[MANUAL]
*1
+ [4]
Key Velocity
[MANUAL]
*1
+ [5]
Velocity
[MANUAL]
Curve
+ [6]
*1
[MANUAL]
Auto Off
+ [7]
[MANUAL]
LED Demo
+ [8]
1 2 3 4 5 6 7 8
9 10 11 12 13 14 15 16
[MANUAL]
Chain Mode
+ [9]
Ribbon
[MANUAL]
Controller
+ [10]
Note Scale
Patch settings
[MANUAL]
Bend Range
+ [13]
[MANUAL]
Delay Level
+ [14]
[MANUAL]
Delay Time
1
2 3 4 5 6 7 8 9 10 11 12 13 14 15 16
+ [15]
[1]
Delay
[MANUAL]
[2]
Feedback
+ [16]
[3]
[4]
*1 Only when using the K-25m keyboard unit (sold separately)
(default: [2])
[1] Normal (default), [2] Even/Odd reverse, [3] Odd only,
[4] Even only, [5] Odd only 0 Even only,
Main Specifications
[6] Even only 0 Odd only, [7] Random
Maximum Polyphony 4 voices
Rechargeable Ni-MH battery (AA, HR6) x 4, Alkaline battery (AA, LR6) x 4,
Power Supply
USB bus power
Current Draw
500 mA (USB bus power)
Dimensions
300 (W) x 128 (D) x 45 (H) mm
Weight
940 g
(including batteries)
Accessories
Owner's Manual, Leaflet "USING THE UNIT SAFELY, " Alkaline battery (AA, LR6) x 4
Options
Keyboard unit: K-25m
(sold separately)
* In the interest of product improvement, the specifications and/or appearance of this unit are subject to
change without prior notice.
1 2 3 4 5 6 7 8
9 10 11 12 13 14 15 16
Plays monophonically (SOLO).
Plays all sounds in unison (UNISON).
Plays polyphonically (POLY).
Shifts the keyboard range in steps of one octave.
For the ±0 (default) setting, [8] is lit.
Creates a smooth change in pitch between one key and the next key played.
Adjusts the time required for the pitch change.
Value
Explanation
setting
[1]–[16]
Specifies the master tuning.
(433–448 Hz)
For the 440 Hz (default) setting, [8] is lit.
[1]–[16]
Specifies the MIDI transmit/receive channel (1–16).
If MIDI clock is being input to the MIDI IN connector or the USB
[1] (AUTO)
port, the JU-06's tempo will automatically synchronize to MIDI clock
(default).
The JU-06 operates at the tempo specified on the unit itself. Choose
[2]
the "INTERNAL" setting if you don't want to synchronize to an external
(INTERNAL)
device.
[2]–[13]
Transposes the keyboard range in semitones.
(-6–+5)
For the ±0 (default) setting, [8] is lit.
Adjusts the velocity value that will be transmitted when you play the keyboard.
[1] (TOUCH) Actual keyboard velocity will be transmitted.
[2] (64)
A fixed velocity value (64 or 127) will be transmitted regardless of how
you play.
[3] (127)
Sets the keyboard's touch.
[1] (LIGHT)
Sets the keyboard to a light touch.
[2] (MEDIUM) Sets the keyboard to the standard touch.
[3] (HEAVY)
Sets the keyboard to a heavy touch.
[1] (OFF)
The power does not turn off automatically.
The power turns off automatically after 30 minutes.
[2] (30 min)
* Auto Off does not occur while USB-connected.
[1] (OFF)
[2] (1 min)
Specifies the time until the LED DEMO is shown.
[3] (3 min)
[4] (10 min)
Although the JU-06 is four-note polyphonic, you can
MIDI OUT
MIDI IN
increase the polyphony by using a MIDI cable to
connect two or more JU-06 units and turning Chain
mode on.
* If you're using two JU-06 units, it is a good idea to match their patch settings by
using the "Data Backup/Restore" procedure.
[1] (OFF)
If Chain mode is on, the fifth voice and subsequent notes are passed
"thru" via MIDI OUT.
[2] (ON)
Sets the note scale type of the ribbon controller (default: [1]).
[1]–[16]
For details, refer to "JU-06 Sound List" (PDF).
& http://www.roland.com/manuals/
[1]–[12],
Specifies the Pitch Bend Range in semitones.
[13] (2 oct),
(default: [2])
[16] (OFF)
Adjusts the volume of delay sound. (OFF=[1])
[1]–[16]
Adjusts the delay time (the time by which the sound is delayed).
Adjusts the delay feedback. (OFF=[1])
:
Roland JU-06:
SOUND MODULE
11-13/16 (W) x 5-1/16 (D) x 1-3/4 (H) inches
2 lbs 2 oz
Advertisement
Table of Contents


Need help?
Do you have a question about the JU-06 and is the answer not in the manual?
Questions and answers