
Related Manuals for Roland Quad-Capture


Summary of Contents for Roland Quad-Capture
- Page 1 For the following languages, a PDF version of the Owner’s Manual can be found on the CD-ROM. Deutsch, Français, Italiano, Español, Português, Nederlands...
- Page 2 Ableton Live, GarageBand, Logic, etc. Set the input/output audio device on the DAW (p. 24, p. 27). Connect a guitar or microphone to the QUAD-CAPTURE (p. 25). Adjust the input gain level. QUAD-CAPTURE (p. 25) Control panel (p. 29) Adjust the preamp or compressor (p.
-
Page 3: Using The Unit Safely
Refer all servicing to your retailer, sound levels that could cause permanent the nearest Roland Service Center, or an hearing loss. Do not operate for a long authorized Roland distributor, as listed on period of time at a high volume level, or the “Information”... - Page 4 • Try to prevent cords and cables from and request servicing by your retailer, becoming entangled. Also, all cords and the nearest Roland Service Center, or an cables should be placed so they are out of authorized Roland distributor, as listed on the reach of children.
-
Page 5: Important Notes
Such noise could occur when receiving we regret that it may not be possible to restore such or initiating a call, or while conversing. Should you data, and Roland assumes no liability concerning such experience such problems, you should relocate such loss of data. - Page 6 Copyright © 2011 ROLAND CORPORATION All rights reserved. No part of this publication may be reproduced in any form without the written permission of ROLAND CORPORATION. Roland is a registered trademark of Roland Corporation in the United States and/or other countries.
-
Page 7: Table Of Contents
Contents USING THE UNIT SAFELY ..... Checking the Driver Settings ....... 35 Viewing the Control Panel in the Foreground ............35 IMPORTANT NOTES ......Checking the Version of the Control Panel ..............35 Contents of the Package ..... Troubleshooting......... Panel Descriptions ......Problems When Installing the Driver .. -
Page 8: Contents Of The Package
USB cable Use this cable to connect the QUAD-CAPTURE to the USB connector of your computer. * Please use only the included USB cable. If you require a replacement due to loss or damage, please contact the nearest Roland Service center, or an authorized Roland distributor, as listed on the “Information”... -
Page 9: License Agreement
Contents of the Package License agreement This agreement allows you to use certain software whose copyright is the property of Roland Corporation. You must read this before opening the CD-ROM. You’ll need to provide the following items • External amplifier, speakers, headphones, etc., for listening to the sound that is output via the QUAD-CAPTURE • Microphone, guitar, etc., for inputting audio to the QUAD-CAPTURE... -
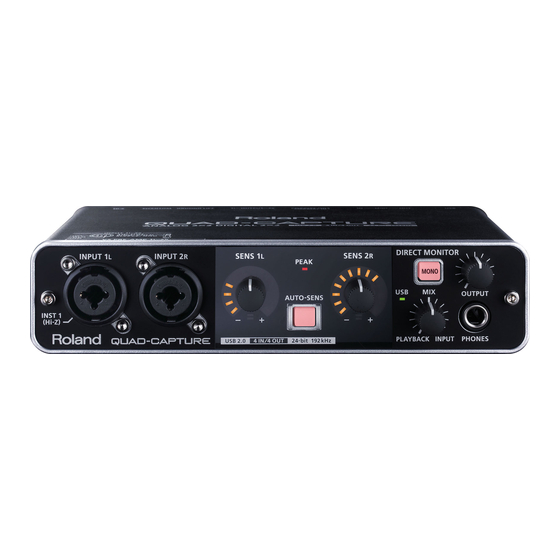
Page 10: Panel Descriptions
Panel Descriptions Note Do not connect the QUAD-CAPTURE to the computer until the driver has been installed (p. 14). Front Panel 1. INPUT 1L jack, INPUT 2R jack (Combo input jacks) These are analog audio input jacks with microphone preamps. - Page 11 The AUTO-SENS setting allows you to optimize the input level by analyzing the input audio signal (p. 26). 6. USB indicator Lights up when the QUAD-CAPTURE is connected to a computer and the computer has detected the QUAD-CAPTURE. 7. [MONO] button...
-
Page 12: Rear Panel
The COAXIAL IN (3/4) jack inputs the digital audio signal. The COAXIAL OUT (3/4) jack outputs the digital audio signals. * While the QUAD-CAPTURE is synchronized with external digital equipment, a small pop noise may be heard, but this does not indicate a malfunction. - Page 13 For details on the requirements of your microphone, refer to its owner’s manual. * QUAD-CAPTURE’s phantom power supply: DC 48 V, 6 mA maximum 17. [Hi-Z (INPUT 1)] switch Switches the impedance of the INPUT 1L jack. You can select high impedance (Hi-Z) or low impedance (Lo-Z) as appropriate for the connected equipment.
-
Page 14: Driver Installation
Mac OS X Note Do not connect the QUAD-CAPTURE to the computer until you are directed to do so. A “driver” is software that transfers data between the QUAD-CAPTURE and application software running on your computer when your computer and the QUAD-CAPTURE are connected. - Page 15 Driver Installation Windows 5. When a confirmation screen regarding user account control appears, click [Yes] or [Continue]. 6. When “The QUAD-CAPTURE Driver will be installed on your computer.” appears, click [Next]. 7. Click [Next] again. Windows 8.1/8/7/Windows Vista If a dialog box regarding Windows security appears, click [Install].
- Page 16 If you cannot select the QUAD-CAPTURE, refer to “Problems When Using the QUAD-CAPTURE” (p. 37). If the QUAD-CAPTURE is selected as the output device, the computer’s audio alerts will be played using the QUAD-CAPTURE; they will not be heard from the computer’s speakers.
- Page 17 If you cannot select the QUAD-CAPTURE, refer to “Problems When Using the QUAD- CAPTURE” (p. 37). If the QUAD-CAPTURE is selected as the output device, the computer’s audio alerts will be played using the QUAD-CAPTURE; they will not be heard from the computer’s speakers.
- Page 18 If you cannot select the QUAD-CAPTURE, refer to “Problems When Using the QUAD-CAPTURE” (p. 37). If the QUAD-CAPTURE is selected as the output device, the computer’s audio alerts will be played using the QUAD-CAPTURE; they will not be heard from the computer’s speakers.
- Page 19 16. Confirm that [QUAD-CAPTURE] appears in the “MIDI Studio” window or the “Audio MIDI Setup” dialog box. If [QUAD-CAPTURE] does not appear or if it is grayed out, it means that the QUAD-CAPTURE is not being detected properly. Click [Rescan MIDI]. Also try disconnecting and reconnecting the QUAD-CAPTURE’s USB cable.
- Page 20 21, 23 21. Click [Test Setup]. If you have a sound module connected to the QUAD-CAPTURE’s MIDI OUT connector, the following step will cause it to produce a fairly laud sound, so please reduce the volume of your sound module before continuing.
-
Page 21: Confirm That Sound Can Be Heard
Driver Installation Confirm that Sound can be Heard Windows Mac OS X 1. Connect the headphones or amplified speakers as shown in the figure. Headphones Amplified speakers Front panel Rear panel * To prevent malfunction and/or damage to speakers or other devices, always turn down the volume, and turn off the power on all devices before making any connections. - Page 22 Use the QUAD-CAPTURE’s [OUTPUT] knob to adjust the volume. If the sample file can be heard, the computer and QUAD-CAPTURE are connected properly and the driver has been successfully installed. If you cannot hear the sample file, refer to “Problems When Using the QUAD-CAPTURE” (p. 37).
-
Page 23: Basic Use
After exiting the DAW software, disconnect the QUAD-CAPTURE. • Select the QUAD-CAPTURE for the DAW software’s audio device setting. • The QUAD-CAPTURE will not operate in the Mac OS X Classic environment. Use the QUAD- CAPTURE when the Classic environment is not running. -
Page 24: Output Device Settings
Basic Use Output Device Settings To play audio and MIDI data on your DAW software, select the QUAD-CAPTURE as the audio and MIDI output device. For details about settings, refer to the documentation for your DAW software. Audio Output Device MME, 44.1 kHz–... -
Page 25: Setup For Recording
Basic Use Setup for Recording Audio signals from the INPUT 1L jack, INPUT 2R jack, and COAXIAL IN (3/4) jack can be sent to your DAW software and recorded. When connecting equipment to the INPUT 1L jack and INPUT 2R jack, check the setting of the [PHANTOM] and [Hi-Z (INPUT 1)] switches (p. -
Page 26: Adjusting The Input Level Automatically
Basic Use Adjusting the Input Level Automatically The AUTO-SENS setting allows you to have the optimum input level be set automatically, based on an analysis of the audio signal being input. 1. Connect equipment to the INPUT 1L or INPUT 2R jack. 2. Press the [AUTO-SENS] button. -
Page 27: Input Device Settings
Basic Use Input Device Settings To record audio and MIDI data on your DAW software, select the QUAD-CAPTURE as the audio and MIDI input device. For details about settings, refer to the documentation for your DAW software. Audio Input Device MME, 44.1 kHz–... -
Page 28: Setting From The Control Panel
Access the QUAD-CAPTURE control panel as follows. Windows Open the “Control Panel” and double-click the [QUAD-CAPTURE] icon. If you don’t see the QUAD-CAPTURE icon, switch to Icon view (Windows 8.1/8/7) or Classic view (Windows Vista/Windows XP). Mac OS X Open the [Applications] folder, then double-click [QUAD-CAPTURE Control Panel]. -
Page 29: Setting The Preamp
Phase Inverts the phase of the input signal. Adjusts the input gain over a range of 0–54 dB, in steps of 1 dB. The input level indicator of the QUAD-CAPTURE varies according to the gain setting. Input gain When setting the input gain from the control panel, the [AUTO-SENS] button lights up. -
Page 30: Setting The Compressor
Setting from the Control Panel Setting the Compressor Screen Indication Setting Description Gate Mutes signals below a specified level (in dB). When set to off, the compressor is enabled. When set to on, the Bypass compressor is disabled. Specifies the signal level (in dB) at which the compressor begins Threshold operating. -
Page 31: Setting The Input Mixer
Adjusting the monitor level does not affect the recording level. Setting the Sampling Rate The sampling rate setting of the QUAD-CAPTURE automatically changes to match the rate of the audio data that is played, or the rate that your DAW software is set to when recording. -
Page 32: Selecting The Sound Output From The Coaxial Out (3/4) Jack
* No sound is output from the COAXIAL OUT (3/4) jack when operating at a sampling rate of 192 kHz. Saving and Loading Your Settings From the QUAD-CAPTURE control panel, you can save the current settings as a file, or load previously saved settings from a file. The following settings are saved. -
Page 33: Initializing The Settings
A digital signal that is input from the COAXIAL IN (3/4) jack will be received. AUTO The QUAD-CAPTURE will switch to the same sampling rate as the incoming digital signal. The digital signal that is input from the COAXIAL IN (3/4) jack will not be received. -
Page 34: Changing The Auto-Sens Setting Method
The maximum value for the recording level is set at -12 dBFS. The recording level will be reduced. Checking Synchronization with Other Digital Equipment You can check the synchronization status in the CLOCK area of the QUAD-CAPTURE control panel. Indication Description INTERNAL The QUAD-CAPTURE’s internal clock is used. -
Page 35: Checking The Driver Settings
From the “QUAD-CAPTURE Control Panel” menu, select [Driver Settings]. Viewing the Control Panel in the Foreground You can set the software so the QUAD-CAPTURE control panel always appears in the foreground. Windows From the “Driver” menu, select [Always on top]. -
Page 36: Troubleshooting
Follow step 9 of the driver installation procedure (p. (Windows XP) 17) and install the driver. If you connect the QUAD-CAPTURE to a different USB connector than the one you used when Numeral such as installing the driver, a numeral may appear with the “2-”... -
Page 37: Problems When Using The Quad-Capture
Problem Confirmation Resolution Is the driver installed? Install the driver (p. 14). Make sure that the QUAD-CAPTURE is connected to the computer correctly. Is the QUAD-CAPTURE’s USB indicator off? If the problem is not resolved, reinstall the driver (p. 49). - Page 38 If the sound in your headphones is inaudible or too soft, check the other troubleshooting items. Is the [OUTPUT] knob of the QUAD- CAPTURE turned down? Use the QUAD-CAPTURE’s [OUTPUT] knob or [MIX] knob to adjust the volume. Also, is the [MIX] knob of the QUAD- Sound played by CAPTURE turned to “INPUT”...
- Page 39 If you’ve connected the device to the INPUT 1L or INPUT 2R jack, try turning the [SENS 1L] or [SENS The volume level Is the input level too low? 2R] knob of the QUAD-CAPTURE toward the right to of the instrument increase the input level (p. 10). connected to...
- Page 40 Use the [SENS 1L] or [SENS 2R] knob of the QUAD-CAPTURE to adjust the input level. If your Is the input level appropriate? software has an input level adjustment, check the Recorded sound input level setting.
- Page 41 Problem Confirmation Resolution Is the driver installed? Install the driver (p. 14). If the QUAD-CAPTURE’s sampling rate is set to 192 Is the QUAD-CAPTURE’s sampling rate kHz, the COAXIAL IN (3/4)/OUT (3/4) jacks cannot set to 192 kHz? be used.
- Page 42 Are you playing or recording audio data? change the sampling rate in the Driver Settings dialog box. Is there another program using the Exit the program that is using the QUAD-CAPTURE. Cannot change QUAD-CAPTURE? the sampling Set the sampling rate setting of the software...
-
Page 43: Limitations When Using The 192 Khz Setting
Troubleshooting Limitations When Using the 192 kHz Setting If the QUAD-CAPTURE’s sampling rate is set to 192 kHz, its operation will be limited as follows. • The COAXIAL IN (3/4)/OUT (3/4) jacks cannot be used. • The 3-4 port of the audio output device and the 3-4 port and MAIN port of the audio input device... -
Page 44: Changing Computer Settings To Avoid Problems
Changing Computer Settings to Avoid Problems Changing these computer settings can help you avoid the problems described in “Problems When Installing the Driver” (p. 36) and “Problems When Using the QUAD-CAPTURE” (p. 37). Driver Signing Options Setting (Windows XP) If the “Driver Signing Options” setting is set to [Block], you cannot install the driver. Configure as follows. -
Page 45: Power Management Settings
Troubleshooting Power Management Settings If the sound is interrupted during a performance or if sounds are missing, you may be able to resolve the problem by changing the computer’s power management settings. Windows 8.1/8/7/Windows Vista 1. Open the “Control Panel,” click [System and Security] or [System and Maintenance], and then click [Power Options]. -
Page 46: System "Performance" Settings (Windows)
Troubleshooting System “Performance” Settings (Windows) If the sound is interrupted during a performance or if sounds are missing, you may be able to solve the problem by changing the “Performance” setting of the system as described below. Windows 8.1/8/7/Windows Vista 1. Open the “Control Panel,” click [System and Security] or [System and Maintenance], and then click [System]. -
Page 47: Setting The System Volume
If you have selected Classic view, double-click [Sounds and Audio Devices]. 2. Click the [Audio] tab. 3. In the “Sound playback” area, make sure that [1-2 (QUAD-CAPTURE)] is selected as the “Default device,” and click [Volume]. 4. When the volume control appears, adjust the “Wave” volume. -
Page 48: Voice Communication Software Settings (Windows 8.1/8/7)
1. Open the “Control Panel,” click [Hardware and Sound], and then click [Sound]. If you have selected Icon view, click [Sound]. 2. In the “Recording” area, click the QUAD-CAPTURE’s [1-2 (QUAD-CAPTURE)], and then click [Properties]. 3. Click the “Listen” tab and clear the [Listen to this device] check box. -
Page 49: Reinstalling The Driver
2. Install the driver again as described in “Driver Installation” (p. 14). Deleting the Driver If the computer does not detect the QUAD-CAPTURE correctly, use the following procedure to delete the driver, and then install the driver again as described in “Driver Installation” (p. 14). - Page 50 2. Insert the included CD-ROM into the computer’s DVD-ROM drive. 3. Double-click [Uninstaller] in the [MacDriver] folder on the included CD-ROM. 4. When “This uninstalls QUAD-CAPTURE driver from this Mac.” appears, click [Uninstall]. If other messages appear, follow the instructions on the screen.
-
Page 51: Advanced Driver Settings
To use Cakewalk software, such as SONAR, with WDM/KS mode, select this check box. [Use Multichannel WDM Audio Port] * The modified setting will take effect after you turn the power of the QUAD-CAPTURE check box (Windows off, then on again. - Page 52 Audio Buffer Size * After adjusting the buffer size, make sure to restart all programs that are using the QUAD-CAPTURE. If using software that has an “audio device test” function, run the test function. If audio drops out or if noise is heard, even if you have adjusted the buffer size setting Recording Margin in the software and adjusted the “Audio Buffer Size”...
-
Page 53: Main Specifications
Main Specifications USB Audio Interface: Roland QUAD-CAPTURE UA-55 Sampling Rate: 96 kHz, 48 kHz, 44.1 kHz Record: 4 channels Playback: 4 channels Number of Audio Record/ Playback Channels Sampling Rate: 192 kHz Record: 2 channels Playback: 2 channels PC interface: 24 bits... - Page 54 Main Specifications XLR type (balanced, phantom power: +48 V, 6 mA Max) * Current value per channel. Input jacks 1–2 1/4-inch TRS phone type (balanced) * INPUT 1 supports high impedance Headphones jack (Stereo 1/4-inch phone type) Connectors OUTPUT jacks 1–2 (1/4-inch TRS phone type (balanced)) COAXIAL IN connector COAXIAL OUT connector MIDI connectors (In, Out)
-
Page 55: Index
Initializing ........33 QUAD-CAPTURE control panel ..... . 28 Loading . - Page 56 For EU Countries For China...
-
Page 57: Declaration Of Conformity
Compliance Information Statement Model Name : UA-55 Type of Equipment : USB Audio Interface Responsible Party : Roland Corporation U.S. Address : 5100 S. Eastern Avenue, Los Angeles, CA 90040-2938 Telephone : (323) 890-3700 For EU Countries This product complies with the requirements of EMC Directive 2004/108/EC. - Page 59 MEMO...
Need help?
Do you have a question about the Quad-Capture and is the answer not in the manual?
Questions and answers