Roland TR-606 User Manual
Hide thumbs
Also See for TR-606:
- Owner's manual (49 pages) ,
- Operation manuals (44 pages) ,
- Service notes (8 pages)
Advertisement
Quick Links
Roland TR-606 User's manual
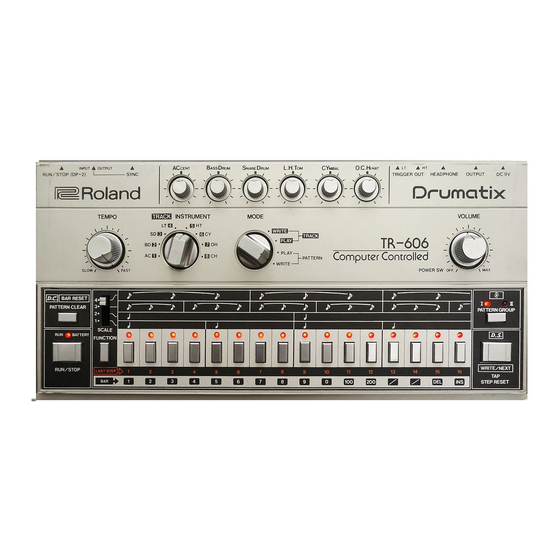
INTRODUCTION
The Roland TR-606 is a portable, economical, automatic and fully programmable
rhythm device, which can memorize our own rhythms with exceptional flexibility.
With it you can write and record different percussive rhythms into non-volatile
memory (battery back-up), with up to seven different drum sounds plus accent. Then
you can adjust the volume of each percussion sound with individual level controls for
full flexibility over the final mix.
Programming several rhythms can be accomplished and stored in a particular order on
the memory, forming the entire rhythm track of a song. The music can then quite
easily be amended, since the TR-606 includes a simple, yet effective, editing facility.
In this manual, we shall refer to each bar of the music as a "Rhythm Pattern".
So, the TR-606 has mainly 2 basic functions. One of them is "Writing/Playing a
Rhythm Pattern", the other is "Writing/Playing a Rhythm Track". The former
describes the writing of individual bars into computer memory, to be played later,
while the latter describes writing the entire rhythm track of a piece into computer
memory, which also may be played later.
The TR-606 can do all this, and more, so each switch has at least two functions.
Furthermore, adjacent Rhythm Patterns may be "chained" together into single, more
complex patterns, for divisions as small as sixty-fourth notes, or for more complex
time signatures.
When using the Track Write function, eight track positions give a maximum of seven
different compositions of 64 bars each, and one of 256 bars, and can be chained
together in various combinations for extended compositions of up to 256 bars each.
A programmable D.C. BAR allows you to program the final bar of a Track
composition to begin again at the first bar.
The TR-606 can be connected to a variety of digital sequencers, synthesizers, and
other devices for synchronized rhythmic control of sound, expanding its live
performance, composing and recording applications.
The TR-606 is exceptionally compact, and for maximum portability features battery
operation for all functions including a self-contained Headphone Amplifier for
monitoring through any Stereo Headphone. For extended battery life, a socket is
included on the back panel for connection to an optional Boss ACA Battery
Eliminator.
The TR-606 owner's manual has two courses consisting of a
Basic Course
and an
Advanced
Course, because these unique functions should be completely understood.
Advertisement

Related Manuals for Roland TR-606


Summary of Contents for Roland TR-606
- Page 1 The TR-606 can do all this, and more, so each switch has at least two functions. Furthermore, adjacent Rhythm Patterns may be "chained" together into single, more complex patterns, for divisions as small as sixty-fourth notes, or for more complex time signatures.
- Page 2 It should be noted that when using the TR-606 by itself (without interfacing with other units using the SYNC connection), the SYNC INPUT/OUTPUT switch on the back panel should be set to the OUTPUT position. The TR-606 will not operate with this switch at the INPUT position.
- Page 3 TR-606. [Actually, any 9V DC adaptor with centre negative providing 150mA of current will work - ed] CAUTIONS When the TR-606 is not in use for long periods, remove the battery to prevent • leakage.
- Page 4 #1 to #16, step by step. 9. Set the SCALE selector (I) to #1, then press the FUNCTION button (J). * When the FUNCTION button (J) is held down, the TR-606 displays the position of every quarter note on the LED indicators (L).
- Page 5 When pressing the button, do not fail to release it once, and go on to the next operation, except for the cases that it is specifically instructed to keep pressing the button. (The TR-606 does not function properly if you go on to the next operation without releasing the button.) 16.
- Page 6 * POSITION --> PATTERN GROUP I-4 1234567890123456 BD x----x--x--x---- SD ---x----x--x-xxx LT ------x--------- CY --------x--x--x- OH -x--x----------- CH x-xx-xxx-------- AC xx-xx-x-x--x--x- * POSITION --> PATTERN GROUP I-5 1234567890123456 BD x------xx-x--x-- SD ----x-------x--- CY x--------------- OH --x---x---x---x- CH xxxxxxxxxxxxxx-- AC x-x-x-x-x-x-xxx- * POSITION -->...
- Page 7 #2 to #3 to #4 and then back to #2 again. * This is called CHAINING THE RHYTHM PATTERNS. Rhythms can be chained up to four rhythms in a block. The TR-606 has four blocks, #1-4, 5-8, 9-12, and 13-16.
- Page 8 PROCEDURE 1. Stop the rhythm. 2. Set the MODE selector (B) to TRACK/WRITE. 3. Set the TRACK/INSTRUMENT selector (C) to Track #1. 4. Press the CLEAR/RESET button. * This button re-sets the first bar of the Track. 5. Select in PATTERN GROUP I (O). 6.
- Page 9 6. Repeat step 5 until you reach the last bar (D.C. bar). 7. Stop the rhythm. A composition of up to 64 bars in a Track can be programmed. The TR-606 has 8 Tracks. Refer to the ADVANCED COURSE MANUAL for details.
- Page 10 When stopped in the TRACK PLAY Mode or TRACK WRITE Mode, this button Resets the TR-606 so that it will begin with bar 1 of the Track selected when the RUN button (H) is pressed. If this button is pressed while the FUNCTION button (J) is held down, the D.C.
- Page 11 The 16 LED Indicators (L) located directly above the SELECTOR Switches (K) are used to indicate the Rhythm Pattern number, Steps within a Rhythm Pattern, or Bar Numbers, depending on the use of the other TR-606 controls. Details of these different applications and reading Bar numbers are given in the Operation section this manual.
- Page 12 When stopped in the PATTERN WRITE and PATTERN PLAY MODE, and when stopped in the TRACK WRITE Mode the PATTERN GROUP button (N) switches the TR-606's memories between the 16 Rhythm Patterns in PATTERN GROUP (N) I and the 16 Rhythm Patterns in PATTERN GROUP (N) II.
- Page 13 Boss J-5 is used, or unless you hi-fi has a master Mono/Stereo selector. Important Note: Begin with the volume level on your TR-606 set at Zero and the hi-fi at normal or lower than normal levels. By gradually raising the TR-606 level and using caution as different programs and instrument levels are selected you can easily avoid high level signals that might otherwise damage sensitive hi-fi equipment.
- Page 14 SYNC switch must be in the OUTPUT position so that the TR-606 will operate by itself. The TR-606 may also be synchronized to the Roland MC-4 polyphonic sequencer, using either the TR-606 or the MC-4 to control the other unit. For more details, refer to the MC-4 owners manual. Battery Eliminator The TR-606 is fully portable, normally relying on batteries for all internal functions and to power the self-contained Headphone amplifier.
- Page 15 Pattern that will play when you press the RUN/STOP button (H). Also lit on the TR-606 Panel is one of the two LEDs above the PATTERN GROUP button (N). These indicate from which group (I or II) the flashing Rhythm will play.
- Page 16 3 rather than pattern 2" - ed] Writing Rhythm Patterns As mentioned earlier, your TR-606 will not only play back Rhythms but also allow you to write them as well. Because we are not just writing the Rhythms but storing them into computer Memory as well, we call this process "Programming".
- Page 17 Steps 1, 7, 11, and 15, so touch the SELECTOR Switches (K) that correspond with these Step Numbers described below them. As is the case with many controls on the TR-606, the SELECTOR Switches (K) serve a dual function that is both choosing Rhythms to be played and also programming the Rhythm itself.
- Page 18 PATTERN WRITE position. Steps and Programming With the TR-606, each measure is divided into a certain number of parts which we call STEPS. The Rhythm you just programmed used a 16 Step measure, which we played in 4/4 time.
- Page 19 switch for step #12, and then release the FUNCTION button (J). You have just set a 12 Step pattern using a #3 Scale. With the TRACK/INSTRUMENT selector (C), choose the sounds you need to program the Program Score #2 as shown in Fig. 5. Program this Rhythm as you had done in Program Score #1.
- Page 20 - ed] Composing the Rhythm Track So far, we have used many of the TR-606 performance controls to produce creative and interesting results, but a function that completely sets the TR-606 apart from any other device is its ability to record an entire composition's percussion score (which we will call the Rhythm Track).
- Page 21 The last Track #8 contains more memory than any of the others having 256 bar storage when used by itself. However, even when chained with other Tracks, the maximum storage of the Chained Tracks remains at 256 bars. Composing the Track To compose a Track, first stop the Rhythm, then set the MODE selector (B) to TRACK WRITE and select a Track to write into by rotating the TRACK/INSTRUMENT Selector (C).
- Page 22 "real" tap button - ed] Setting the $ and D.C. Bars To set the $ Bar, your TR-606 must be in the TRACK WRITE MODE in exactly the same status as when you were composing the Rhythm Track. First, select a Track, reset the Track by pressing the CLEAR/RESET button (F) and start the Rhythm by pressing the RUN/STOP button (H).
- Page 23 $ or D.C., the original D.S. or D.C. Bar's designation will automatically be erased. Bar Selection Within the Track A truly outstanding feature of the TR-606 is the facility to access any bar within a Track for editing, changing a $/D.C. designation, or just to listen to a specific passage.
-
Page 24: Specifications
RUN/STOP button and select the new Rhythm Pattern by pressing the SELECTOR switch (K) and press the TAP button (M). For example:- If you mistakenly missed bar 4 e.g. A B C E F G Then call up the fourth bar using Bar Selection, and press FUNCTION and INSERT. e.g. - Page 25 (Accent, Bass Drum, Snare Drum, L.H. Tom, Cymbal, O.C. Hihat) POWER Switch/VOLUME Control CLEAR/RESET button PATTERN CLEAR D.C. Setting bar reset RUN/STOP button BATTERY Check/RUN Indicator SCALE Selector (1, 2, 3, 4) FUNCTION button Last Step Setting Scale Setting Bar Number, (Be sure the bar number of $, D.C.) SELECTOR Switch x 16 RHYTHM Selector Designated Bar Number Switch...
- Page 26 RUN/STOP x 1 (DP-2) Power Battery 6V (UM-2 Size (C) R-14 or equal battery x 4) (AC Adaptor: 9V) Consumption Current draw 70mA (MIN) ~ 150mA (MAX) Dimensions 300(W) x 146(D) x 55(H) mm Weight 3.7 kg Accessories Compact Soft Case x 1 Connection Cord (PJ-1) x 1 Option AC-Adaptor...
Need help?
Do you have a question about the TR-606 and is the answer not in the manual?
Questions and answers