
Subscribe to Our Youtube Channel
Related Manuals for OLIMEX MOD-VGA


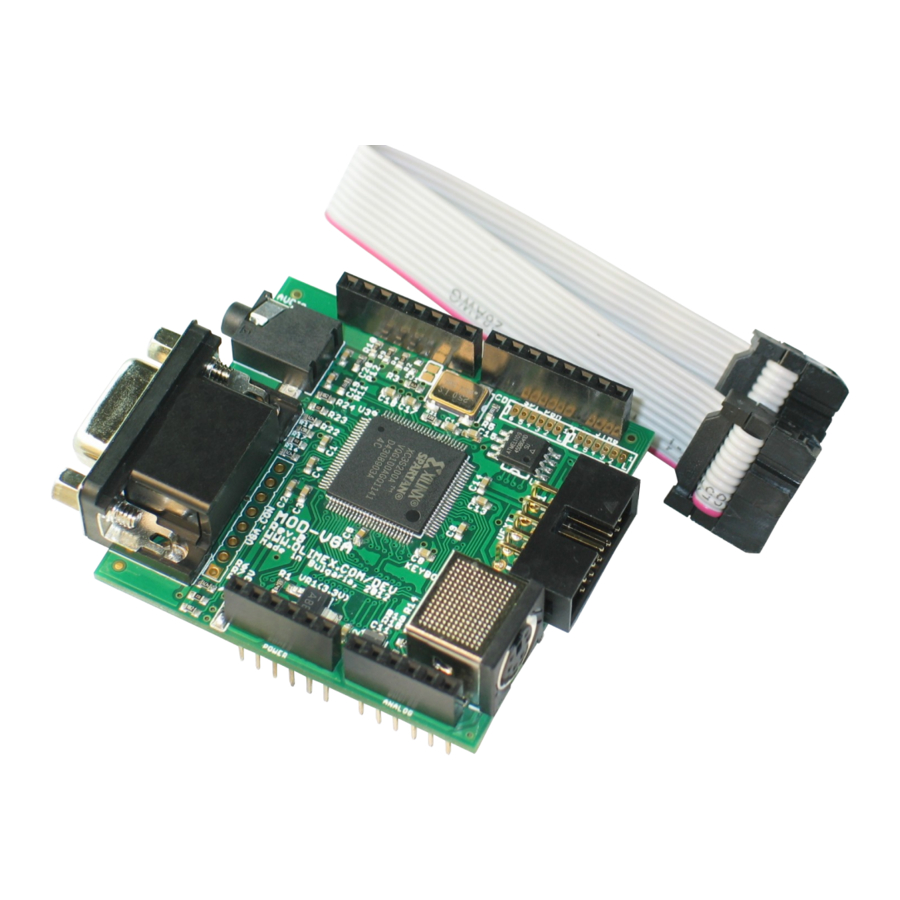
Summary of Contents for OLIMEX MOD-VGA
- Page 1 MOD-VGA and MOD-VGA-32 USER’S MANUAL Document revision B, June 2016 Designed by OLIMEX Ltd, 2012 All boards produced by Olimex LTD are ROHS compliant...
-
Page 2: Disclaimer
This document is intended only to assist the reader in the use of the product. OLIMEX Ltd. shall not be liable for any loss or damage arising from the use of any information in this document or any error or omission in such information or any incorrect use of the product. -
Page 3: Table Of Contents
1.1 Features ............................. 5 1.2 Target market and purpose of the board ................6 1.3 Organization ..........................6 CHAPTER 2: SETTING UP THE MOD-VGA BOARD ......... 7 2. Introduction to the chapter ....................... 7 2.1 Electrostatic warning ....................... 7 2.3 Requirements ........................... 7 2.4 Powering the board ........................ - Page 4 OLIMEX© 2016 MOD-VGA user's manual 9.1 Document revision ......................... 21 9.2 Board revision ........................21 9.3 Useful web links and purchase codes ................... 22 9.4 Product support ........................23 Page 4 of 23...
-
Page 5: Chapter 1: Overview
1.1 Features MOD-VGA is a game adapter for the Arduino – or anything else with an SPI interface – built as a single shield that stacks up on top of the Arduino and has plugs for a VGA monitor and stereo speakers. -
Page 6: Target Market And Purpose Of The Board
OLIMEX© 2016 MOD-VGA user's manual 1.2 Target market and purpose of the board The board follows the Arduino shield connector platform and can be mounted directly on 3.3V Arduino boards. Note that if your Arduno board doesn't have 3.3V operating mode you would need level shifter. -
Page 7: Chapter 2: Setting Up The Mod-Vga Board
CHAPTER 2: SETTING UP THE MOD-VGA BOARD 2. Introduction to the chapter This section helps you set up the MOD-VGA development board for the first time. Please consider first the electrostatic warning to avoid damaging the board, then discover the hardware and software required to operate the board. -
Page 8: Powering The Board
2.4 Powering the board The board gets powered when mounted on compatible Arduino board by 3.3V. Important: MOD-VGA is not 5V tolerant. The SPI lines coming from the main board go to the XYLNIX SPARTAN-3A chip via 47 Ohm resistors and the GPIO pins of SPARTAN-3A have an absolute maximum of 4.6V! 2.5 Running an example using Olimex OLIMEXINO-328... -
Page 9: Chapter 3: Mod-Vga Board Description
3. Introduction to the chapter Here you get acquainted with the main parts of the board. Note the names used on the board might differ from the names used below to describe them. For the actual names check the MOD-VGA board itself. -
Page 10: Layout (Bottom View)
OLIMEX© 2016 MOD-VGA user's manual 3.2 Layout (bottom view) Note the base MOD-VGA version doesn't have the additional memory present on the picture of MOD-VGA-32. Page 10 of 23... -
Page 11: Chapter 4: The Xilinx Spartan-3 Xc3S200 Fpga
CHAPTER 4: The XILINX SPARTAN-3 XC3S200 FPGA 4. Introduction to the chapter In this chapter is located the information about the heart of MOD-VGA – its controller. The information is a modified version of the datasheet provided by its manufacturers. - Page 12 OLIMEX© 2016 MOD-VGA user's manual For comprehensive information on the microcontroller visit the Xilinx’s web page for a datasheet. At the moment of writing the FPGA's datasheet can be found at the following link: http://www.xilinx.com/support/documentation/data_sheets/ds099.pdf Page 12 of 23...
-
Page 13: Chapter 6: Connectors, Hardware, Pinouts
OLIMEX© 2016 MOD-VGA user's manual CHAPTER 6: CONNECTORS, HARDWARE, PINOUTS 6. Introduction to the chapter In this chapter are presented the connectors that can be found on the board all together with their pinout and notes about them. Jumpers functions are described. Notes and info on specific peripherals are presented. -
Page 14: Jtag Pinholes
OLIMEX© 2016 MOD-VGA user's manual 6.1.2 JTAG pinholes The JTAG interface lacks connector. You can mount plastic header (for instance WU06S) for easier interfacing. JTAG PIN# SIGNAL NAME +3.3V 6.2 UEXT connector Note that the signals on the UEXT connector are multiplexed with the respective header pins from the Arduino shield connector. -
Page 15: Audio Connector
OLIMEX© 2016 MOD-VGA user's manual 6.3 Audio connector Standard audio jack and phone jack are mounted for the audio interfacing. Headphones/Audio out connector Pin# SIGNAL NAME Processor Pin# LINE_OUT_L LINE_OUT_R GND pins The headphones resistance is 16 Ohms! 6.4 VGA video connector The female DA-15 connector is used for video output on a monitor. -
Page 16: Arduino Shield Connector
OLIMEX© 2016 MOD-VGA user's manual You may find the pinout of the DA-15 connector on the next page. VGA DB15 connector GPIO Pin# Signal Name GPIO Pin# Signal Name 1 VGA_R 2 VGA_G 3 VGA_B 4 Not Connected 5 GND... -
Page 17: Keyboard Connector
OLIMEX© 2016 MOD-VGA user's manual 6.6 Keyboard connector The key board connector is a standard PS2 one requiring MINI-DIN cable connector. By default it operates at 5V. The voltage available for the keyobard can be changed by modifying jumper 5V/3V. -
Page 18: Chapter 8: Schematics
CHAPTER 8: SCHEMATICS 8. Introduction to the chapter In this chapter are located the schematics describing logically and physically MOD-VGA. 8.1 Eagle schematic The EAGLE schematic is situated on the next page for quicker reference. It can also be found on the web-page of the device. - Page 19 OLIMEX© 2016 MOD-VGA user's manual JTAG & CLOCK AUDIO AUDIO JACK-3PINSCJ325P00XG0B02G 3.9k 3.3V 3.3V 3.9k JTAG WU06S(NA) 3.9k 3.3V 1.2V 25MHZ LM1117IMPX-ADJ SRAM ADJ/GND 25MHz 10uF/6.3V 100n 47uF/6.3V 240R I/O0 XC3S200A-4VQ100C I/O1 I/O2 PROG_B I/O3 LINE_OUT_L IO_L06N_0/PUDC_B I/O4 VSYNC LINE_OUT_R...
-
Page 20: Physical Dimensions
OLIMEX© 2016 MOD-VGA user's manual 8.2 Physical dimensions Note that all dimensions are in mil. The two highest elements on the board are: VGA connector – 500mil; KEYBOARD connector – 500mil Page 20 of 23... -
Page 21: Chapter 9: Revision History And Support
OLIMEX© 2016 MOD-VGA user's manual CHAPTER 9: REVISION HISTORY AND SUPPORT 9. Introduction to the chapter In this chapter you will find the current and the previous version of the document you are reading. Also the web-page for your device is listed. Be sure to check it after a purchase for the latest available updates and examples. -
Page 22: Useful Web Links And Purchase Codes
MOD-VGA-32: https://www.olimex.com/Products/Modules/Interface/MOD-VGA-32MB/ ORDER NAMES: MOD-VGA – the standard/base version of MOD-VGA (GAMEDUINO project derivative) MOD-VGA-32MB – the MOD-VGA version with additional memory OLIMEXINO-328 – an Arduino compatible board tested and working out-of-the-box with MOD- OLIMEXINO-32U4 - a Leonardo-like Arduino compatible board The latest price list can be found at https://www.olimex.com/prices. -
Page 23: Product Support
All goods are checked before they are sent out. In the unlikely event that goods are faulty, they must be returned, to OLIMEX at the address listed on your order invoice. OLIMEX will not accept goods that have clearly been used more than the amount needed to evaluate their functionality. - Page 24 Mouser Electronics Authorized Distributor Click to View Pricing, Inventory, Delivery & Lifecycle Information: Olimex Ltd. MOD-VGA...
Need help?
Do you have a question about the MOD-VGA and is the answer not in the manual?
Questions and answers