Table of Contents
Advertisement
Advertisement
Table of Contents

Subscribe to Our Youtube Channel
Related Manuals for Leica S7 E


Summary of Contents for Leica S7 E
- Page 1 Leica S7 E User Manual...
-
Page 2: General Instructions
Use in clean rooms Servicing Before using your stereo microscope for the first The Leica S series can be used in clean rooms Repairs may only be carried out by Leica time, please read the "Safety Concept" booklet without any problems. -
Page 3: Important Safety Notes
(e.g. cold you to download and print from our website light sources, etc.). Please read the user manual www.leica-microsystems.com. Keep it in a safe and the safety requirements of the supplier. place, and readily accessible to the user. -
Page 4: Symbols Used
Figures Failure to comply can cause the following: (1) Numbers in parentheses within the Hazards to personnel descriptions relate to the figures and the items within those figures. Functional disturbances or damaged instruments S7 E User Manual... -
Page 5: Safety Instructions
The responsible Leica affiliate fungus. must be consulted whenever the instrument is altered, modified or used in conjunction with non-Leica components that are outside of the scope of this manual! S7 E User Manual... - Page 6 Use the original packaging for shipping Refer to "Safety Concept" booklet or transporting the individual modules Only original Leica Microsystems spare of the Leica S stereo microscopes and the Disposal parts may be used. accessory components. Refer to "Safety Concept" booklet...
- Page 7 • Workplaces with stereo microscopes construction of the Leica S stereo facilitate and improve the viewing task, microscopes are intended to reduce the but they also impose high demands on the eyes exertion of the user to a minimum.
-
Page 8: Table Of Contents
The Modular Design: Everything is Possible What Your Stereo Microscope has to Offer you Dimensional Drawings in mm On We Go Leica S7 E With Incident Light Base & Transmitted Light Base Assembly Technical Data Installing the Basic Equipment (Overview) -
Page 9: Congratulations
Congratulations! Congratulations on obtaining your new Leica stereo microscope from Though the reliability and robustness of Leica stereo microscopes is the S series. We are convinced it will exceed your expectations, as world-renowned, like any high-tech product, the Leica S series requires this instrument embodies all the qualities you associate with Leica a certain degree of care and attention. -
Page 10: The Modular Design: Everything Is Possible
The Modular Design: Everything is Possible The Leica S series provides a high degree of Despite this, you will notice that the controls Have a special request? Let us know! flexibility in choosing equipment, thanks and individual components do not differ... -
Page 11: What Your Stereo Microscope Has To Offer You
ESD protection view of the object field. The Leica S7 E including its cold light source The Greenough system enables cost-effective and stand, are made from a highly conductive material with surface resistivity of 2 ×10... -
Page 12: On We Go
If, on the other hand, you are assembling the been assembled and commissioned by your stereo microscope yourself, continue with the Leica consultant, click here to skip through the "Assembly" chapter, which begins on page 14. installation instructions and go directly to the Quick Start Guide on page 22. -
Page 13: Assembly
Assembly S7 E User Manual Assembly... -
Page 14: Installing The Basic Equipment (Overview)
Installing the Basic Equipment (Overview) 1. Sub-base for transmitted light with glass stage plate 2. Incident light base with stage plate 3. Focusing column with microscope carrier 4. Additional objective, optional 5. Optics carrier 6. Eyepieces, fixed and/or adjustable S7 E User Manual Assembly... -
Page 15: Focusing Column
Disclaimer: Illustrations on this page show the optics carrier of an S9 stereo microscope with same proportion as the S7 E featured in this user manual. S7 E User Manual Assembly... -
Page 16: Sub-Base For Transmitted Light And Cold Light Source
3. Set the incident-light stand to the sub-base 5. Insert the glass stage plate. Additional information can be found in for transmitted light and engage it with the the user manual for cold-light source connection screw. Leica KL300 LED. S7 E User Manual Assembly... -
Page 17: Optics Carrier And Additional Objective
Disclaimer: Illustrations on this page show the optics carrier of an S9 stereo microscope with same proportion as the S7 E featured in this user manual. S7 E User Manual Assembly... -
Page 18: Available Graticules
Graticule 10 mm/0.1 mm place. Graticule 5 mm/0.1 mm Graticule 5 mm/0.05 mm Graticule 100 Div./0.002" Graticule 100 Div./0.001" Graticule 150 Div./0.0005" Crosshairs Stage micrometer 50 mm, 0.1/0.01/ mm graduation Stage micrometer 1", 0.001" graduation S7 E User Manual Assembly... -
Page 19: Inserting Graticules
4. Replace the insert in the eyepiece and press it firmly into place. 5. Insert the eyepiece in the tube and turn the eyepiece in the tube to align the graticule correctly. S7 E User Manual Assembly... -
Page 20: Eyepieces
We recommend that you also eyepieces for each individual or detachable equip the high-powered S APO with two eyecups. adjustable eyepieces. 2. Check that the eyepieces are seated firmly and precisely in place. S7 E User Manual Assembly... -
Page 21: Leica Led Illumination
The combination of a high performance optical system and optimized illumination gives you the best imaging results. The Leica LED3000 RL ring light, shown on the image to the right, guarantees bright, uniform illumination of the specimen over a large object field at a constant color temperatures. -
Page 22: Quick Start Guide
Quick Start Guide S7 E User Manual Quick Start Guide... -
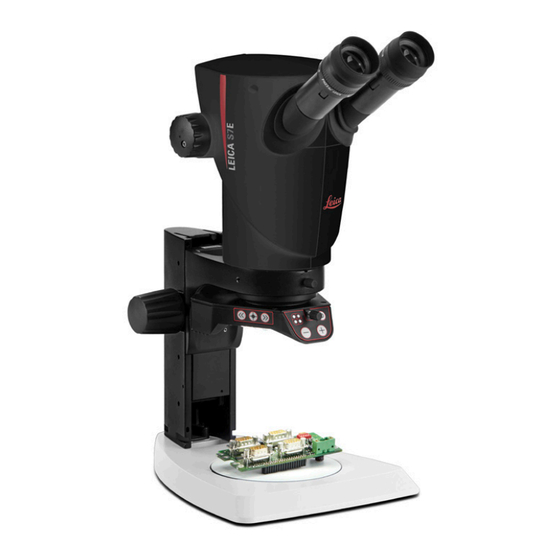
Page 23: Overview: S7 E Stereo Microscope
Overview: S7 E Stereo Microscope 1. Magnification changer, right drive knob with magnification scale 2. Focusing drive 3. Fixing screw for optics carrier in the microscope carrier 4. Adjustable tube: Interpupillary distance adjustable from 50 to 76 mm 5. Eyepieces 6. -
Page 24: Using The Eyepieces
All stereo microscopes from Leica Microsystems are parfocally matched. However, the parfocality requires a personal dioptric correction for the user. -
Page 25: The Correct Interpupillary Distance
12 mm. Disclaimer: Illustrations on this page show the optics carrier of an S9 stereo microscope with same proportion as the S7 E featured in this user manual. S7 E User Manual Quick Start Guide... -
Page 26: Focusing
Disclaimer: Illustrations on this page show the optics carrier of an S9 stereo microscope with same proportion as the S7 E featured in this user manual. S7 E User Manual Quick Start Guide... -
Page 27: Changing Magnification (Zooming)
41. Disclaimer: Illustrations on this page show the optics carrier of an S9 stereo microscope with same proportion as the S7 E featured in this user manual. S7 E User Manual Quick Start Guide... -
Page 28: Regulating The Resistance Of The Focusing Drive
Disclaimer: Illustrations on this page show the optics carrier of an S9 stereo microscope with same proportion as the S7 E featured in this user manual. S7 E User Manual Quick Start Guide... -
Page 29: Changing The Position Of The Optics Carrier
Disclaimer: Illustrations on this page show the optics 3. Carefully tighten the clamping screw. carrier of an S9 stereo microscope with same proportion as the S7 E featured in this user manual. S7 E User Manual Quick Start Guide... - Page 30 Use this advantage as often as possible, it is not available on all stereo microscopes. The diopters can be set between +5 and -5. S7 E User Manual Quick Start Guide...
-
Page 31: Diopter Settings And Parfocality: 1 Adjustable & 1 Fixed Eyepiece
"–" direction until the eye can see the specimen sharply. 4. Observe the specimen through the eyepieces and bring it into sharp focus with 7. Set the lowest magnification level. Continued on next page the focusing drive. S7 E User Manual Quick Start Guide... - Page 32 2. Monitor the specimen; if necessary, refocus it slightly. 3. Change from the highest to the lowest magnification. The sharpness should be constant (parfocal). If this is not the case, repeat this procedure. S7 E User Manual Quick Start Guide...
-
Page 33: Dioptric Correction With Two Adjustable Eyepieces
Use this advantage as often as possible, it is not available on all stereo microscopes. The diopters can be set between +5 and -5. S7 E User Manual Quick Start Guide... - Page 34 4. Observe the specimen through the eyepieces and bring it into sharp focus with 7. Set the lowest magnification level. 11. Repeat steps 10 and 11 with the other eye. the focusing drive. Continued on next page S7 E User Manual Quick Start Guide...
- Page 35 2. Monitor the specimen; if necessary, refocus it slightly. 3. Change from the highest to the lowest magnification. The sharpness should be constant (parfocal). If this is not the case, repeat this procedure. S7 E User Manual Quick Start Guide...
-
Page 36: Dimensional Drawings In Mm
Dimensional Drawings in mm S7 E User Manual Dimensional Drawings in mm... -
Page 37: Leica S7 E With Incident Light Base & Transmitted Light Base
Leica S7 E With Incident Light Base & Transmitted Light Base ø58 ø58 ø76 ø76 Measurements shown in millimeters. S7 E User Manual Dimensional Drawings in mm... - Page 38 Technical Data S7 E User Manual Technical Data...
-
Page 39: Technical Data
Ergonomic eyepieces, fixed and adjustable, with cups 10× / 23, 16× / 16, 20× / 12 10× / 23, 16× / 15, Ergonomic eyepieces for eyeglass wearers, adjustable, with eyecups 25× / 9.5, 40×/ 6 Interpupillary distance 50 –76 mm S7 E User Manual Technical Data... -
Page 40: Appendix
Appendix S7 E User Manual Appendix... -
Page 41: Calculating The Total Magnification/Field Of View Diameter
Calculation example: Field of view diameter in the specimen M TOT VIS = M O × M E × z N FOV ∅ OF: = 1.9 mm M O × z 1.6 ×4 1.6 × 20 × 4 = 128 S7 E User Manual Appendix... -
Page 42: Troubleshooting
Perform diopter correction exactly correctly? according to the instructions (from Are the fuses intact? page 33). The focusing drive gradually sinks on its own or is difficult to turn Regulate the ease of movement (page 15). S7 E User Manual Appendix... -
Page 43: Care, Maintenance, Contact Persons
Leica representative or Leica Microsystems alkaline, caustic and corrosive materials and that even after years and decades, your Leica (Schweiz) AG, CH-9435 Heerbrugg. keep chemicals away from the instruments. stereo microscope will continue to work as well as it did on the very first day. - Page 44 Keep accessories in a dust-free place when Remove dust with a pneumatic rubber bulb not in use. or with a soft brush. Clean objectives and eyepieces with special optic cleaning cloths and with pure alcohol. S7 E User Manual Appendix...
- Page 45 CONNECT WITH US! Leica Microsystems (Schweiz) AG · Max-Schmidheiny-Strasse 201 · 9435 Heerbrugg, Switzerland T +41 71 726 34 34 · F +41 71 726 34 44 www.leica-microsystems.com...
Need help?
Do you have a question about the S7 E and is the answer not in the manual?
Questions and answers