Table of Contents
Advertisement
Quick Links
Download this manual
See also:
User Manual
Quick Start Guide
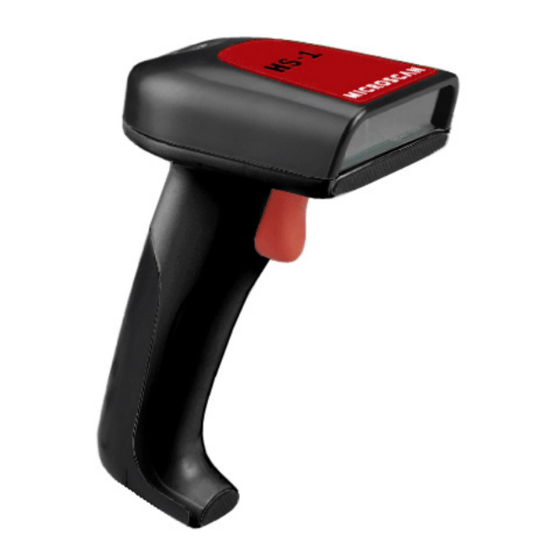
HS-1 Handheld Scanner
Step 2 — Set Up Hardware
(USB Virtual Comm)
Note: The USB Virtual Comm interface draws its power from
the host.
Hardware for USB Virtual Comm
1
HS-1 Handheld Scanner
98-000106-01
2
USB Virtual Comm Cable
98-000112-01
Installation Steps for USB Virtual Comm Mode
1. Attach the RJ50 end of the scanner cable to the bottom of
the handle.
2. Attach the USB end of the cable to a USB port on the host
computer. The host computer will detect the device and
prompt you to install drivers.
3. Insert the USB Virtual Comm driver CD (included with the
USB Virtual Comm Cable) in the host computer's CD drive
and follow the instructions in the driver installation wizard.
4. Read the symbols below in the order provided to set the
scanner to USB Native (HID) Communications Mode.
1
2
3
USB Virtual Comm Mode
Save Settings
Step 1 — Check Required Hardware
HS-1 USB Hardware
1. HS-1 Handheld Scanner
2. USB Cable
HS-1 Serial Hardware
1. HS-1 Handheld Scanner
2. RS-232 Kit
3. USB Virtual COM Cable (if required by application; not shown)
P/N 83-110001 Rev A
Step 2 — Set Up Hardware (RS-232)
Hardware for RS-232
1
HS-1 Handheld Scanner
2
RS-232 Kit
Installation Steps for RS-232
1. Attach the RJ50 end of the scanner cable to the bottom of the
handle.
2. Attach the 15-pin Dsub end of the scanner cable to the host
computer and then plug in the power supply.
3. Read the symbols below in the order provided to set the scanner
to RS-232 Communications Mode.
1
2
Bar Code
Configuration
Mode
RS-232 Mode
Step 2 — Set Up Hardware (USB)
Note: The USB interface draws its power from the host.
Hardware for USB
Installation Steps for USB
Step 3 — Install ESP
ESP Software can be found on the Microscan Tools Drive that is
packaged with the HS-1.
98-000106-01
98-000111-01
Minimum System Requirements
• 166 MHz Pentium processor (Pentium II processor recommended)
Bar Code
Configuration
• Windows Vista, XP, or 2000 operating system
Mode
• Internet Explorer 5.0 or higher
• 64 MB minimum RAM (128+ MB RAM recommended)
• 80 MB hard drive space
• 800 x 600 minimum 256 color display (1024 x 768 32-bit color
3
Save Settings
1
HS-1 Handheld Scanner
98-000106-01
2
USB Cable
Included
1. Attach the RJ50 end of the scanner cable to the bottom of
the handle.
2. Attach the USB end of the cable to a USB port on the host
computer.
3. Read the symbols below in the order provided to set the
scanner to USB Native (HID) Communications Mode.
1
Bar Code
Configuration
Mode
2
3
USB Native (HID) Mode
Save Settings
1. Follow the prompts to install ESP from the Tools Drive.
2. Click on the ESP icon to run the program.
Note: ESP can also be installed from the Download Center
at
www.microscan.com.
recommended)
Advertisement
Table of Contents

Related Manuals for Microscan HS-1


Summary of Contents for Microscan HS-1
-
Page 1: Quick Start Guide
Step 3 — Install ESP (USB Virtual Comm) Hardware for RS-232 ESP Software can be found on the Microscan Tools Drive that is packaged with the HS-1. Note: The USB Virtual Comm interface draws its power from HS-1 Handheld Scanner 98-000106-01 1. - Page 2 RS-232 or USB Virtual Comm You are now ready to configure the HS-1 using ESP. 1. Click the HS-1 button and then click OK. If you do not want to make this selection every time you start ESP, uncheck “Show this dialog at startup”.
Need help?
Do you have a question about the HS-1 and is the answer not in the manual?
Questions and answers