
Related Manuals for GPI FM-300H


Summary of Contents for GPI FM-300H
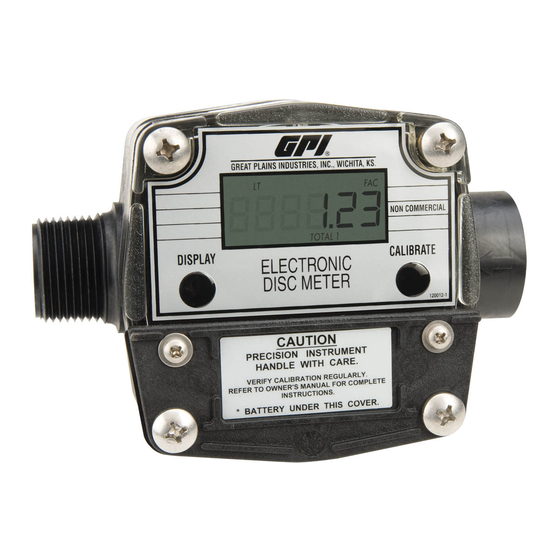
- Page 1 FM-300H FM-300HR Electronic Disc Meter Owner’s Manual 5252 East 36th Street North Wichita, KS USA 67220-3205 TEL: 316-686-7361 FAX: 316-686-6746 www.gpipumps.net 06/10 Rev. C 920679-06...
-
Page 2: Table Of Contents
To the owner… GENERAL INFORMATION Congratulations on receiving your GPI This manual assists you in operating and Electronic Disc Meter. We are pleased to maintaining your meter. Please take a few provide you with a meter designed to give moments to acquaint yourself with the you maximum reliability and efficiency. -
Page 3: Before Installation
2. When handling hazardous chemicals, 3. Replace the gasket and battery always follow the chemical manu- cover and tighten securely. Torque facturer’s safety precautions. Wear the screws to 9 to 10 in. lbs. protective clothing such as goggles, gloves, and respirators, as instructed. 3. -
Page 4: Operation
Computer Display If the display becomes dim, faded or the low battery message appears (see below), All operations are reflected in the LCD battery needs to be replaced. Reference readout. The large center digits indicate the Maintenance Section for details. Also amounts, where smaller words or “icons”... -
Page 5: Calibration
Flowrate Feature Field Calibration Procedures (Dispense/Display Method) Some models have of Rate of Flow mode. To use this feature, press and 1. To field calibrate, press and hold the release DISPLAY until FLOWRATE icon CALIBRATE and DISPLAY buttons appears. The factory set time base will for about 3 seconds until you see be highlighted to the right of FLOWRATE FLdCAL. -
Page 6: Maintenance
CAUTION through which the level of liquid can be To avoid damage to the housing, do viewed. GPI offers a properly designed not use a wrench. calibration container for volumes of 5 gallons or 5 litres. - Page 7 2. Tap the screws with a hammer to 5. Gently remove the metal clips holding loosen the coverplate from the hous- the nutator in place. (Figure 6) Take ing. (Figure 3) Remove the screws care not to damage the O-ring on the and washers.
-
Page 8: Battery Replacement
5. Coat the O-ring lightly with bearing Figure 7 grease and seat securely on the coverplate. 6. With the display facing up, turn the coverplate to the desired orientation. Align holes on coverplate and hous- ing. 7. Secure the coverplate by evenly tightening screws to 25 to 35 in. -
Page 9: Troubleshooting
End of Season 4. Install the new battery. To ensure proper operation, the meter When the battery is installed cor- should be cleaned prior to extended rectly, the computer powers on periods of inactivity and at the end of automatically. Check the readout to the season before storage. - Page 10 SYMPTOM PROBABLE CAUSE CORRECTIVE ACTION C. NORMAL FLOW- 1. Field Calibration not Field calibrate again or select Factory RATE BUT performed correctly Calibration. METER DOES 2. Nutator misaligned Disassemble meter and install nutator NOT COUNT again. Ensure O-ring and retainer clips (Meter comes on are in place.
-
Page 11: Illustrated Parts List
ILLUSTRATED PARTS LIST Item Item Part No. Description Req’d. Part No. Description Req’d. 120505-1 Housing Kit ......1 901001-78 O-ring ........1 904004-19 Screw, 1/4-20 x 1-3/4 in..4 902004-20 9 Volt Transistor Battery ..1 904005-29 Washer, 1/4 in...... 4 120501-3 Battery Cover and 120503-1... -
Page 12: Specifications
It may be possible to Outlet: 1 inch NPT male diagnose the trouble and identify needed parts in a telephone call or letter. GPI can Dimensions also inform you of any special handling Height: 4 inches (10.3 cm) requirements you will need to follow Depth: 3.1 inches (8.1 cm) - Page 16 To make a claim against this warranty, contact the GPI Customer Service Department at 316-686-7361 or 800-835-0113. Or by mail at: Great Plains Industries, Inc.
Need help?
Do you have a question about the FM-300H and is the answer not in the manual?
Questions and answers