
Subscribe to Our Youtube Channel
Related Manuals for Cygnus Cygnus 4


Summary of Contents for Cygnus Cygnus 4
-
Page 1: Operating Manual
Cygnus 4 Multiple Echo Ultrasonic Thickness Gauge Operating Manual Covers Gauge Model : M5-C4 Doc No. M5-CYG4-M-01_Iss6.doc 18 October 2016... - Page 2 Cygnus 4 Operating Manual M5-CYG4-M-01_Iss6.doc QUALITY POLICY STATEMENT Cygnus Instruments’ mission is to be a premier supplier of niche test and measurement instruments. To achieve this we will: Customers • Be dedicated to customer satisfaction by listening to direct and indirect feedback regarding our performance and product requirements in general.
-
Page 3: Table Of Contents
Cygnus 4 Operating Manual M5-CYG4-M-01_Iss6.doc Contents 1. Important Notice .............. 6 2. Introduction ..............7 Cygnus 4 Thickness Gauge ............7 Cygnus Instruments ...............8 Regional Offices ..............8 Gauge Kit Contents ..............9 3. Gauge Preparation ............10 Fitting the Batteries ............. 10 Connecting the Probe ............ - Page 4 Cygnus 4 Operating Manual M5-CYG4-M-01_Iss6.doc Setting the Velocity of Sound ..........30 7. Gauge Setup ..............32 Menu Operation ..............32 Settings are Saved with the Probe Type ........33 Changing Numeric Values using the Navigation Keys ....34 Selecting the Probe Type ............35 Automatic Probe Detection ..........
- Page 5 Cygnus 4 Operating Manual M5-CYG4-M-01_Iss6.doc Index ................61...
-
Page 6: Important Notice
The following important information must be read and understood by all users of Cygnus ultrasonic thickness gauges. The correct use of Cygnus ultrasonic thickness gauges requires identification of the correct equipment for the specific application coupled with an appropriately trained and qualified operator or technician. -
Page 7: Introduction
Cygnus 4 Operating Manual M5-CYG4-M-01_Iss6.doc 2. Introduction Cygnus 4 Thickness Gauge The Cygnus 4 Ultrasonic Thickness Gauge is a rugged, handheld, battery-powered instrument designed for high-reliability multiple echo thickness measurements in harsh environments using ultrasound. The gauge can be used with a choice of Ultrasonic Probes, selected to suit the material and thickness range to be measured. -
Page 8: Cygnus Instruments
Our philosophy is to work closely with each of our customers to provide a range of products specifically for each application. Cygnus Ultrasonic Thickness Gauges are designed to be simple to use and to withstand the harsh environments that they are intended for. -
Page 9: Gauge Kit Contents
Cygnus 4 Operating Manual M5-CYG4-M-01_Iss6.doc Gauge Kit Contents Cygnus 4 Gauge Operating Manual (in side pouch) Neck Strap (in side pouch) Ultrasonic Probe Moulded Probe Cable (in side pouch) Accessory Pouch, containing; 3 x AA Batteries Blue Couplant Gel. 15mm (or ½”) Steel Test Block... -
Page 10: Gauge Preparation
Fitting the Batteries The gauge requires 3 x AA/LR6/UM3 Batteries. Cygnus supplies and recommends Duracell Alkaline batteries. The batteries are located behind a cover on the rear of gauge. The hand strap can be separated by a push-button buckle to gain access to the battery cover. -
Page 11: Connecting The Probe
This would not be covered by the warranty. Connecting the Probe The Cygnus probe lead uses a custom made cable that offers superior flexibility and resistance to oils and ultraviolet light. The cable will not stiffen after exposure to ultraviolet light. - Page 12 Cygnus 4 Operating Manual M5-CYG4-M-01_Iss6.doc Wire loop fitted to the gauge body. Simply pass the loop through the hole in the gauge and back over the other end. The neck strap can then be clipped on to the loops.
-
Page 13: Selecting The Right Probe
The performance of any thickness gauge, and its ability to get a reliable measurement depends on selecting the right ultrasonic probe for the application and conditions. Cygnus gauges are therefore offered with a selection of probes suitable for most thickness gauging applications. -
Page 14: Measurement Modes Explained And Compared
This method has been used in all Cygnus gauges since the late 1970s. Multiple echo mode will ignore surface coatings, there is no need to remove the paint to take a measurement. -
Page 15: Single Element Probes And Protective Membranes
• Foams • Composites Single Element Probes and Protective Membranes All Cygnus single element probes have a soft face and are therefore fitted with a Polyurethane Membrane which provides better contact on rough surfaces and protects the probe face from wear, prolonging the life of the probe. - Page 16 Cygnus 4 Operating Manual M5-CYG4-M-01_Iss6.doc Single Element Probe Membrane Locking Key...
- Page 17 Cygnus 4 Operating Manual M5-CYG4-M-01_Iss6.doc Changing the Protective Membrane on Single element Probes Unscrew the Knurled Ring from the end of the Probe. Use the Membrane Key to unscrew the Locking Ring from inside the Knurled Ring. The old membrane can then be removed and discarded.
-
Page 18: Summary Of Cygnus Probes
70°C (160°F). For measuring higher temperatures Teflon membranes are available and suitable for surface temperatures up to 150°C (300°F) with intermittent contact. Contact Cygnus instruments to order Teflon membranes. When measuring high temperatures limit the time the probe is in contact with the hot surface to less than 4 seconds and ensure the probe has sufficient time between measurements to cool down. -
Page 19: The 'Probe Type' Code
Cygnus 4 Operating Manual M5-CYG4-M-01_Iss6.doc The ‘Probe Type’ Code Size ingle or Frequency in MHz Crystal 13mm 19mm... -
Page 20: Gauge Operation
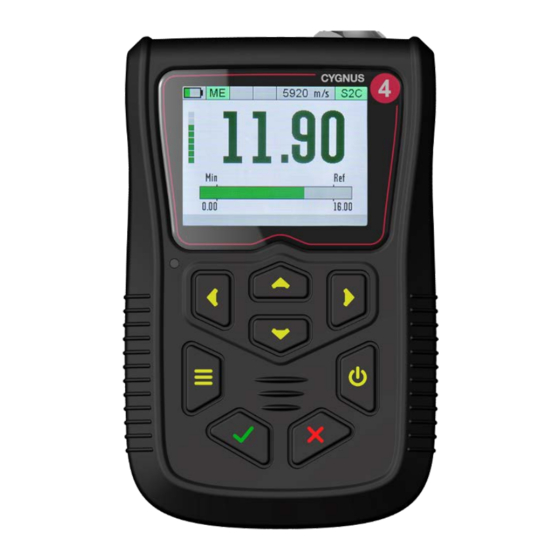
Cygnus 4 Operating Manual M5-CYG4-M-01_Iss6.doc 5. Gauge Operation Gauge Controls Probe Connection End view of gauge Navigation Keys Power Menu Select Keys Front view of gauge... -
Page 21: Turning The Gauge On
Cygnus 4 Operating Manual M5-CYG4-M-01_Iss6.doc Turning the Gauge On Press the Power key Cygnus Instruments Logo is displayed The gauge details are displayed; Model Serial Number Version Number Run Time The gauge is ready to use Turning the Gauge Off Press &... -
Page 22: Status Information
Cygnus 4 Operating Manual M5-CYG4-M-01_Iss6.doc Taking thickness measurements or accessing the menu will reset the activity timer back to zero. You can change the activity time value the Setup menu, see Power Off Setting on page 45. Status Information At the top of the display is an area that shows information about the gauge’s status;... -
Page 23: Taking The Thickness Measurement
Cygnus 4 Operating Manual M5-CYG4-M-01_Iss6.doc Taking the Thickness Measurement Remove all scale, rust, dirt or loose coatings and brush the test area clean. Apply ultrasonic couplant to the test surface. Place the probe-face on the clean, lubricated test surface and make firm contact applying gentle pressure. -
Page 24: Display Hold Function
Cygnus 4 Operating Manual M5-CYG4-M-01_Iss6.doc 1 steady + 1 Bar Flashing: Only 1 echo detected 2 steady + 1 Bar Flashing: Only 2 echoes detected 3 steady + 1 Bar Flashing: 3 echoes detected but they are not matched To help obtain a multiple echo reading the operator should continue to move the probe around to locate a suitable reflector, using a slight rocking motion. -
Page 25: Battery Life
Cygnus 4 Operating Manual M5-CYG4-M-01_Iss6.doc A thickness measurement is displayed Press the X/Cancel key to hold the thickness measurement. The measurement value now has a light blue border to indicate its held or froze. Press the X/Cancel key to un-hold the thickness measurement. -
Page 26: Low Battery Indication
Cygnus 4 Operating Manual M5-CYG4-M-01_Iss6.doc Battery almost full Battery about 1/2 full Battery low Low Battery Indication The gauge will periodically flash a red Low Battery warning sign when the batteries have approximately 1 hour of use remaining. Low battery indication When the batteries are exhausted the gauge will display a Flat Battery message for 5 seconds then turn off automatically. -
Page 27: Calibration
Cygnus 4 Operating Manual M5-CYG4-M-01_Iss6.doc 6. Calibration Why should I Calibrate my Thickness Gauge? Ultrasonic thickness gauges measure time in order to measure the thickness of the material being tested. The rely on the principal that sound travels through a material at a constant velocity or speed. -
Page 28: Calibration Options
Cygnus 4 Operating Manual M5-CYG4-M-01_Iss6.doc Calibration Options The Gauge is supplied tested and calibrated. The Gauge will have been calibrated to measure thickness through steel (grade S355JO) with a velocity of sound of 5920 m/s. Either a 15mm or 1/2” Test Block is supplied with the kit so the Gauge can be quickly checked for correct operation. - Page 29 Cygnus 4 Operating Manual M5-CYG4-M-01_Iss6.doc Place the Probe on the sample and verify the gauge can get a thickness value. Access the Menu and scroll down to the ‘Calibration’ group. Then scroll right to the ‘1 Point Cal’ item. Press the Ok/Select key to open the ‘1 Point Cal’...
-
Page 30: Setting The Velocity Of Sound
Cygnus 4 Operating Manual M5-CYG4-M-01_Iss6.doc ‘1PC’ Indicator Setting the Velocity of Sound The gauge uses the Velocity of Sound value to calculate the material thickness value. It is therefore important the velocity value is set for the material being measured. - Page 31 Cygnus 4 Operating Manual M5-CYG4-M-01_Iss6.doc Use the Up and Down keys to adjust the velocity value as required Use the Left and Right keys to highlight the digit to change. When done press the OK/Select key to save the changes.
-
Page 32: Gauge Setup
Cygnus 4 Operating Manual M5-CYG4-M-01_Iss6.doc 7. Gauge Setup Menu Operation Press the Menu key, the Main Menu is displayed Use the four Navigation keys to scroll around the Main Menu Use the Up and Down keys to select a group in the left column.. -
Page 33: Settings Are Saved With The Probe Type
Cygnus 4 Operating Manual M5-CYG4-M-01_Iss6.doc If you want to change or select the item currently displayed simply press the green Ok/Select button Then use the Navigation keys to highlight the required setting or option Press the green Ok/Select key to... -
Page 34: Changing Numeric Values Using The Navigation Keys
Cygnus 4 Operating Manual M5-CYG4-M-01_Iss6.doc • Units • Resolution • Velocity of sound • Calibration • Deep Coat Changing Numeric Values using the Navigation Keys Some menu functions require the user to input a numeric value using the navigation keys. This is done ‘digit’ as a time, using the Left and Right keys to select the digit, then the Up and Down keys to change the highlighted digits value. -
Page 35: Selecting The Probe Type
Cygnus 4 Operating Manual M5-CYG4-M-01_Iss6.doc Selecting the Probe Type The Probe Type must be set to the probe connected to it. If the wrong probe is selected the gauge will not measure accurately if at all. The Probe Type is displayed is displayed at the top of the measurement screen in the status area. -
Page 36: Automatic Probe Detection
Cygnus 4 Operating Manual M5-CYG4-M-01_Iss6.doc Remember settings and calibration is saved with each probe type. So if you change the probe type you may find a setting has changed – this is normal. The reason settings are saved with each probe type is so you can swap probes during a survey without having to re- calibrate each time. -
Page 37: Measurement Units
Cygnus 4 Operating Manual M5-CYG4-M-01_Iss6.doc Measurement Units The Gauge can display thickness measurements in either Metric (mm) or Imperial (inch). Changing the measurement units will not affect the calibration. Access the Menu and scroll down to the ‘Measurement’ group. Then scroll right and select ‘Units’. -
Page 38: Limit Functions
Cygnus 4 Operating Manual M5-CYG4-M-01_Iss6.doc To change the Resolution setting: Access the Menu and scroll down to the ‘Measurement’ group. Then scroll right and select ‘Units’. Press the Ok/Select key to open the ‘Resolution’ function Use the Up and Down keys to select the required Resolution Press the OK/Select key to save. - Page 39 Cygnus 4 Operating Manual M5-CYG4-M-01_Iss6.doc • Minimum Limit – this is the lowest thickness measurement, measurements under this value will cause an Alert • Reference Limit – this is the ‘correct’ thickness value, or when corrosion monitoring this is usually set to the thickness of the steel/material when it was new.
- Page 40 Cygnus 4 Operating Manual M5-CYG4-M-01_Iss6.doc Now the thickness measurement is 8.05 mm so the bar-graph shows a dark green bar positioned left of the Reference point. Now the thickness measurement is 5.10 mm so the bar-graph shows a red bar positioned at the Minimum point.
-
Page 41: Deep Coat Function
Cygnus 4 Operating Manual M5-CYG4-M-01_Iss6.doc Access the Menu and scroll down to the ‘Limits’ group. Then scroll right and select ‘Limits’. Press the Ok/Select key to open the ‘Limits’ function Use the Up and Down keys to turn Limits On or Off…... - Page 42 Cygnus 4 Operating Manual M5-CYG4-M-01_Iss6.doc With Deep Coat turned On this will allow the gauge to measure through coatings over 3mm (0.11”) thick up to a maximum of around 20 mm (0.78”) depending on the properties of the coating material.
- Page 43 Cygnus 4 Operating Manual M5-CYG4-M-01_Iss6.doc When Deep Coat is turned On a ‘DC’ indicator will be displayed in the status area at the top of the measurement screen. DC = Deep Coat is ON.
-
Page 44: Setup Menu
Cygnus 4 Operating Manual M5-CYG4-M-01_Iss6.doc 8. Setup Menu The Setup group is found at the bottom of the menu, it holds various gauge setup options. Access the Menu and scroll down to the ‘Setup’ group. Then scroll right to select the required item Press the Ok/Select key to open the highlighted item. -
Page 45: Power Off Setting
Cygnus 4 Operating Manual M5-CYG4-M-01_Iss6.doc Manual Brightness Setting. Power Off Setting You can choose from three power-saving settings, these determine how long before the gauge will dim the display and ultimately turn off when the gauge is inactive (inactive = no key presses and no thickness measurements). - Page 46 Cygnus 4 Operating Manual M5-CYG4-M-01_Iss6.doc Note. Although the Cygnus 4 gauge displays the time and date it does not use them for any function.
-
Page 47: General Points On Thickness Gauging
Cygnus 4 Operating Manual M5-CYG4-M-01_Iss6.doc 9. General Points On Thickness Gauging On very rough surfaces and especially if both sides are badly corroded, it is often necessary to move the Probe around to locate a back wall reflector. Sometimes a slight rocking movement can help find reflectors which are otherwise impossible. -
Page 48: Troubleshooting
Cygnus 4 Operating Manual M5-CYG4-M-01_Iss6.doc 10. Troubleshooting The Gauge will not Switch On • Are the batteries exhausted? • Check the batteries are inserted correctly. Difficulty obtaining a Reading • Check that the Probe lead is properly connected to both Probe and Gauge. - Page 49 Cygnus 4 Operating Manual M5-CYG4-M-01_Iss6.doc • When measuring on very heavily corroded metal with single element probes the gauge uses more power searching for a multiple echo match – this can significantly reduce battery life. So if you are frequently measuring on very heavy corrosion consider using a twin element probe as this will require less power to get measurements.
-
Page 50: Updating Your Gauge
Before updating your gauge note the model and serial number of the gauge (see Turning the Gauge On on page 21). You can then check on the Cygnus website if your gauge has the latest firmware version, and if not proceed to download the update software. -
Page 51: Care And Servicing
Do not store the Gauge for long periods in conditions of high humidity. Repairs There are no user serviceable parts inside the Gauge. Therefore all repair work should be carried out by Cygnus Instruments or by an Authorised Cygnus Service dealer. -
Page 52: Returning The Gauge For Servicing
Cygnus 4 Operating Manual M5-CYG4-M-01_Iss6.doc Returning the Gauge for Servicing A full Manufacturer’s Factory Service is available from Cygnus Instruments. The Complete Kit should always be returned for Service or Repair, including all Probes and Leads. Cygnus Gauges are renowned for their reliability, very often problems with getting measurements are simply due to the way the Gauge is being used. -
Page 53: Information
Cygnus 4 Operating Manual M5-CYG4-M-01_Iss6.doc 13. Information Technical Specifications Cygnus M5-C4 Technical Specifications General Attributes Size 84 mm x 130 mm x 35 mm (W x H x D) (3.3 in x 5.1 in x 1.4 in) Weight Gauge with batteries 300 g (10.5 oz.) Power Supply 3 x AA / R6 Batteries. - Page 54 Cygnus 4 Operating Manual M5-CYG4-M-01_Iss6.doc Cygnus M5-C4 Technical Specifications Measurement Allows continuous measurement up to 75°C (160°F). Resolution Multiple Echo measurement modes; 0.1 mm [0.005”] (measurement > 120 mm) Medium 0.05 mm [0.002”] (measurement < 120 mm) Accuracy ±0.1 mm (±0.004”) or 0.1% of thickness measurement whichever is the greatest.
- Page 55 Cygnus 4 Operating Manual M5-CYG4-M-01_Iss6.doc Cygnus M5-C4 Technical Specifications MIL STD 810G Method 516.7 (Transit Drop 1.22m) Compliance RoHS Compliant. Designed for BS EN 15317:2013. CE Marked including EMC. Specifications are subject to change for product improvement.
-
Page 56: Table Of Sound Velocities
Cygnus 4 Operating Manual M5-CYG4-M-01_Iss6.doc Table of Sound Velocities Velocities will vary according to the precise grade and processing conditions of the material being measured. This table is included as a guide only. Wherever possible, the Gauge should always be calibrated on the material under test. -
Page 57: Reading Conversions
Cygnus 4 Operating Manual M5-CYG4-M-01_Iss6.doc Stainless Steel 304 5664 0.2229 0.956 Stainless Steel 314 5715 0.2250 0.965 Stainless Steel 316 5750 0.1163 0.971 3320 0.1307 0.561 Titanium 6100 - 6230 0.2402 – 0.2453 1.030 – 1.052 Tungsten Carbide 6660 0.2622 1.125... -
Page 58: Eu Declaration Of Conformity
Cygnus 4 Operating Manual M5-CYG4-M-01_Iss6.doc 14. EU Declaration of Conformity... -
Page 59: Recycling And Disposal (Ec Countries)
DO dispose of the complete product including cables, plugs and accessories in the designed WEEE collection facilities. This product may also be returned to the agent or manufacturer who supplied it for safe end-of-life disposal. Cygnus Instruments Ltd registration number for The WEEE Directive is WEE/HE1274RU. -
Page 60: Warranty Information
6. Except in respect of death or personal injury caused by the negligence of Cygnus, Cygnus shall not be liable to the Purchaser or to any other person by reason of any representation (unless fraudulent), or any implied warranty, condition or other term,... - Page 61 Cygnus 4 Operating Manual M5-CYG4-M-01_Iss6.doc 17. Index Automatic Power Off, 21 Units, 37 Batteries Metric, 37 Fitting, 10 Multiple Echo, 14 Level, 26 Echo Bars, 23 Life, 25 Neck Strap, 11 Low Battery Warning, 26 Power button, 21 NiCad, 10...
Need help?
Do you have a question about the Cygnus 4 and is the answer not in the manual?
Questions and answers