
Related Manuals for Clear-Com HelixNet 2.1


Summary of Contents for Clear-Com HelixNet 2.1
- Page 1 IKB-12P Industrial KB Station User Guide Document Reference PN: 399G167 Rev: 1 1/13/16 Clear-Com HelixNet Industrial KB Station User Guide...
- Page 2 The product described in this document is distributed under licenses restricting its use, copying, distribution, and decompilation/reverse engineering. No part of this document may be reproduced in any form by any means without prior written authorization of Clear-Com, an HME Company.
-
Page 3: Table Of Contents
Important safety instructions ................ 5 Safety symbols ....................6 Further information ..................6 Introduction ....................7 Panels and Interfaces ..................8 Industrial KB Station front panel ............... 8 Industrial KB Station rear panel ..............10 KB Station handset ..................12 Installing the Industrial KB Station ............. - Page 4 Specifications ....................34 Industrial KB Station (IKB-12P) ..............34 Menu maps ....................36 Compliance ....................40 HelixNet Industrial KB Station User Guide...
-
Page 5: Important Safety Instructions
Important safety instructions It is important to note the following safety information. Read these instructions. Keep these instructions. Heed all warnings. Follow all instructions. Do not use this apparatus near water, unless it is mounted in an approved enclosure. ... -
Page 6: Safety Symbols
Further information For the latest information about HelixNet Partyline, including software updates, see: http://www.clearcom.com/product/helixnet. For information about Clear-Com accessories, including headsets and gooseneck microphones, see http://www.clearcom.com/product/accessories. For legal and contact information, see Page 2 of this guide. HelixNet Industrial KB Station User Guide... -
Page 7: Introduction
Introduction ® This guide is intended to help you install, configure, and use the HelixNet Industrial KB Station (IKB-12P). The HelixNet Industrial KB Station is an easy-to-use intercom station that connects to a single partyline and enables users to send and receive audio. A HelixNet Main Station (HMS- 4X) connect to and controls up to 64 Industrial KB Stations, and each station is individually configured and controlled using a menu driven display and a browser-based software configuration tool. -
Page 8: Panels And Interfaces
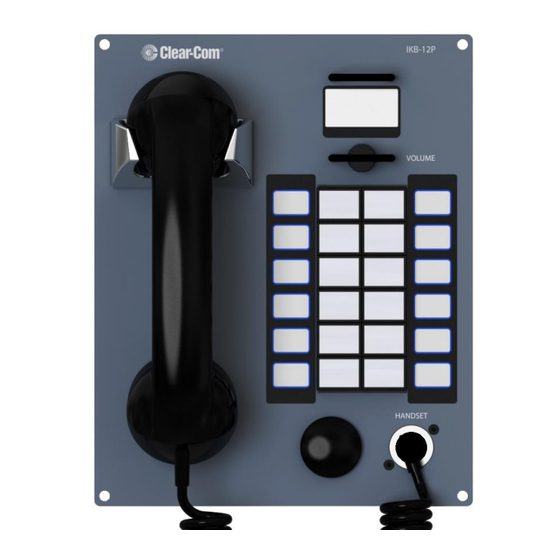
Panels and Interfaces Industrial KB Station front panel Figure 3-1 Industrial KB Station front panel HelixNet Industrial KB Station User Guide... - Page 9 Key to Industrial KB Station front panel Description Feature Handset. The handset contains a Push-To-Talk (PTT) button. OLED display screen. An OLED display that shows three horizontal lines of text. In normal operating mode the display shows: The User Name ...
-
Page 10: Industrial Kb Station Rear Panel
Industrial KB Station rear panel Phoenix connectors for panel expansion Ethernet connector Figure 3-2 Industrial KB Station rear panel For information on expanding the unit to include more call buttons, see 4.4 Installing the Industrial KB Station You can install the Industrial KB Station in a network which has a DHCP server which automatically assigns IP addresses, or in a network where you manually assign IP addresses. - Page 11 From a Web browser, enter the address of the Main Station. From the Configuration Editor tool, configure a new profile for the Industrial KB Station. See 7.6 Profile Editing screen. Connect an Ethernet cable (cat 5 or higher) from the Ethernet connector on the rear of the Industrial KB Station (see 3.2 Industrial KB Station rear panel) to a Power over Ethernet (PoE) switch.
-
Page 12: Kb Station Handset
By Name, and select the name of the required Main Station. See 5.6.1Selecting a HelixNet Main Station controller. From the KB Station menu, select Profiles, and select the profile that you created in step 3. See 5.5 Profiles. Adding extra call buttons to the Industrial KB Station. KB Station handset Push-To-Talk (PTT) button... -
Page 13: Installing The Industrial Kb Station
Installing the Industrial KB Station This chapter describes how to install your Industrial KB Station. Do not plug any non-approved equipment into HelixNet Partyline. HelixNet Partyline operates at different voltage levels than analog two-wire partyline systems. Do not plug any analog two-wire partyline equipment into the HelixNet partyline ports, as this may cause damage. -
Page 14: Mounting The Industrial Kb Station
Mounting the Industrial KB Station The Industrial KB Station can be: Mounted in an enclosure for desktop use Mounted inside a wall box. There are four mounting holes located at each corner of the unit that enable you to fix the unit to your existing desktop or wall-hanging enclosures. -
Page 15: Adding Extra Call Buttons To The Industrial Kb Station
If your network contains only one HelixNet Main Station, the Industrial KB Station automatically pairs with the Main Station. If there is more than one Main Station, press and hold the rotary control on the front of the KB Station for four seconds, and then select Networking > Pair to Station > By Name, and select the name of the required Main Station. - Page 16 Access the two phoenix expansion connectors located on the back panel of the Industrial KB Station. SW 13 to SW 26 SW 27 to SW 40 Make the necessary connection as follows. For each extra call button connect the coresponding switch connection (SW #) to GND. HelixNet Industrial KB Station User Guide...
-
Page 17: Configuring The Industrial Kb Station
Configuring the Industrial KB Station This chapter describes how to configure the settings and manage the Speaker Station using the display screen configuration menus. There are four menu levels. You can only use the configuration menus if they are unlocked. To lock or unlock a Station’s Note: menu, see 7.3 User Stations . -
Page 18: Configuration Settings
Configuration settings The following menu levels appear in Menu mode: Audio Settings – use this menu to configure audio volume and quality. Station Settings – use this menu to configure the station display brightness and screensaver settings. Profiles – use this menu to select a profile. ... - Page 19 +6dB 0dB (default) - 6dB To confirm the selected setting, press the rotary control. Note: When Headphone Limit is set to anything but Off, a LIM indication will be shown on the leftmost display. Adjusting the headphone gain In the third menu, select Headphone Gain.
- Page 20 To confirm the selected setting, press the rotary control. Enabling or disabling the Contour Filter The Contour filter is a Clear-Com algorithm enhancing speech intelligibility, especially when whispering or talking at a low volume. From the third menu, select Contour Filter From the fourth menu, select one of the following: ...
-
Page 21: Station Settings
Enabled Disabled Note: The default is Enabled. To confirm the selected setting, press the rotary control. Station Settings 5.4.1 Setting the Station ID To set the Station ID: In Menu mode, select Station Settings and then Station ID. Enter a Station ID. -
Page 22: Profiles
5.4.4 Setting the screensaver You can choose to enable the screensaver, and to determine what it displays. Tip: To exit screensaver mode, press any key on the front panel. To enable or disable the screensaver: In Menu mode, select Station Settings and then Screensaver. From the third menu, select one of the following: ... - Page 23 To select a Main Station by IP address: In Menu mode, select Networking, and then Pair to Station. From the third menu, select By Address. In the fourth menu, enter a Main Station IP address. To confirm the selected setting, press the rotary control. 5.6.2 Selecting network preferences You can edit the following network parameters:...
-
Page 24: Administration
From the third menu, select Gateway. In the fourth menu, enter or edit the gateway address. To confirm the selected setting, press the rotary control. To edit the subnet mask: In Menu mode, select Networking, and then Preferences. From the third menu, select Subnet Mask. In the fourth menu, enter or edit the subnet mask. -
Page 25: Diagnostics
Diagnostics 5.8.1 Viewing Ethernet information In Menu mode, select Diagnostics and then Ethernet. The third menu displays the following information: Status – The status of the Ethernet IP Addr – The IP address of the Industrial KB Station ... -
Page 26: Using The Industrial Kb Station
Using the Industrial KB Station This chapter describes how to use the Industrial KB Station. Using the handset (HS-6) Ensure that the handset (HS-6) is connected to the station using the 4-pin XLR connector. For more information, see 3.1 Industrial KB Station front panel. 6.1.1 Making an outgoing call to other intercom users: Lift the handset from its cradle... -
Page 27: Using The Configuration Editor
Using the Configuration Editor The Configuration Editor is a software tool that you can download to your configuration PC browser. It offer a quick and easy way to configure HelixNet 2.1. This chapter contains the following sections: Introduction Accessing the Configuration Editor ... -
Page 28: Accessing The Configuration Editor
Accessing the Configuration Editor To access the Configuration Editor, enter the IP address of the HelixNet Main Station that is acting as the HelixNet 2.1 controller into an internet browser address field. You can use any of the following browsers: ... -
Page 29: Station Details Screen
Handset status. This icon indicates that the handset is onhook (white icon) or off hook (red icon). Station Details screen To access more detailed information about any station, click the required station on the User Stations page. The following screen appears. Figure 7-3 Station Details From this screen you can: ... -
Page 30: Profiles Screen
7.4.2 Renaming a station To rename a station, select the station name in the top left of the screen and edit it as required. Locking or unlocking a station’s menu 7.4.3 Before a station can be configured using its display panel, the station’s menu must be unlocked. -
Page 31: Profile Editing Screen
From the Profiles screen you can: View the stations allocated to each profile. To edit this information, see 7.6 Profile Editing screen. Add or delete profiles Create a profiles database backup Restore a previous profile backup ... - Page 32 Figure 7-5 Profile Editing screen From the Profile Editing screen you can: View a list of station Call keys, and see which profiles are associated with each Call key. Rename a profile Add profiles to a Call key ...
-
Page 33: Change Password Screen
Change Password screen To access the Change Password screen, select Figure 7-6 Change Password screen To change your password: In the Old Password edit field, enter your current password. In the New Password edit field, enter your new password. In the Confirm New Password edit field, re-enter your new password Click Change Password. -
Page 34: Specifications
Specifications Industrial KB Station (IKB-12P) 8.1.1 Connectors Specification Description / value Handset One 4-pin male XLR. Ethernet/Power over Ethernet RJ-45 Table 8-1: Station: Connectors 8.1.2 Microphone pre-amplifier Specification Description / value 200 Ω (Dynamic) Handset Mic impedance: Mic limiter range >35 dB Mic gain 60dB (dynamic) -
Page 35: Power Requirements
8.1.3 Earphone amplifier Specification Description / value >32 Ω Load impedance Output level +12dBu before clipping Sidetone -6dB (selectable) The following specified for a route from a 4-wire input @0dBu in: Max gain 12dB Noise <-65dBu (@ max gain) Headphone limiter -0dBu (selectable) Table 8-3: Station: Headphone amplifier 8.1.4... -
Page 36: Menu Maps
Menu maps IKB-12P Industrial KB Station menu map Menu 1 (First) > Menu 2 > Menu 3> Menu 4 (Last ) Audio Settings Headset Sidetone Gain Range: 0dB to -18dB Default: -12db Headphone Limit Off + Range: +6dB to -6dB Default: 0db Headphone Gain Range: 0 to +12dB... - Page 37 Menu 1 (First) > Menu 2 > Menu 3> Menu 4 (Last ) Contour Filter Enabled Disabled Default: Enabled Buzzer Enabled None Disabled Default: Enabled Station Settings Station ID Station ID entry None Alphanumeric entry OLED Brightness High Medium None Default: Medium Display Call Enabled...
- Page 38 Menu 1 (First) > Menu 2 > Menu 3> Menu 4 (Last ) Profile_1 Profile_2 ….. Network Pair to Station By Name Station IDs By Address IP address: xx.xx.xx.xx where x is a numeric value Preferences DHCP Enabled Disabled Default: Enabled IP Address IP address: xx.xx.xx.xx where x is a numeric value Gateway...
- Page 39 Menu 1 (First) > Menu 2 > Menu 3> Menu 4 (Last ) Keyset Name: Industrial KB Station name Talkers: Number of talkers Devices: Number of Industrial KB Stations listening on party line Main Stations: Number of Main Stations listening 2-Wire: Number of 2-Wire ports listening 4-Wire: Number of 4-Wire ports listening HelixNet Industrial KB Station User Guide...
-
Page 40: Compliance
Changes or modifications not expressly approved by Clear-Com, LLC, an HM Electronics, Inc. company could void the user’s authority to operate this equipment. - Page 41 (manufacturers, distributors and/or retailers) to take-back electronic products at the end of their useful life. The WEEE Directive covers most Clear-Com products being sold into the EU as of August 13, 2005. Manufacturers, distributors and retailers are obliged to finance the costs of recovery from municipal collection points, reuse, and recycling of specified percentages per the WEEE requirements.
Need help?
Do you have a question about the HelixNet 2.1 and is the answer not in the manual?
Questions and answers