Invacare Colibri User Manual
Hide thumbs
Also See for Colibri:
- User manual (44 pages) ,
- Service manual (42 pages) ,
- Service manual (24 pages)

Related Manuals for Invacare Colibri


Summary of Contents for Invacare Colibri
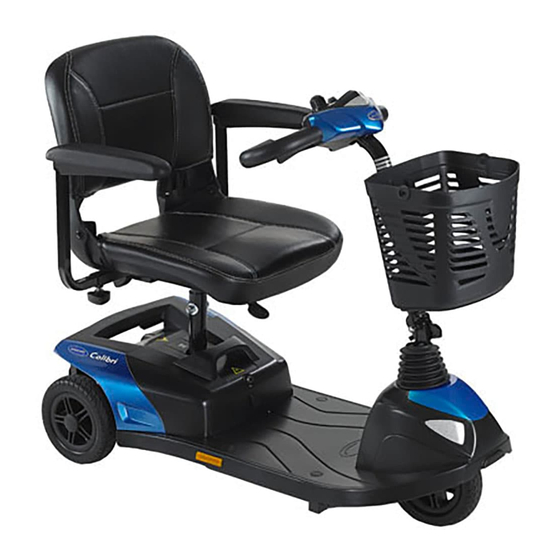
- Page 1 Invacare® Colibri en Scooter User Manual This manual MUST be given to the user of the product. BEFORE using this product, read this manual and save for future reference.
- Page 2 All rights reserved. Republication, duplication or modification in whole or in part is prohibited without prior written permission from Invacare. Trademarks are identified by ™ and ®. All trademarks are owned by or licensed to Invacare Corporation or its subsidiaries unless otherwise noted.
-
Page 3: Table Of Contents
Contents 5 Usage ......... . 26 5.1 Getting in and out. - Page 4 8.3 Inspection checks ......39 8.4 Wheels and tires ....... 40 8.5 Short-term storage .
-
Page 5: General
Identifies required tools, components and items For more information about the product, for example which are needed to carry out certain work. product safety notices and product recalls, contact your Invacare representative. See addresses at the end of this document. 1576371-C... -
Page 6: Intended Use
Invacare® Colibri 1.3 Intended use The values in parentheses name the maximum possible values of a class A product. For the maximum possible values This mobility device was designed for persons whose ability of this mobility device, see 11 Technical Data, page 47. -
Page 7: Limitation Of Liability
General 1.9 Limitation of liability Invacare accepts no liability for damage arising from: • Non-compliance with the user manual • Incorrect use • Natural wear and tear • Incorrect assembly or set-up by the purchaser or a third party •... -
Page 8: Safety
Invacare® Colibri 2 Safety WARNING! Risk of damage or injury if mobility device is accidentally set into motion 2.1 General safety notes – Switch off the mobility device before you get in, get out or handle unwieldy objects. DANGER! – Be aware that the motor brakes are... - Page 9 Safety WARNING! CAUTION! Risk of falling out of the mobility device Risk of injury due to wrong lifting or dropping – If a posture belt is installed, it should be of heavy components correctly adjusted and used each time you use –...
-
Page 10: Safety Information On The Electrical System
Textiles and other materials that normally would mobility device that are not expressly certified not burn are easily ignited and burn with great by Invacare for this purpose. Have all electrical intensity in oxygen enriched air. installations done by your authorized Invacare –... - Page 11 Safety WARNING! WARNING! Risk of death, serious injury, or damage Risk of death or serious injury Corroded electrical components due to water or Failure to observe these warnings can cause an liquid exposure can result in death, serious injury, electrical short resulting in death, serious injury, or damage.
-
Page 12: Safety Information On Electromagnetic Interference
Invacare® Colibri Risk of damage to the mobility device WARNING! A failure in the electric system can lead to Risk of malfunction due to electromagnetic unusual behavior such as continuous light, no interference light, or noises from the magnetic brakes. -
Page 13: Safety Information On Driving And Freewheel Mode
Safety 2.4 Safety information on driving and freewheel WARNING! mode Risk of injury if the mobility device tips over (continued) WARNING! – Never use the mobility device to transport Risk of injury if the mobility device tips over more than one person. –... -
Page 14: Safety Information With Regard To Care And Maintenance
Invacare® Colibri WARNING! WARNING! The center of gravity of the scooter is higher Risk of tipping than that of a power wheelchair. Antitippers (stabilizers) are only effective on firm There is an increased tipping risk when ground. They sink in on soft ground such as negotiating bends. -
Page 15: Labels On Product
Safety CAUTION! Pull battery box latch to Risk of accident and loss of warranty if front to release battery maintenance is insufficient box for removing – For reasons of safety and in order to avoid accidents which result from unnoticed wear, it Quick info how to is important that this electric mobility product disassemble scooter. - Page 16 Invacare® Colibri This product has been Disengaging lever label supplied from an indicating “Push” and environmentally aware “Drive” position of lever manufacturer. This product may contain substances that could be harmful to the environment if disposed of in places (landfills) that are not appropriate according to legislation.
- Page 17 Safety Explanation of Symbols on Labels Date of manufacture See above This symbol indicates the “Drive” position of the coupling lever. In this position the motor is engaged and the motor brakes are operational. You can drive the mobility device. This symbol indicates the “Push”...
-
Page 18: Components
Invacare® Colibri 3.2 Operating console arrangement 3 Components 3.1 Main Parts of the Scooter Battery charge display Speed controller Drive lever Keyswitch (ON/OFF) Operating console Horn Lever for adjusting inclination of steering column Status display / ON/OFF diode Unlocking lever for swivelling and removing seat (front below seat) 3.2.1 Status Display... -
Page 19: Battery Charge Display
Components 3.2.2 Battery charge display All diodes illuminate: Maximum driving range Only red and yellow diodes Reduced driving range. illuminate: Recharge the batteries at the end of your journey. Only red LEDs Battery reserve = severely illuminate/blink, electronic restricted driving range. beeps 3x: Recharge batteries immediately! -
Page 20: Setup
Off and re-enter set-up specifications. – The mobility device is fitted with an individual, Contact Invacare, if mobility device still does multiply adjustable seating system including not perform to correct specifications. adjustable legrests, armrests, a headrest or other options. -
Page 21: Adjusting The Armrest Width
Setup Initial setup should always be done by a healthcare professional. Adjustment by the user is only recommended after they have been given appropriate guidance by the healthcare professional. Note that there may be sections in this user manual, which are not relevant to your product, since this manual applies to all existing modules (on the date of printing). -
Page 22: Replacing Armrest Pads
Invacare® Colibri 3. Install the new armrest pad and securely tighten with the existing mounting screws. 4. If necessary, repeat STEPS 1-3 to replace the other armrest pad. 4.5 Disengaging the seat to rotate it or remove 1. Lift up the armrest. -
Page 23: Adjusting The Seat Height
Setup 1. Pull the lever upwards to disengage the seat. 2. Hold the seat firmly by the backrest and front edge and remove it upwards. Installing the seat 1. Lower the seat assembly onto the seat post. 2. Allow the seat to drop into the locked position. 3. -
Page 24: Adjusting Light
Invacare® Colibri 4.8 Adjusting Light 1. Rotate or pull out the tiller adjustment lever A until the pin disengages from the mounting hole. If your mobility device is fitted with optional light, refer to 2. Move the tiller to the desired position. - Page 25 Setup Adjusting Headlight Before first usage you have to adjust the headlight to prevent safety issues. Adjust the headlight so that you are seen well but do not dazzle other traffic. Fig. 4-2 1. Adjust headlight straight ahead. 2. Measure distance between middle of headlight and floor A.
-
Page 26: Usage
Invacare® Colibri 5 Usage 5.1 Getting in and out Lift the detent lever A up. The armrests can be swivelled upwards to assist getting in and out. The seat can also be rotated to assist getting in and out. Turn the seat to the side. -
Page 27: Taking Obstacles
Usage operating elements. Take your time to test all functions 5.3.3 The correct way to overcome obstacles and driving modes. If installed, make sure to properly adjust and use the posture belt each time you use the mobility device. Sitting comfortably = Driving safely Fig. -
Page 28: Parking And Stationary
Invacare® Colibri 5.5 Parking and stationary WARNING! Risk of tipping over If you park your vehicle, or leave it idle or unattended for – Only ever drive downhill at a maximum of 2/3 a longer period: of the top speed. -
Page 29: Driving The Scooter
WARNING! The control system is programmed with standard Risk of injury from the unintended rolling of values in the works. Your Invacare dealer can carry the vehicle out programming tailored to fit your requirements. When stopping the vehicle, the drive lever needs... -
Page 30: Using The Horn
Invacare® Colibri To brake quickly, simply let go of the drive lever. It will then automatically return to the middle position. The scooter will brake. 5.8 Using the horn Press the horn key. An acoustic signal sounds. 1576371-C... -
Page 31: Controls System
6 Controls system A defective main fuse may be replaced only after checking the entire electrical system. A specialized Invacare provider must perform the replacement. 6.1 Controls protection system You can find information on the fuse type in 11 Technical Data, page 47. -
Page 32: How To Charge The Batteries
Risk of short circuit and electric shock if the chargers may be left unattended during charging. All battery charger has been damaged charging devices which are supplied by Invacare comply – Do not use the battery charger if it has been with these requirements. -
Page 33: How To Disconnect The Batteries After Charging
Controls system • Do not leave the batteries in a low state of charge WARNING! for an extended length of time. Charge a discharged Risk of fire and electric shock if a damaged battery as soon as possible. extension cable is used •... -
Page 34: Transporting Batteries
Invacare® Colibri • Driving with blinking red LED means an extreme stress 6.2.7 Transporting batteries for the battery and should be avoided under normal The batteries supplied with your mobility device are circumstances. not hazardous goods. This classification is based on the •... -
Page 35: How To Handle Damaged Batteries Correctly
• Wash all objects that have come into contact with acid with lots of water. Disposing of dead or damaged batteries correctly Dead or damaged batteries can be given back to your provider or directly to Invacare. 1576371-C... -
Page 36: Transport
Invacare® Colibri 7 Transport CAUTION! Risk of injury from unsecured scooter parts Removing the battery box will release the 7.1 Transport - General information LITE-LOCK™ mechanism allowing the front frame assembly to separate from the rear frame WARNING! assembly. Risk of severe or fatal injuries in the event –... -
Page 37: Removing The Drive Unit
Transport Ensure the battery box latch A engages the mounting hole in the seat post. 5. Reinstall the seat. Refer to 4.5 Disengaging the seat to rotate it or remove it, page 22. The drive unit separates from the chassis. 7.2.2 Removing the drive unit 7.3 Reassembling the scooter CAUTION! - Page 38 Invacare® Colibri 3. Refit the battery box. Refer to 7.2.1 Removing/Installing the battery box, page 36. Make sure the latch A of the battery box is locked. 5. Refit the seat. Refer to 4.5 Disengaging the seat to rotate it or remove it, page 22.
-
Page 39: Maintenance
The following table lists inspection checks that should be performed by the user and their intervals. If the mobility device fails to pass one of the inspection checks, please refer to the chapter indicated or contact your authorised Invacare dealer. A more comprehensive list of inspection checks and instructions for maintenance work can be found in the service manual for this device, which can be obtained from Invacare. -
Page 40: Wheels And Tires
– Inflate tires to recommended pressure. Use tire gauge to check pressure. Check weekly that the tires are inflated to the correct pressure, see chapter Inspection checks. For recommended tire pressure see inscription on tire/rim or contact Invacare. Compare table below for conversion. 1576371-C... -
Page 41: Short-Term Storage
Have the mobility device checked by an authorized • We recommend to store the mobility device at a Invacare provider. temperature of 15° C, avoid hot and cold extremes when storing to ensure a long service life of the product and batteries. -
Page 42: After Use
Electric components and printed circuit boards are disposed of as electronic scrap. • Exhausted or damaged batteries can be returned to your medical equipment supplier or Invacare. • Disposal must be carried out in accordance with the respective national legal provisions. -
Page 43: Troubleshooting
Troubleshooting If the status display is OFF: 10 Troubleshooting • Check whether the keyswitch is SWITCHED ON. 10.1 Diagnosis and fault repair • Check whether all cables are correctly connected. If the status bar indicator is FLASHING: The electronic system offers diagnostic information to support the technician during the recognition and •... -
Page 44: Error Codes And Diagnostic Codes
Switch the scooter off, wait a few minutes and then switch on again. • The electronic system has determined a motor short-circuit. Check the wiring harness for short-circuit and check the motor. • Contact your Invacare provider. 1576371-C... - Page 45 Ensure that the disengaging lever is in the engaged position. • There is a defect in the braking coil or in the cabling. Check the magnetic brake and cabling for open or short-circuited circuitry. Contact your Invacare provider. No neutral position when Stops driving •...
-
Page 46: Resetting The Circuit Breaker
Invacare® Colibri 10.2 Resetting the circuit breaker WARNING! – NEVER defeat or bypass the circuit breaker. – ONLY replace with a circuit breaker of the same rating. – Key must be removed from ignition before resetting circuit breaker. – Resetting the circuit breaker may be needed if the scooter does not turn on and the reset button has popped out about 6 mm. -
Page 47: Technical Data
Technical Data 11 Technical Data 11.1 Technical specifications The technical information provided hereafter applies to a standard configuration or represents maximum achievable values. These can change if accessories are added. The precise changes to these values are detailed in the sections for the respective accessories. - Page 48 Invacare® Colibri Tyres Tyre type • 200 x 50 puncture-proof • 210 x 65 puncture-proof Driving characteristics Speed (dependent on country - please ask • 6 km/h your dealer which speed is available in your • 8 km/h country.) Min. braking distance •...
- Page 49 Technical Data Dimensions according to ISO 7176–15 • 610 mm Stowage width • 710 mm Stowage height • 490 mm Seat height Seat width • 465 mm Seat depth • 400 mm • 225 mm Armrest height • 270 mm Armrest depth •...
- Page 50 Invacare® Colibri Axle loads Max. front axle load • 60 kg Max. rear axle load • 130 kg IPX4 classification means that the electrical system is protected against spray water. Static stability according to ISO 7176-1 = 9° (15.8 %) Dynamic stability according to ISO 7176-2 = 6°...
-
Page 51: Service
It is confirmed by stamp and signature that all jobs listed in the inspection schedule of the service and repair instructions have been properly performed. The list of the inspection jobs to be performed can be found in the service manual which is available through Invacare. Delivery Inspection... - Page 52 Invacare® Colibri Stamp of authorized provider / Date / Signature Stamp of authorized provider / Date / Signature 4th Annual Inspection 5th Annual Inspection Stamp of authorized provider / Date / Signature Stamp of authorized provider / Date / Signature...
- Page 53 Notes...
- Page 54 Notes...
- Page 55 Notes...
- Page 56 Invacare representatives/distributors Australia: Canada: Ireland: New Zealand: Invacare Australia PTY. Ltd. Invacare Canada LP Invacare Ireland Ltd, Invacare New Zealand Ltd 1 Lenton Place, North Rocks NSW 570 Matheson Blvd E. Unit 8 Unit 5 Seatown Business Campus 4 Westfield Place, Mt Wellington 1060...
Need help?
Do you have a question about the Colibri and is the answer not in the manual?
Questions and answers
How do I remove the batteries from the unit?