Table of Contents
Advertisement
Quick Links
Advertisement
Table of Contents

Related Manuals for Invacare Cetus


Summary of Contents for Invacare Cetus
- Page 1 Invacare® Cetus Scooter Instruction Booklet...
-
Page 2: Table Of Contents
Cetus Instruction Booklet Table of Contents INTRODUCTION ........................3 IMPORTANT PRECAUTIONS ....................3 ELECTROMAGNETIC INTERFERENCE AND WARNINGS ............4 SAFETY WARNING AND INSTRUCTION LABELS ..............5 IDENTIFICATION OF PARTS ....................6 CHARGING THE BATTERIES ....................11 DISASSEMBLING THE SCOOTER ..................13 LCD DISPLAY PANEL ...................... -
Page 3: Introduction
Please read and observe all warnings and instructions provided in the owner’s manual before you operate the various functions of this scooter. Also, please retain this booklet for future reference. If you have any questions, please contact your Invacare representative. See addresses at the end of this document. -
Page 4: Electromagnetic Interference And Warnings
Cetus Instruction Booklet ELECTROMAGNETIC INTERFERENCE AND WARNINGS It is very important that you read this information regarding the possible effects of electromagnetic interference on your mobility scooter. Scooters may be susceptible to electromagnetic interference (EMI), which is interfering electromagnetic energy (EM) emitted from sources such a radio stations, TV stations, amateur radio (HAM) transmitters, two- way radios, and mobile phones. -
Page 5: Safety Warning And Instruction Labels
Cetus Instruction Booklet Important Information: 1. 20 volts per meter (V/m) is a generally achievable and useful immunity level against EMI (as of May 1994). The higher the level, the greater the protection. 2. The immunity level of this product is at least 20/Vm. -
Page 6: Identification Of Parts
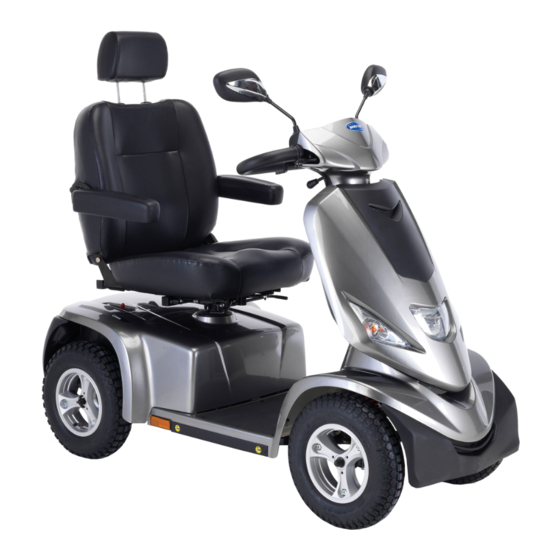
Seat fore-aft adj. lever Angle armrest Headlight adjustment Seat back angle Turn signal adjustment Rear bumper Side reflector Swivel lever Front bumper Tiller storage compartment Figure 1: Cetus Front View Figure 2: Cetus Control Panel Figure 3: Cetus Rear View 1654724~A... - Page 7 Cetus Instruction Booklet FUNCTION OF PARTS: Main Key Switch (A) 1. Turn the key to the right - turn the scooter on. 2. Turn the key to the left - turn the scooter off. Always ensure that the scooter is switched off before...
- Page 8 Cetus Instruction Booklet If you have to brake in an emergency, simply release the throttle and hold hand brake, which will bring you to a halt! Wigwag Lever Operation Pull the left-hand drive lever (M) carefully to travel forwards. Pull the right-hand drive lever (N) carefully to travel in reverse.
- Page 9 Cetus Instruction Booklet Sit firmly on seat after getting on the scooter, do not stand on the foot rest to prevent tipping over or damaging to the scooter. Angle Armrest Adjustment (R) Pull the lever (S) and adjust the armrest to the required angle.
- Page 10 Cetus Instruction Booklet Seat (P) Electrical Lifter (Optional) 1. Press seat lifter button (W) lightly. Seat will rise. Press lightly. Seat will lower. • Do not operate this function on a slope, or in motion or under unstable conditions. •...
-
Page 11: Charging The Batteries
Cetus Instruction Booklet Proportional Speed Reduction: 1. The scooter is equipped with proportional speed reduction. It will automatically reduce speed when encountering a corner, reducing speed corresponding to the angle of turn. 2. For safety reasons, when pushing the scooter by hand, if a pre-determined speed is exceeded, the controller automatically switches on and brakes the scooter. - Page 12 Cetus Instruction Booklet 8A/12A Charger: Operating Instructions: 1. Make sure the power cord (a), charger (b), charging cable (c) are in good condition. 2. Make sure the output voltage of charger is the same as the connecting battery / scooter.
-
Page 13: Disassembling The Scooter
Cetus Instruction Booklet Check to see if the input power cord has been connected correctly. 3. If the red light flashes during charging, it means the charger cannot charge normally and enters into protection mode. Please unplug the power cord and plug in again when the light is off. - Page 14 Cetus Instruction Booklet Information sticker of scooter Resetting the Circuit Breaker: Resetting the circuit breaker may be needed if scooter does not turn on and when a scooter's circuit over loaded, the circuit breaker will trip. 1. To reset, press the circuit breaker button (D1) upwards.
-
Page 15: Lcd Display Panel
Cetus Instruction Booklet LCD DISPLAY PANEL Function Buttons and Indicators ITEM SPECIFICATION Hazard Light, Horn, Right Turn Light, Headlight, Left Turn Light, Turtle (decelerate), Control Buttons H/L Speed, Rabbit (accelerate) Status Indicator (Green), Headlight Indicator (Green), Left / Right Indicators (Green),... -
Page 16: Full Lighting Control
Cetus Instruction Booklet 8.1 Full Lighting Control Headlight, Taillight ITEM SPECIFICATION Operation Feature Take exterior headlight switch as determinant signal. Press button to turn on headlight and turn signal and headlight indicator. Control Mode Press button again to turn off headlight and turn signal and headlight indicator. -
Page 17: Mode
Cetus Instruction Booklet Determinant Condition There is no priority between left / right lights or parking lights. Usage Condition While (1) controller shut down (2) in charging-mode, the function will be disabled. Flicker Frequency 1 second, Duty 50 % Warning Tone... - Page 18 Cetus Instruction Booklet Quit Setup Mode The user could quit the setup mode with the following conditions. (1) Leave buttons alone for 15 secs. (2) Press any button of Parking light, Horn, Turn light or Headlight. The definitive settings will be stored, and mode returns to normal clock mode.
- Page 19 Cetus Instruction Booklet 8.2.3 Speedometer ITEM DESCRIPTIONS Operation Feature Use optical coupler to detect the signal and transfer to related speed. Speed displays 60 km/h while it is on 1500 rpm. Display Errors +15~20 % Display Range 0.0 ~ 30.0, display resolution: 0.5 Operational mode of Press「Mode」button and switch to speedometer...
- Page 20 Cetus Instruction Booklet 8.2.4 Odometer ITEM DESCRIPTIONS Operation Feature Use optical coupler to detect the signal and transfer to related distances. Unit Switch When speedometer was set as: 「km/h」, the odometer displays as kilometer, 「mph」, the odometer displays as mile, 「/h」, means the odometer is displaying as travel hours.
-
Page 21: Notice To Routine Maintenance For Certain Mileage
Cetus Instruction Booklet 8.3 Notice to Routine Maintenance for certain mileage ITEM DESCRIPTIONS The initial mileage of routine maintenance is 5,000 km. Display: When it reaches the mileage for routine maintenance, ODO symbol will start to flash for 1 minute. - Page 22 Cetus Instruction Booklet Note 1: Setup mode The mileage counts down to 0 km SPD ODO TRIP Flashing The mileage does not count down to 0 km. Display II for Routine Maintenance SPD ODO TRIP Flashing Note 2: Press button to adjust to the mileage for next maintenance.
-
Page 23: Digital High / Low Speed Control
Cetus Instruction Booklet 8.4 Digital High / Low Speed Control ITEM DESCRIPTIONS Operation Feature Press「H/L Speed」 button to switch High/Low speed. Press to fine tune in 5 speeds. Control Mode Press「H/L Speed」 button once. The High/Low Speed Indicator (H) will light on. - Page 24 Cetus Instruction Booklet Charge Status ITEM DESCRIPTIONS Charge Status The charging status displays with segments cycling, increasing only, will not decrease. km/h Charging Indication Capacity (%) Display status of segments 100% displays with 6 segments Increasing ratio 0.5 seconds Operation Feature 1.
-
Page 25: Malfunction Messages
Cetus Instruction Booklet 8.6 Malfunction Messages ITEM DESCRIPTIONS Operation Feature Take the connector pin (KEY) of controller as determinant signal, then converts it into digital codes. Usage Condition When the controller sends out an error message, (LED) starts flashing to wait for confirmation and displays the "Error message code" as follows. -
Page 26: Caution
Cetus Instruction Booklet CAUTION 1. Obstacle Climbing: Your scooter can climb obstacles and kerbs of up to 6 cm (10 cm with run-up) in height. Never attempt to overcome an obstacle when on an uphill or downhill gradient! Always approach obstacles straight on! Ensure that the front wheels and rear wheels move over the obstacle in one stroke. - Page 27 Cetus Instruction Booklet Front wheels: 15 inch air tires Rear wheels: 15 inch air tires The following areas require periodic inspection: • Tire pressure between 2.4-2.8 bar (35-40 psi) • Tread depth drops below 1/16 inch Follow these easy steps to replace the tire: 1.
-
Page 28: Technical Specifications
Cetus Instruction Booklet TECHNICAL SPECIFICATIONS Overall Length 1600 mm / 63.0 inch Overall Width 720 mm / 28.3 inch Overall Height 1280 mm / 50.0 inch Front Wheels 380 mm / 15 inch Rear Wheels 380 mm / 15 inch... - Page 29 Cetus Instruction Booklet - Page intentionally left blank - 1654724~A...
- Page 30 Cetus Instruction Booklet - Page intentionally left blank - 1654724~A...
- Page 31 Cetus Instruction Booklet - Page intentionally left blank - 1654724~A...
- Page 32 España: France: Ireland: Italia: Invacare SA Invacare Poirier SAS Invacare Ireland Ltd, Invacare Mecc San s.r.l., c/Areny s/n, Polígon Industrial Route de St Roch Unit 5 Seatown Business Via dei Pini 62, F-37230 Fondettes Campus I-36016 Thiene (VI) Celrà...
Need help?
Do you have a question about the Cetus and is the answer not in the manual?
Questions and answers