Table of Contents
Advertisement
Quick Links
Advertisement
Table of Contents

Related Manuals for Chauvet EZ WEDGE Tri


Summary of Contents for Chauvet EZ WEDGE Tri
- Page 1 User Manual...
-
Page 2: Table Of Contents
EZwedge™ Tri User Manual Rev. 1 ABLE OF ONTENTS 1. Before You Begin ..........................3 What Is Included ..............................3 Unpacking Instructions ............................3 Claims .................................. 3 Text Conventions ..............................3 Symbols ................................... 3 Disclaimer ................................3 Product at a Glance ..............................4 2. -
Page 3: Before You Begin
The information and specifications contained in this User Manual are subject to change without Disclaimer notice. Chauvet assumes no responsibility or liability for any errors or omissions, and reserves the right to revise or recreate this manual at any time. The latest version of this manual can be downloaded from http://www.chauvetlighting.com/product-manuals-literature/. -
Page 4: Product At A Glance
Product at a Use on Dimmer Auto Program Glance Outdoor Use Auto-Ranging Power Supply Sound-Activated Replaceable Fuse User-Serviceable Master/Slave Safety Notes These notes include important information about the mounting, usage, and maintenance of this product; read before using the product. ·... -
Page 5: Introduction
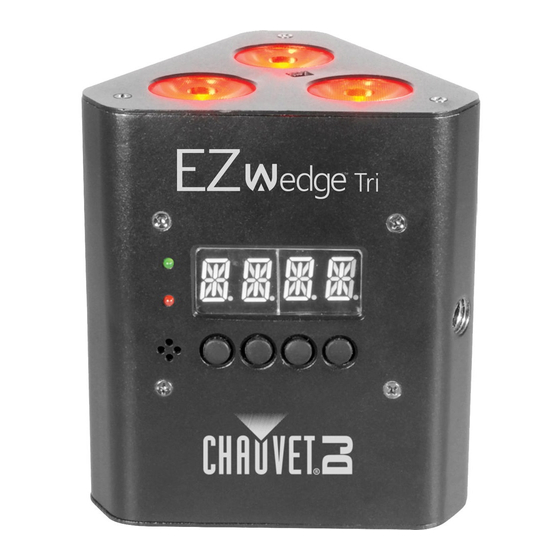
2. I NTRODUCTION LEDs Overview Sensor Display Power Power Status Full Charge Status Fuse Holder Microphone Power In Menu Buttons Size M12 Threaded Hole EZwedge™ Tri User Manual Rev. 1 Page 5 of 22... -
Page 6: Overview (Cont.)
Overview (cont.) DMX Out DMX In On/Off Switch Threaded Mounting Hole Page 6 of 22 EZwedge™ Tri User Manual Rev. 1... -
Page 7: Dimensions
Dimensions 5.4 in 136 mm 4.3 in 108 mm 4.3 in 108 mm 4.3 in 108 mm EZwedge™ Tri User Manual Rev. 1 Page 7 of 22... -
Page 8: Setup
The listed current rating indicates the product’s average current draw under normal conditions. For more information, you may download Sizing Circuit Breakers from the Chauvet website www.chauvetlighting.com/download/. Always connect the product to a protected circuit (circuit breaker or fuse). Make sure the product has an appropriate electrical ground to avoid the risk of electrocution or fire. -
Page 9: Power Linking
Up to 33 EZwedge™ Tri products can be power linked at 120 V and up to 57 EZwedge™ Tri products can be power linked at 230 V. If using this product anywhere other than North America, consult with the local Chauvet distributor because power linking connectors and requirements differ from country to country, and region to region The EZwedge™... -
Page 10: Mounting
When mounting the product overhead, always use a mounting clamp and safety cable. Mount the product securely to a rigging point, such as a pipe or truss. The CHAUVET® CH-05 safety cable is appropriate for this product. -
Page 11: Dmx Linking
EZwedge™ Tri operates in Master/Slave mode or in DMX mode, both of which require DMX DMX Linking linking. In Master/Slave mode the master product sends DMX signals to the slaves. In DMX mode the lighting control board sends DMX signals to the products. To DMX-link a number of EZwedge™... -
Page 12: Master/Slave Mode
Master/Slave mode allows a single EZwedge™ Tri (the master) to control the actions of one or Master/Slave more EZwedge™ Tri units (the slaves) without a DMX controller. Mode The master will be set to operate in either Auto or Sound-Active mode, while the slaves will be set to operate in Slave mode. -
Page 13: Operation
4. O PERATION To access the control panel functions, use the four buttons located underneath the display. Control Panel Operation Button Function <MENU> Selects an operation mode <UP> Scrolls up the list of options or selects a higher value <DOWN> Scrolls down the list of options or selects a lower value <ENTER>... -
Page 14: Dmx Configuration
Set the product in DMX mode to control with a DMX controller. Connect the product to a suitable power outlet. Configuration Connect a DMX cable from the DMX output of the DMX controller to the DMX input socket on the product. -
Page 15: Dmx Channel Assignments And Values
DMX Channel The following tables show which DMX channels control which functions in each of the DMX personalities. Be sure to become familiar with these values when operating the product with a Assignments and DMX controller. Values 8-CH Channel Function Value Setting 000 ó... -
Page 16: Configurations (Standalone)
Use standalone configurations to operate the product without a DMX controller. There are a Configurations variety of Standalone modes and they are powerful tools for making exciting looks. (Standalone) Never connect a product operating in a standalone mode (Sound-Active, Auto, or IR) to a DMX chain that includes a DMX controller. -
Page 17: Static Colors
IRC-6 can remotely set the product to various modes; adjust the color, speed and sensitivity; and set the strobe. The EZwedge™ Tri is compatible with the IRC-6 from Chauvet. To enable use with the IRC-6, follow the instructions below: Press <MENU> repeatedly until SET shows on the display. -
Page 18: Irc-6 Operations
IRC-6 Operations Be sure the IRC-6 remote is pointing directly at the product and there is nothing in between the remote and the product. Automatic Mode Automatic mode will enable you to run the automatic programs on the product. To turn on Automatic mode: Press <AUTO>... -
Page 19: Technical Information
5. T ECHNICAL NFORMATION Dust build-up reduces light output performance and can cause overheating. To maintain Product optimum performance, clean product least twice month. Maintenance However, usage and environmental conditions contribute to increasing the cleaning frequency. To clean the product, follow the instructions below: 1. -
Page 20: Technical Specifications
6. T ECHNICAL PECIFICATIONS Dimensions and Length Width Height Weight Weight 4.3 in (108 mm) 4.3 in (108 mm) 5.4 in (136 mm) 2.8 lb (1.3 kg) Note: Dimensions in inches rounded to the nearest decimal digit. Power Input Voltage Range Voltage Selection Switching (internal) -
Page 21: Returns
Mexico. If you live outside the U.S., United Kingdom, Ireland, or Mexico, contact your distributor of record and follow their instructions on how to return Chauvet products to them. Visit our website for contact details. Call the corresponding Chauvet Technical Support office and request a Return Merchandise Authorization (RMA) number before shipping the product. -
Page 22: Contact Us
(954) 577-4455 Email: tech@chauvetlighting.com Fax: (954) 929-5560 Toll free: (800) 762-1084 World Wide Web www.chauvetlighting.com UNITED KINGDOM AND IRELAND - Chauvet Europe Ltd. General Information Technical Support Address: Unit 1C Email: uktech@chauvetlighting.com Brookhill Road Industrial Estate Pinxton, Nottingham, UK World Wide Web www.chauvetlighting.co.uk...
Need help?
Do you have a question about the EZ WEDGE Tri and is the answer not in the manual?
Questions and answers