Table of Contents
Advertisement
Quick Links
Real-Time 960H Recording
Please note that the Accessory Kit and Shipping Box contain the items :
Items
Photo
Quantity
Items
Photo
12V DC
User
Adaptor
Manual
1 Set
&
(DVR & Software)
Power Cable
CD
Rubber Mount
(DVR & Software)
&
&
1 Set
Ground Screw
Quick Start
Guide
IR Remote
USB Mouse
1 Set
Control
MADE IN KOREA
Tel: 866-446-3595 / 813-888-9555
www.Digital-Watchdog.com
Technical support hours: 9:00AM to 9:00PM Eastern Time, Monday thru Friday
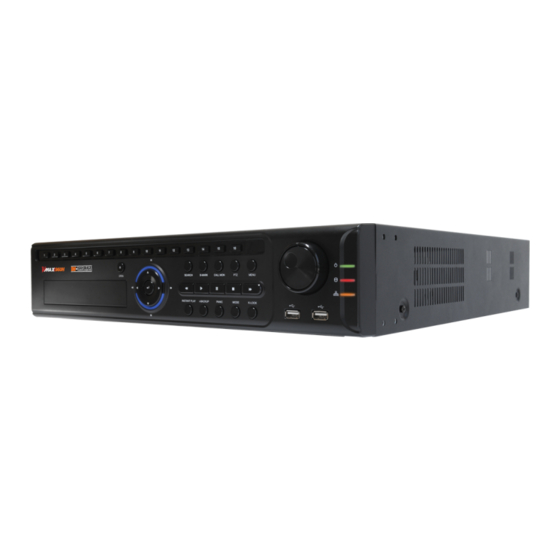
BACK / FRONT PANEL
16CH Back Panel
1
7
5 6
8
9 10 11 12
13 14
15
8CH Back Panel
1
2
7
Quantity
5 6
8
9 10 11 12
13
14
15
1 Set
No.
I/O
Description
1
VIDEO-IN
Camera Input 1~8/ 16 (Auto Detect NTSC/ PAL)
2
LOOP OUT
Built-in Looping Output 1~8/ 16
1 Set
3
VIDEO OUT
Composite Output
(4 Pieces)
4
SPOT OUT
Programmable Digital Spot Output
1 Set
(1piece
5
e-SATA
e-SATA for External Storage Device
VMAX960H
6
NAS
Network Port for Network Attached Storage (10/100)
Rear /
1piece )
7
VGA
VGA Output
RS-232C
Serial Port for External Devices
8
9
HDMI
True HDMI Output
10
ETHERNET
Gigabit Network Port (10/100/1000)
1 Set
11
PTZ / KEYBOARD
2 x RS-485 for PTZ Cameras, Keyboard Controller, and FaceStamp Interface
12
ALARM IN
Alarm Input 1~8/16
13
ALARM OUT
Alarm Output (2 Relay Outputs & 2 TTL Outputs)
14
MIC IN
Microphone Input
15
AUDIO IN
Audio Input (Amplifier)
Audio Out 1 (Green): Main Audio Output (Amplifier)
16
AUDIO OUT
Audio Out 2 (Blue): Audio Output for Head Set
17
POWER ON/ OFF SWTICH
Power Switch On/ Off
18
POWER
Main Power Supply connection (Default: 12V. 9A)
19
Ground for DVR's Protection (Installed in Rack-mount Kit)
Initial Setup
When all necessary cameras and monitors are setup in their permanent locations,
connect them to the DVR. Use the diagram in the Quick Start Guide and manual
for additional information.
When all connections have been made, connect the DVR to an appropriate power
supply. The DVR will boot up automatically.
INSTALLATION
8/16CH Front Panel (W)428 x (H)93 x (D)446mm
2
3
4
17
20
19
18
16
19
18
No.
Buttons
1
Menu / Exit
Menu/ Exit Button
2
Mode
Change Screen Display Mode
3
4
17
3
Freeze
Enable/ Disable Freezing Video Screen
4
PTZ
Show/ Hide PTZ Control
5
Instant Record Button
Emergency Recording
Search
Go to Search Mode
6
7
Instant Play
Initiate Instant Reverse Playback
In Live- Go to Bookmark Search
8
B-Mark
In Playback- Start/ End Bookmarking Video
9
Call Monitor
Select a Camera Channel to set for Spot Output in Full Screen Mode
10
I-Backup
Instant Backup
16
19
18
11
Fast Rewind
12
Playback, Reverse Playback
13
Pause in Playback
14
Stop Playback
15
Fast Forward
16
Enter Button (Execute Selected Menu & Designated Value)
17
Direction Button to Control the Menu
18
Open
Open & Close DVD-RW
19
DVD±RW Bay
DVD-RW Door
20
1~16
Channel Selection Button from Ch1 to CH16
21
Jog / Shuttle
Jog & Shuttle to Control Playback Speed
22
2 x 2.0 USB Ports (Mouse, Backup, F/W Upgrade)
Indicates the DVR's Status: Power On (Green), Recording (Red),
23
LED Indicator
Network Connection (Orange)
DVR Installation Safety Tips
1. Make sure the cameras and the monitors are properly connected to the DVR.
2. The DVR should be placed in a dust and moisture free environment.
It must never be exposed to direct sunlight. Server room temperature is highly
recommended to reduce the chance of overheating. Overheating may cause
the DVR to become unstable.
3. During the boot process, the DVR should not be interrupted by pressing any
buttons on the front keypad, mouse, or remote controller. Do not unplug the
power adapter or turn the DVR off during the boot process.
A UPS (Uninterruptable Power Supply) is highly recommended to prevent
malfunctioning of the DVR during a power outage.
INITIAL SETUP
Quick Startup Wizard
The Quick Startup Wizard is designed to make the installation process of your
17
1
2 3 4 5
21
23
new DVR as quick and easy as possible. This startup wizard will automatically
appear when you first boot up your DVR. It will guide you through setting up
some of the DVR's more critical features required for its proper function.
The Quick Startup Wizard will take you
through setting up the Date & Time,
Recording Setup, Network Setup and
If you do not want to follow the
16
6
7 8 9 10
22
Startup Wizard you can disable it by
clicking the [CANCEL] button and
11 12 13 14 15
adjusting your settings manually via
the DVR's main menu.
Functions
Main Menu
The Main Menu (Setup Menu) system includes six (6) sub-menus: System,
Device, Record, Network, Backup, & Q. Setup. To access the Setup Menu, press
the [Menu] button on the front panel of the DVR, or right-click anywhere on the
screen and select 'Setup Menu'.
The DVR's default user ID and password are: admin/ no password.
Navigation
Use the supplied USB mouse for easy operation. Alternatively, use the following
front panel buttons or remote controller key pad.
- Use the [Enter] button to select or enter edit mode for a highlighted selection.
- Use the directional keys
- Use the [Menu] button to enter or exit a menu or setup window.
Date and Time Setup
1. Go to the System Menu and select
SYSTEM INFO. Click on the pencil
icon next to the Date/ Time to enter
edit mode.
2. Select the appropriate display
format from the
[DATE/TIME FORMAT] drop down
lists.
3. Select the appropriate date and
local time in the [DATE/ TIME] section.
4. Select the appropriate time zone from the [TIME ZONE] drop down list.
5. If applicable, enable Daylight Savings mode.
Formatting the Hard Drive Disk
After adjusting the time and date for the first time, it is highly recommended to
format your Hard Disk Drive.
1. Go to the System Menu and select the HDD submenu.
2. Select the Check box next to the HDDs.
3. Click the [HDD Clear] button.
4. When the HDD formatting is complete, exit the main menu and reboot the DVR
to save all changes.
to move through a menu or list.
Advertisement
Table of Contents

Related Manuals for Digital Watchdog Vmax 960 H


Summary of Contents for Digital Watchdog Vmax 960 H
- Page 1 BACK / FRONT PANEL INSTALLATION INITIAL SETUP 16CH Back Panel 8/16CH Front Panel (W)428 x (H)93 x (D)446mm Quick Startup Wizard Real-Time 960H Recording The Quick Startup Wizard is designed to make the installation process of your 2 3 4 5 new DVR as quick and easy as possible.
- Page 2 RECORD SETUP NETWORK SETUP SPECIAL FUNCTIONS REMOTE CLIENT Recording Configuration Network Setup 5x Signal Extender CMS (Central Monitoring Software) 1. Go to the Main Menu and select RECORD. 1. Go to the NETWORK menu in the menu window. The Pivot CMS is included with the DVR. Install it on your computer from the accessory The adjustable 4CH built-in 5x Signal Extender enables to extend the distance 2.
Need help?
Do you have a question about the Vmax 960 H and is the answer not in the manual?
Questions and answers