Cognex DataMan 360 Quick Reference Manual
Hide thumbs
Also See for DataMan 360:
- Reference manual (70 pages) ,
- Quick reference manual (31 pages) ,
- Reference manual (173 pages)
Table of Contents
Advertisement
Quick Links
Download this manual
See also:
Reference Manual
Advertisement
Table of Contents

Related Manuals for Cognex DataMan 360


Summary of Contents for Cognex DataMan 360
- Page 1 ® DataMan Quick Reference Guide 10/12/2015 Version 5.6.0...
-
Page 2: Legal Notices
Copyright © 2015. Cognex Corporation. All Rights Reserved. Portions of the hardware and software provided by Cognex may be covered by one or more U.S. and foreign patents, as well as pending U.S. and foreign patents listed on the Cognex web site at: http://www.cognex.com/patents. -
Page 3: Table Of Contents
Setting Focus Field of View and Reading Distances Reading Distance and Field of View (DataMan 360 Readers with a 10.3 mm Lens) Reading Distance and Field of View (DataMan 360 Readers with a 16 mm Lens) Reading Distance and Field of View (DataMan 360 Readers with a 19 mm Lens) - Page 4 Table of Contents 15m I/O Breakout Cable (CCB-PWRIO-15) High-Speed Output Lines High Speed Output Wiring Ethernet M12 to RJ45 Cable (CCB-84901-y00x-xx) Acquisition Triggering Compliance Information, Warnings and Notices Warnings and Notices Compliance Statements Reader Programming Codes...
-
Page 5: Symbols
Symbols Symbols The following symbols indicate safety precautions and supplemental information. WARNING: This symbol indicates the presence of a hazard that could result in death, serious personal injury or electrical shock. CAUTION: This symbol indicates the presence of a hazard that could result in property damage. Note: Notes provide supplemental information about a subject. -
Page 6: Getting Started
Getting Started Getting Started This section provides general information about the DataMan 360 series readers as well as about the DataMan 360 accessories and systems. About the DataMan 360 Readers The DataMan 360 series readers are high-performance, fixed-mount ID readers that, among others, offer the following... -
Page 7: Dataman 360 Accessories
Getting Started Release Notes list detailed system requirements and additional information about this DataMan software release. Cognex->DataMan Software v x.x->Documentation->DataMan v x.y.z Release Notes DataMan 360 Accessories M12/S-MOUNT LENS OPTIONS 10.3 mm M12 lens with locking (DM300-LENS-10) and 10.3 mm IR M12 lens with locking (DM300-LENS-10-IR) Liquid lens module and pre-focused 10.3 mm IR M12 lens... - Page 8 Getting Started Extension kit (DM300-EXT) LENS COVERS Clear lens cover (DM300-CLCOV) Clear lens cover with white LED illumination (DM300- CLCOV-WHI) Diffuse lens cover with red LED illumination (DM300- DLCOV-RE) Diffuse lens cover with blue LED illumination (DM300- DLCOV-BL) Diffuse lens cover with IR LED illumination (DM300-DLCOV- Polarizer lens cover with red LED illumination (DM300- PLCOV-RE) Diffuse lens cover, red illumination (assembled), ESD safe...
- Page 9 Getting Started Coaxial (DOAL) light (CLRO-K5050G1) Spot light (CLRS-P14G1) Dark-field light (CLRD-D120G1) LASER AIMERS Laser aimer (DM300-AIMER-00) HIGH POWER ILLUMINATIONS Red narrow (DM30X-HPIA-625) Red wide (DM30X-HPIA-625-W) White narrow (DM30X-HPIA-WHI) White wide (DM30X-HPIA-WHI-W) Blue narrow (DM30X-HPIA-470) Blue wide (DM30X-HPIA-470-W) Infrared narrow (DM30X-HPIA-IR) Infrared wide (DM30X-HPIA-IR-W) DM500 C-Mount cover (DM500-CMTLC-000) DM500 Lens cover extender (DM500-LNSEXT-000)
- Page 10 Getting Started Connection cable RS-232 (CCB-M12xDB9Y-05) Ethernet M12 to RJ45 cable (CCB-84901-y00x-xx) (y straight/angled, x-xx specifies length) External light cable (CCB-M12x4MS-xxx) (xxx specifies length) I/O extension cable, 5m straight (CKR-200-CBL-EXT) POWER SUPPLIES 24V power supply (ACC-24l) 24V power supply (PS-KIT-1) MOUNTING BRACKETS External light mounting brackets (DM300-ELMB-xx) (xx specifies light type) (may get used in combination with...
-
Page 11: Dataman 360 Systems
Getting Started DataMan 360 Systems 1DMax+™ — IDQuick™ — 2DMax+™ — Omni-directional Resolution Best-In-Class 1- High-Speed 2-D for hard to 1-D Code D Reading Reading read DPM and Reading damaged 2-D codes DataMan 360L √ 800x600 (DMR-360L-00) DataMan 360X √... -
Page 12: Setting Up Your Dataman 360
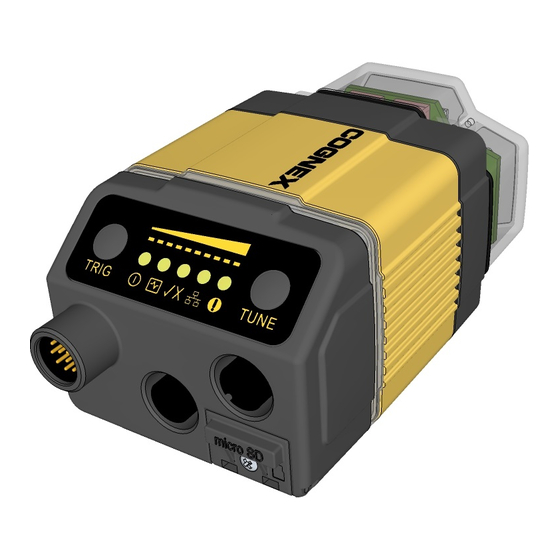
Setting Up Your DataMan 360 Setting Up Your DataMan 360 This section provides information on the physical appearance of the DataMan 360 reader. It also details the steps of installing the lenses and filters of the reader, and gives information on the imager itself. - Page 13 Setting Up Your DataMan 360 Error Peak meter Good/bad read Tuning button Ethernet SD card slot External light control Power, I/O, and RS232 Indicator lights: Power: GREEN = Power ON Train status: GREEN = trained / YELLOW = untrained Good/bad read: GREEN = good read / RED = bad read...
-
Page 14: Sd Card Slot
Setting Up Your DataMan 360 SD Card Slot The DataMan 360 reader is equipped with a Micro SD card. This Micro SD card is located in a slot on the rear side of the reader. The Micro SD card can be installed to read and write system configuration and identity, so automatic backup and restore is done using the Micro SD card. -
Page 15: Dimensions
Setting Up Your DataMan 360 Dimensions Observe the following DataMan 360 series reader dimensions when installing your reader. M3-5 (4x) mounting holes for the device M3-6 (4x) mounting holes for external illumination LEDs Operating buttons... - Page 16 Setting Up Your DataMan 360 The following images show the DataMan 360 reader’s dimensions without lens and with C-mount and S-mount lens options. C-Mount Lens version S-Mount (M12) Lens version...
-
Page 17: Installing The Lens
Installing the Lens You can choose between a variety of different S-Mount/M12 (including variable-focus liquid lens module) and C-Mount lens options to be installed on your DataMan 360 series reader. WARNING: Disconnect the DataMan 360 reader from power before installing the lens. - Page 18 Setting Up Your DataMan 360 4. Place the reader at the desired working distance from focus target. a. Connect the reader to the DataMan Setup Tool. b. On the Results Display pane, check the Focus Feedback option and enable Live Display. For best results, adjust your camera settings to make sure you have a brightened and high contrast image.
-
Page 19: Installing A Liquid Lens
Setting Up Your DataMan 360 PHILLIPS PAN HEAD M2 X 6MM Note: Tighten in sequence. Torque limit: 9 Ncm (0.08 in-lbs). Note: Remove the protection film applied to the front cover before usage! Installing a Liquid Lens 1. Remove the lens plug as described in Installing the Lens. - Page 20 Setting Up Your DataMan 360 3. Tighten the locking ring. 4. Connect the liquid lens cable to the reader. WARNING: To avoid equipment damage, the cables must be routed as shown in the figure. 5. Snap the liquid lens module onto the nose of the lens, making sure that it lies flat.
- Page 21 Setting Up Your DataMan 360 6. Attach the front cover. 7. Insert and tighten the screws. PHILLIPS PAN HEAD M2 X 6MM Note: Tighten in sequence. Torque limit: 9 Ncm (0.08 in-lbs).
-
Page 22: Installing A 19 Mm Liquid Lens
Adjust focus for maximum sharpness. Enhance image quality in the Setup Tool for better guidance. Installing a 19 mm Liquid Lens The possible hardware configurations using a 19 mm liquid lens with a DataMan 360 series reader are the following: DM3xx-system + DM300-LENS-19LL + DM300-CMCOV-SH... - Page 23 Setting Up Your DataMan 360 3. Push the wires into the space behind the lens. 4. Place the spacer over the front of the unit. Ensure that the gasket side is toward and lines up with the unit.
- Page 24 Setting Up Your DataMan 360 5. Blow out the cover with compressed air. 6. Place the cover on the unit. Note: Ensure that the top of each piece of the assembly lines up and the gasket does not stick out.
- Page 25 Setting Up Your DataMan 360 3. Push the wires into the space behind the lens. 4. Install the electrical extender. 5. Place the spacer over the front of the unit. Ensure that the gasket side is toward and lines up with the unit.
- Page 26 Setting Up Your DataMan 360 Note: Ensure that the top of each piece of the assembly lines up and the gasket does not stick out. 7. Place the cover on the unit. 8. Screw in the four screws. Note: Tighten in sequence. Torque limit: 9 Ncm (0.08 in-lbs).
-
Page 27: Installing A C-Mount Lens
Setting Up Your DataMan 360 Installing a C-Mount Lens 1. Remove the lens plug as described in Installing the Lens. 2. Thread the lens into the reader. 3. Place the reader at the desired working distance from focus target. a. Connect the reader to the Setup Tool. - Page 28 Setting Up Your DataMan 360 4. Attach the C-Mount cover base. 5. Add the screws to C-mount cover base. PHILLIPS PAN HEAD M2 X 6MM Note: Tighten in sequence. Torque limit: 9 Ncm (0.8 in-lbs).
- Page 29 Setting Up Your DataMan 360 6. Attach the front cover. Note: Do not unscrew the front-most part of the nose of the cover to avoid risking the glass lens falling out. Align the peg on the reader and the slot on the cover so that the cover locks in place.
-
Page 30: Installing A Filter
Setting Up Your DataMan 360 Installing a Filter Perform the following steps to install an optical filter in the front cover. Observe the following constraints on the filter: Diameter (Ø): 12.3mm<Ø<12.7mm Thickness (t): 1.6mm<t<2mm 1. First, remove the front cover: unscrew the four M3 screws and take off the LED cover. - Page 31 Setting Up Your DataMan 360 3. Working from the front of the PCB, press the legs of the filter holder gently together and pull off the clip. Filter retaining clip LED PCB Filter holder 4. Insert first the filter glass, then the soft spacer (which was removed from its place between the filter holder and the filter retaining clip) into the filter holder.
- Page 32 Setting Up Your DataMan 360 5. Snap fit the filter retaining clip onto the legs of the filter holder. Ensure that the laser modules slide into the laser guides and the orientation pin fits into the filter retaining clip. Orientation pin...
- Page 33 Setting Up Your DataMan 360 6. Insert the PCB with the filter retaining clip and the filter holder back into the front cover. Ensure that the hole in the PCB meets the orientation pin in the front cover. Fix the PCB with two Torx 6 screws of size 2.0x5 mm.
- Page 34 Setting Up Your DataMan 360 8. Remount the front cover. Observing the tightening sequence below, tighten all four screws to 9 Ncm using a torque wrench. PHILLIPS PAN HEAD M2 X 6MM Note: Tighten in sequence. Torque limit: 9 Ncm (0.08 in-lbs).
-
Page 35: External Light Mounting Brackets
Setting Up Your DataMan 360 External Light Mounting Brackets You can mount your reader using external light mounting brackets. The brackets are intended to mount any of the different lights to the reader. They can also be used to mount the reader (with lights attached) to your machine. Pivot mounting, as illustrated, is optional. - Page 36 Setting Up Your DataMan 360 3. Choose one of the following light options: Using coaxial (DOAL) light Using dark field light Using ring light Using spot light...
-
Page 37: Setting Focus
Setting Up Your DataMan 360 Setting Focus There is a range of reading distances available for different code sizes and focus positions. To set focus on your reader, use the following options depending on whether you use a liquid lens or a manual focus lens. - Page 38 Setting Up Your DataMan 360 Make sure the target is perfectly flat (avoid floppy pieces of paper). Make sure that the target is perfectly perpendicular to the optical axis of the reader. Make sure that the rest of the field of view (such as the part not covered by the focus target) does not contain any high-contrast features.
-
Page 39: Field Of View And Reading Distances
Reading Distance and Field of View (DataMan 360 Readers with a 10.3 mm Lens) This map shows the field of view (FoV) of the DataMan 360 series readers with a 10.3 mm lens (with or without a liquid lens). The FoV values are shown as follows:... -
Page 40: Reading Distance And Field Of View (Dataman 360 Readers With A 16 Mm Lens)
Reading Distance and Field of View (DataMan 360 Readers with a 16 mm Lens) This map shows the FoV of the DataMan 360 series readers with a 16 mm lens (with or without a liquid lens). The FoV values are shown as follows:... -
Page 41: Reading Distance And Field Of View (Dataman 360 Readers With A 19 Mm Lens)
Reading Distance and Field of View (DataMan 360 Readers with a 19 mm Lens) This map shows the FoV of the DataMan 360 series readers with a 19 mm lens (with or without a liquid lens). The FoV values are shown as follows:... -
Page 42: Reading Distance And Field Of View (Dataman 360 Readers With A 25 Mm Lens)
Reading Distance and Field of View (DataMan 360 Readers with a 25 mm Lens) This map shows the FoV of the DataMan 360 series readers with a 25 mm lens (with or without a liquid lens). The FoV values are shown as follows:... - Page 43 Setting Up Your DataMan 360...
-
Page 44: Dataman 360 Specifications
Setting Up Your DataMan 360 DataMan 360 Specifications Weight 165 g Operating 0ºC — 40ºC (32ºF — 104ºF) Temperature Storage -10ºC — 60ºC (-14ºF — 140ºF) Temperature Maximum < 95% (non-condensing) Humidity Environmental IP65 (with cable or protection cap attached to all connectors, front cover... -
Page 45: Dataman 360 Imager Specifications
DataMan 360 Series Imager Image Sensor 1/1.8 inch CMOS Image Sensor Properties 6.9 mm x 5.5 mm (H x V); 5.3 µm square pixels (DataMan 360 and 362), 4.5 µm square pixels (DataMan 363) Image Resolution (pixels) DataMan 360: 800 x 600... -
Page 46: Using Your Dataman 360
5. Select a reader from the list and click Connect. WARNING: Do not stare into beam when adding, removing, or changing cables. Cognex recommends to unpower the reader any time you make physical changes to it. Follow the steps below to connect your reader to power and network: 1. -
Page 47: Industrial Protocols
Using Your DataMan 360 Industrial Protocols The DataMan 360 readers support the following industrial protocols: EtherNet/IP™ PROFINET MC Protocol Modbus TCP Select industrial protocol samples and tools you want to use when you install the DataMan Setup Tool. There are three ways to enable or disable industrial protocols. Using either method, a reboot is required for the changes to come into effect. - Page 48 Using Your DataMan 360 Single (external trigger): Acquires a single image and attempts to decode any symbol it contains, or more than one symbol in cases where multicode is enabled. The reader relies on an external trigger source. Presentation: Scans, decodes and reports a single code in the field of view. The reader relies on an internal timing mechanism to acquire images.
-
Page 49: External Triggers
Using Your DataMan 360 External Triggers If you are using external triggering you can use any of the following methods to trigger your DataMan 360 reader: Press the trigger button on the reader. Send a pulse on the I/O cable:... -
Page 50: Multi-Reader Triggering
Note: The DataMan 360 readers use IEEE1588 for high speed trigger synchronization. DataMan 360 Tuning By tuning, your DataMan 360 series reader automatically selects the best settings for the given reading situation, based on parameters of illumination, camera and decoder properties, and focal distance. Tuning autodisciminates all enabled symbologies (both 1-D and 2-D). -
Page 51: Dataman 360 Image Filtering
DataMan 360 Image Filtering You can define a stack of filters to be applied to each image acquired by your DataMan 360 series reader. You can select the following filters on the Setup Tool’s Image Filtering pane (under Light and Imager Settings): Equalize This filter redistributes the brightness values of the pixels in the image. - Page 52 Using Your DataMan 360 Stretch This filter linearly scales up or stretches the greyscale values in the input image to the full 256-step greyscale. The result is an output image with increased contrast. Low Pass Using this filter results in output images where edges are smoothed or blurred.
- Page 53 Using Your DataMan 360 3. If the filter you selected require further settings, change properties according to your needs. 4. Change the selection in the Image to Use group box according to the symbology you want to be filtered (after making sure that that Symbology is enabled): If no image is read, the Results Display shows the image according to your selection under No-Read Image.
-
Page 54: Training The Reader
Using Your DataMan 360 6. You can compare the original and filtered results on the Results Display if you choose the images from the Read Result History. The example images were taken using the Equalize filter. Training the Reader Training your reader with the expected symbology can make the time required to decode successive symbols more consistent. -
Page 55: Training Feedback
Using Your DataMan 360 Training Feedback The second LED from left on the reader glows green to indicate that it is currently trained, or yellow to indicate that it is not trained. Connect the reader to the Setup Tool to untrain it and allow it to recognize other enabled symbologies. - Page 56 Using Your DataMan 360 For more information, see the DataMan Fixed Mount Readers Reference, available through the Windows Start menu or the Setup Tool Help menu.
-
Page 57: Connections, Optics, And Lighting
Connections, Optics, and Lighting Connections, Optics, and Lighting This part contains descriptions about the external light control, I/O Cables, high-speed output lines, high-speed output wiring, ethernet M12 to RJ45 cable, and acquisition triggering. External Light Control A 4-pin cable is provided for the external light control. The drawing on the left shows the socket on the device. -
Page 58: I/O Breakout Cable (Ccb-M12Xm12Fy-Xx)
Connections, Optics, and Lighting 5m I/O Breakout Cable (CCB-M12xM12Fy-xx) The I/O cable provides access to trigger and high-speed outputs. Unused wires can be clipped short or tied back using a tie made of non-conductive material. For RS-232, use the Power Supply return path for ground. The drawing on the left shows the plug on the device. -
Page 59: I/O Breakout Cable (Ccbl-05-01)
Connections, Optics, and Lighting 5m I/O Breakout Cable (CCBL-05-01) The I/O cable provides access to trigger and high-speed outputs. Unused wires can be clipped short or tied back using a tie made of non-conductive material. For RS-232, use the Power Supply return path for ground. The drawing on the left shows the plug on the device. - Page 60 Connections, Optics, and Lighting 15m I/O Breakout Cable (CCB-PWRIO-15) The power and I/O breakout cable provides access to trigger and high-speed outputs. The cable is not terminated. Unused wires can be clipped short or tied back using a tie made of non-conductive material. For RS-232, use the Power Supply return path for ground.
- Page 61 Connections, Optics, and Lighting High-Speed Output Lines The high-speed outputs can be used as either NPN (pull-down) or PNP (pull-up) lines. For NPN lines, the external load should be connected between the output and the positive supply voltage (<26.4V). The outputs pull down to less than 3V when ON, which causes current to flow through the load.
- Page 62 Connections, Optics, and Lighting High Speed Output Wiring To connect to an NPN-compatible PLC input, connect Output 0, Output 1, Output 2, or Output 3 directly to the PLC input. When enabled, the output pulls the PLC input down to less than 3V. To connect to a PNP-compatible PLC input, connect Output 0, Output 1, Output 2 or Output 3 directly to the PLC input.
- Page 63 Connections, Optics, and Lighting Ethernet M12 to RJ45 Cable (CCB-84901-y00x-xx) The Ethernet cable provides Ethernet connection for network communications. The Ethernet cable can be connected to a single device or provide connections to multiple devices via a network switch or router. P1 Pin# Signal Name Wire Color...
- Page 64 Compliance Information, Warnings and Notices Compliance Information, Warnings and Notices The final part of this guide contains general warnings and notices about DataMan 360. The compliance statements and the DataMan 360 specification are also included in this part. Warnings and Notices Note: For product support, contact http://support.cognex.com...
- Page 65 One Vision Drive Natick, MA 01760 Cognex Corporation shall not be liable for use of our product with equipment (i.e., power supplies, personal computers, etc.) that is not CE marked and does not comply with the Low Voltage Directive. Laser Safety Statement...
- Page 66 UL and cUL Statement For European Community Users Cognex complies with Directive 2002/96/EC OF THE EUROPEAN PARLIAMENT AND OF THE COUNCIL of 27 January 2003 on waste electrical and electronic equipment (WEEE). This product has required the extraction and use of natural resources for its production. It may contain hazardous substances that could impact health and the environment, if not properly disposed.
- Page 67 Reader Programming Codes Reader Programming Codes Reset Scanner to Factory Defaults Reboot Scanner...
Need help?
Do you have a question about the DataMan 360 and is the answer not in the manual?
Questions and answers