Table of Contents
Advertisement
Quick Links
Advertisement
Table of Contents

Related Manuals for SnowEx SP-65


Summary of Contents for SnowEx SP-65
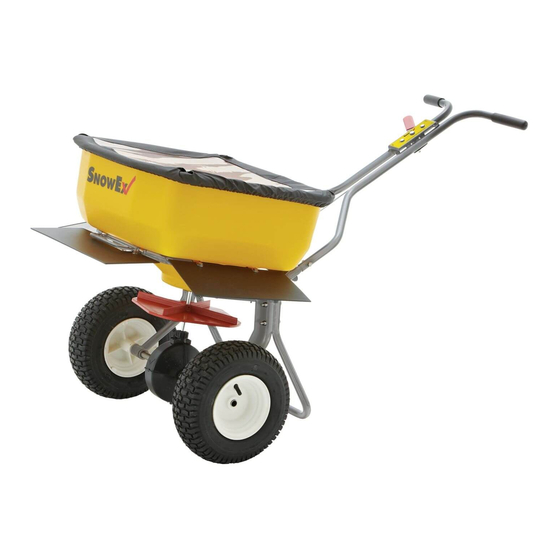
- Page 1 Owner / Operator’s Manual This Manual Must Be Read Before Operating The Equipment SP-65 Serial # PA-201033 and higher CUSTOMER COPY Madison Heights, Michigan 48071 800-725-8377 www.snowexproducts.com © TrynEx International 2013 (REV B) F50753...
-
Page 2: Table Of Contents
Troubleshooting ......................................11 Warranty ........................................12 Key to Parts ....................................... 13 Hopper Assembly Parts Breakdown Model # SP-65 ..................................14 - 15 Axle Assembly Parts Breakdown Model # SP-65 ..................................16 - 17 Handle Assembly Parts Breakdown Model # SP-65 ..................................18 - 19 Notes ........................................ -
Page 3: General Information
General Information CONGRATULATIONS! The SnowEx product you have purchased is an example of snow and ice management product at its finest! Your SnowEx product’s self contained design is a trademark of all SnowEx products. Here’s why... SIMPLICITY: Fewer moving parts manufactured of higher quality means minimal maintenance for your SnowEx product. -
Page 4: Introduction
We require that you read and understand the contents of this manual completely (especially all safety information) before attempting any procedure contained in this manual. Extra copies of Owner / Operator Manuals can be purchased at your SnowEx Dealer. THIS SIGN SHOULD ALERT YOU: The Society of Automotive Engineers has adopted this Safety Alert Symbol to pinpoint characteristics that, if not carefully followed, can create a safety hazard. -
Page 5: Safety
For your safety warning and information decals have been placed on this product to remind the operator of safety precautions . If anything happens to mark or destroy the decals, please request new ones from SnowEx. Remember, most accidents are preventable and caused by human error. Exercising of care and precautions... -
Page 6: Operation
Spreader Operation Model # SP-65 SPREADER LOADING Capacity: 1.5 Cubic Foot Hopper Do not overload spreader. Weights of material are an average for dry materials. Material Weight Per Cubic Ft. Rock Salt 80-90 lbs. Sand/Salt Mix 95-120 lbs. Never remove spreader from vehicle with material in it as this could cause damage to the frame assembly. -
Page 7: Assembly Instructions
Assembly Instructions Model # SP-65 STEP 1 Open Box. Remove the Axle/Spinner Assembly. Slide the Shaft Collars from the hardware kit onto the axle - one on each side of the Gearbox One Hole in Axle – Left. STEP 2 Slide the Hopper Frame Assemblies over the Axle –... - Page 8 Assembly Instructions Model # SP-65 STEP 4 Install the other Wheel. Slide the 1.5” Cotter Pin through the Axle, outside the Wheel. STEP 5 Install Frame Stand. Attach to the Hopper Supports. STEP 6 Install Hopper. Put Bolts with Washers through all four holes in Hopper and Frame.
- Page 9 Assembly Instructions Model # SP-65 STEP 9 Put bolt through both handles at the base. Hand-Tighten only. STEP 10 Put Handle Assembly onto frame. Insert Bolts. Hand-Tighten. STEP 11 Tighten Bolts holding the handle together, then tighten the bolts holding the handle to the frame.
-
Page 10: Assembly Instructions
Assembly Instructions Model # SP-65 STEP 13 Install Cable Clip to cable bracket. COMPLETE. © TrynEx International 2013 (REV B) F50753... -
Page 11: Troubleshooting
Troubleshooting Model # SP-65 DROP SPREADER: TOO MUCH GATE STUCK OPEN LUBRICATE GATE SLIDES ADJUST FRONT GATE MATERIAL FLOW SLIDE ADJUST GATE STOP LUBRICATE LINKAGE REMOVE AND CLEAN IF BROKEN, REPLACE CABLE STUCK LUBRICATE REPLACE RECONNECT ACTUATOR / LINKAGE ADJUST/REPLACE... -
Page 12: Warranty
Neither Snowex, nor any company a liated with it, makes any warranties, representations for promise as to the performance or quality other than what is herein contained. The liability of Snowex to the purchaser for damages arising out of the manufacture, sale, delivery, use or resale of this spreader shall be limited to and shall not exceed the costs of repair or replacement of defective parts. -
Page 13: Key To Parts
Key to Parts Model # SP-65 A4014 Hardware Kit | Handle D5936 Gate Stop Spring A4185 Hardware Kit D5938 Spring Pin | 5/32” X 3/4” D5292 Washer | #10 Flat Stainless D5939 Spring Pin | 5/32” X 1” D5345 Gate Slide... -
Page 14: Hopper Assembly Parts Breakdown
Hopper Assembly Parts Breakdown Model # SP-65 © TrynEx International 2013 (REV B) F50753... -
Page 15: Model # Sp-65
Hopper Assembly Parts Breakdown Model # SP-65 ID # Part # ID # Part # D5292 D5948 D5345 D5967 D5361 D5973 D5905 D5981 D5907 D5982 D5912 F50772 D5927 T15014 D5928 T15016 D5935 D5936 © TrynEx International 2013 (REV B) F50753... -
Page 16: Axle Assembly Parts Breakdown
Axle Assembly Parts Breakdown Model # SP-65 © TrynEx International 2013 (REV B) F50753... -
Page 17: Model # Sp-65
Axle Assembly Parts Breakdown Model # SP-65 ID # Part # ID # Part # ID # Part # D5902 D5923 D5971 D5909 D5926 D5974 D5910 D5930 D5993 D5911 D5938 D5994 D5913 D5939 D6024 D5915 D5941 D6090 D5919 D5947 D5921 D5956 ©... -
Page 18: Handle Assembly Parts Breakdown
Handle Assembly Parts Breakdown Model # SP-65 © TrynEx International 2013 (REV B) F50753... -
Page 19: Model # Sp-65
Handle Assembly Parts Breakdown Model # SP-65 ID # Part # ID # Part # D5365 D5975 D5384 D5976 D5389 D5977 D5907 D5983 D5917 D5990 T15016 D5943 D5948 © TrynEx International 2013 (REV B) F50753... -
Page 20: Notes
Notes © TrynEx International 2013 (REV B) F50753... - Page 21 Notes © TrynEx International 2013 (REV B) F50753...
- Page 22 Notes © TrynEx International 2013 (REV B) F50753...
- Page 23 Notes © TrynEx International 2013 (REV B) F50753...
- Page 24 131903...
Need help?
Do you have a question about the SP-65 and is the answer not in the manual?
Questions and answers