
Related Manuals for mr. steam MS-65T


Summary of Contents for mr. steam MS-65T
- Page 1 Residential Steambath Generator Systems Installation, Operation & Maintenance Manual...
- Page 2 Residential Steambath Generator Systems Installation, Operation & Maintenance Manual MODEL_________________ Serial No._____________________ MODELS: MS-65T, MS-90T, MS-150T, MS-225T, MS-300T, MS-400T MS-SUPER 1T, MS-SUPER 2T, MS-SUPER 3T, MS-SUPER 4T, MS-SUPER 5T, MS-SUPER 6T WARNING 1. Children under the age of 16 should not use the Steambath.
-
Page 3: Table Of Contents
Table of Contents Before Installing ....... . . 3 Steam Room Guidelines......3 Locating the Steam Generator Unit . -
Page 4: Before Installing
. steamsteambaths ® Installation, Operation & Maintenance Manual Before Installing IMPORTANT: The following general information should be used in conjunction with consultations with your architect, designer and con- tractor in determining all factors necessary in providing a suitable and safe steam room. Read these instructions before installation or service. -
Page 5: Locating The Steam Generator Unit
. steamsteambaths ® Installation, Operation & Maintenance Manual Locating the Steam Generator Unit Select a location as near as practical to the steam room. Typical locations include: closet, vanity cabinet, heated attic or basement. 1. Locate steambath generator within 25 feet of steam room. NOTE: THE STANDARD LENGTH OF THE CABLE FOR CONNECTING THE CONTROL TO THE STEAM GENERATOR IS 30 FEET. -
Page 6: Ms Super-4T, 5T, 6T Typical Installation
. steamsteambaths ® Installation, Operation & Maintenance Manual MS Super 4T, 5T, 6T Typical Configuration Installation Instructions for Models: Diagram A MS-Super 4T, MS-Super 5T and MS-Super 6T 1. Install each steam generator as in a single installation. Printed Circuit Board Component shown Install generators as close as practical to each other, enlarged for illustrative... -
Page 7: Installation
. steamsteambaths ® Installation, Operation & Maintenance Manual Installation Plumbing All plumbing shall be performed by a qualified licensed plumber and in accordance with applicable National and local codes. • Use unions on all pipe connections. • Use only brass piping or copper tubing as permitted by codes. •... -
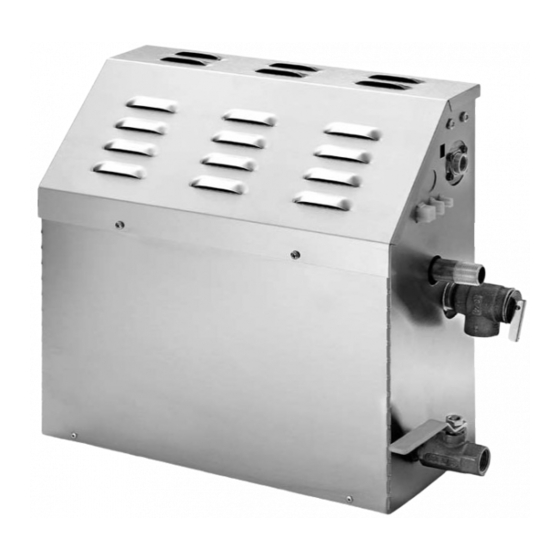
Page 8: Generator Dimensions
. steamsteambaths ® Installation, Operation & Maintenance Manual Generator Diagram Water Inlet Control & Accessory Connections Steam Outlet Safety Valve Optional AutoFlush Manual Drain Valve /----- ----\ /------------------------------------------------------------ -----------------------------------------------------------\ /----- ----\ /----------- ---------\ /-------------------------- -----------------------\ /------------------ ----------------\ ------------------------------------- ------------------------------------ Side View Showing IMPORTANT NOTE: MS 65T- MS 400T MS SUPER 1T-6T Element Access Panel... -
Page 9: Electrical Specifications
Neutral (white) wire is not required. AMPERE CHART _____________________________________________________________________________________________________ MODEL NO. MAXIMUM ROOM VOLTS AMPS WIRE SIZE † VOLUME, CU. FT.* 1 PH (AWG) _____________________________________________________________________________________________________ MS-65T _____________________________________________________________________________________________________ MS-90T _____________________________________________________________________________________________________ MS-150T _____________________________________________________________________________________________________ MS-225T _____________________________________________________________________________________________________ MS-300T _____________________________________________________________________________________________________ MS-400T _____________________________________________________________________________________________________ MS-Super 1T 10.0... -
Page 10: Field Power Wiring
. steamsteambaths ® Installation, Operation & Maintenance Manual Field Power Wiring Ground Lug Ground Models MS 65T – MS 400T (single phase wiring shown) Contactor Knockout (conduit and fittings omitted for clarity) __________________________________________________ TO AVOID EQUIPMENT DAMAGE DO NOT CONNECT POWER SUPPLY DIRECTLY TO ELEMENTS !!! __________________________________________________ NOTE: FOR ILLUSTRATIVE PURPOSES ONLY. -
Page 11: Wiring Diagrams
L E G E N D (All Diagrams) FIELD WIRING POWER INPUT FACTORY WIRING TRANSFORMER BLACK WHITE DARK SINGLE PHASE BLACK BLUE MS-65T, MS-90T, MS-150T, MS-225T, MS-300T, MS-400T GREEN PURPLE GROUND WHITE TO PROBE LIGHT CABLE TEMPO or BLUE TEMPO/PLUS CONTROL CONTACTOR CABLE... - Page 12 . steamsteambaths ® Installation, Operation & Maintenance Manual Single Phase Wiring Diagram with Tempo/Plus Controls Installation Instructions for Models: MS-Super 4T, MS-Super 5T and MS-Super 6T 1. Install each unit as in a single installation as close to each other as possible. 2.
-
Page 13: Wiring Diagrams
. steamsteambaths ® Installation, Operation & Maintenance Manual Three Phase Wiring Diagram with Tempo/Plus Control Installation Instructions for Models: MS-Super 4T, MS-Super 5T and MS-Super 6T 1. Install each unit as in a single installation as close to each other as possible. 2. -
Page 14: Optional Tandem Cable
. steamsteambaths ® Installation, Operation & Maintenance Manual Optional Tandem Cable - for connecting 2-5 steam generators in tandem 3, 4 OR 5 MR STEAM UNITS POWER INPUT FIELD WIRING MASTER UNIT TRANSFORMER BLACK WHITE FACTORY DARK WIRING BLACK BLUE GREEN PLUG THIS END FUSES... -
Page 15: Optional Autoflush System
. steamsteambaths ® Installation, Operation & Maintenance Manual Optional AutoFlush (3) Pin Connector for Tempo/Ext (2) Pin Connector Box Contents (9) Pin Connector for AutoFlush for Tempo and Tempo/Plus Controls • AutoFlush Valve with Cord • Installation instructions. Operation The optional AutoFlush® feature automatical- ly drains the MrSteam system following AutoFlush Cord Connector each use. -
Page 16: Using Aromasteam Essential Oils
. steamsteambaths ® Installation, Operation & Maintenance Manual Optional AutoFlush (cont.) Sweat Fittings When using sweat fittings use only tin base solder with a melting point below 600 degrees F. Do not overheat. Ends of water supply tubing must be thoroughly cleaned for a minimum distance of 1"... -
Page 17: Liquid Level Control Board
. steamsteambaths ® Installation, Operation & Maintenance Manual Liquid Level Control Board - Explaination of LED Indicators With TEMPO or TEMPO/PLUS control OFF _________________________________________________________________________________________________ Water level indicator–LED is ON when no water is detected (for more that 5 seconds). OFF when water level is satisfactory. -
Page 18: Select Your Mrsteam Model
. steamsteambaths ® Installation, Operation & Maintenance Manual Select Your Mr.Steam 1. Measure the Length, Width, and Height in feet of steam/shower or tub/shower Multiply the Length______ x Width______ x Height ______ ______________ to get the basic room volume in CUBIC FEET (a) 2. -
Page 19: Replacement Parts Diagram
. steamsteambaths ® Installation, Operation & Maintenance Manual MS Regular Models - MS65T - MS400T (with AutoFlush) shown with cover removed Liquid Level Control Board Transformer Water Feed Solenoid Power Block Power Supply Knock-Out Liquid Level Probe Water Feed Plug and Play Connection (see page 14) Water Feed Hose... -
Page 20: Replacement Parts List
103922 Cable for Tempo Control (60 ft.) All models MSTS Remote Temperature Probe All models 100476-2 Contactor 50A 2-pole MS-65T-400T, Single phase 99012 Contactor 50A 3-pole All 3-Phase models 103453 Contactor 50A 4-pole MS Super-1T – Super-6T 100471-2 Probe Assembly... -
Page 21: General Information & Care Tips
. steamsteambaths ® Installation, Operation & Maintenance Manual Care Tips for all Controls 1. Use only mild soap and water on a soft cloth to clean the control. 2. Do not use abrasive cleansers 3. If the decorative cover is damaged on the TEMPO or TEMPO/PLUS call MrSteam technical service for replacement parts. -
Page 22: Tempo Controls
. steamsteambaths ® tempo controls ® ™ Dimensional Information for Tempo & Tempo/Plus BOX CONTENTS: • TEMPO or TEMPO/PLUS Control • Control Cable (30 ft.) • Steam Head • Tube of Silicon Sealant • Owner's Manual Installation Instructions for Tempo® & Tempo/Plus™ IMPORTANT: Turn power to the steam generator OFF before installing the control. - Page 23 . steamsteambaths ® tempo controls ® ™ Installation Instructions for Tempo & Tempo/Plus Step 4 Firmly connect the connector near the "CONTROL END" marking to the back of the control. Turn on power to the steam generator and test the control to verify correct connections.
-
Page 24: Tempo Operating Instructions
. steamsteambaths ® tempo controls ® Tempo Operating Instructions The Tempo Control features programmable digital temperature control, a fixed (60) minute duration, ON/OFF and PAUSE. ON/OFF - Diagram 1 Press the ON/OFF key to start or stop the flow of steam. Steam will begin to flow a few minutes after the control is turned ON. -
Page 25: Tempo/Plus Tm Operating Instructions
. steamsteambaths ® tempo controls ™ Tempo/Plu Operating Instructions The Tempo/Plus Control features programmable digital temperature control, pro- grammable time duration, ON/OFF and PAUSE and two personal settings storage. ON/OFF - Diagram 1 Press the ON/OFF key to start or stop the flow of steam. Steam will begin to flow a few minutes after the control is turned ON. -
Page 26: Tempo/Remote
. steamsteambaths ® tempo controls ® Tempo/Remote Wireless Remote Control Box Contents: The TEMPO/REMOTE Control operates all functions of the TEMPO/PLUS Control from a maximum distance of about 15 feet. It is for use inside the • TEMPO/REMOTE Control steam room and requires a direct line-of-sight with the TEMPO/PLUS •... -
Page 27: Using The Remote
. steamsteambaths ® tempo controls Using the Tempo/Remote® To Control Your TEMPO/PLUS™ with the Remote Control: TEMP TIME Setting Temperature Set Point Turning Unit ON/OFF Press the TEMP UP or TEMP DOWN key. 1. Press ON/OFF key to turn unit on. Setting Duration Time 2. -
Page 28: Battery Replacement
. steamsteambaths ® tempo controls Battery Replacement Your remote control is powered by two AAA batteries. NOTE: Before you start it's important to note that you have only 3 minutes to change batteries if you want to retain codes recorded in the memory! 1. -
Page 29: Using The Tempo/Ext
. steamsteambaths ® tempo controls Tempo/Ext™ Dimensional Information The TEMPO/EXT control can only be used together with a TEMPO or TEMPO/PLUS control. The TEMPO/EXT control functions as an external ON/OFF switch for the TEMPO or TEMPO/PLUS control Box Contents: • Tempo/Ext Control •... -
Page 30: Installing The Msts Remote Temperature Probe
. steamsteambaths ® tempo controls Installing the Remote Temperature Probe for Tempo & Tempo/Plus Controls (PN: MSTS) The Remote Temperature Probe is required when the Tempo ™ or Tempo/Plus ™ Controls are installed outside the steam room. C A U T I O N The Remote Temperature Probe (P/N MSTS) is for use with Tempo™... - Page 31 . steamsteambaths ® tempo controls Installing the Remote Temperature Probe (cont.) 5. Route the end of the temperature probe cable with the temperature probe through the wall into the steam room as shown in Diagram 3. IMPORTANT NOTE: Do not strain, staple, pinch or otherwise damage the probe cable.
- Page 32 Sussman-Automatic 43-20 34th Street 9410 S. La Cienega Blvd. Corporation® Long Island City, NY 11101 Inglewood CA 90301 info@mrsteam.com Tel: 1-800-76 STEAM 1-800 -72 STEAM www.mrsteam.com Fax: (718) 472-3256 Western Fax: (310) 216-2944...
Need help?
Do you have a question about the MS-65T and is the answer not in the manual?
Questions and answers