Uconnect 5.0 Owner's Manual Supplement
Hide thumbs
Also See for 5.0:
- Owner's manual supplement (140 pages) ,
- Owner's manual (99 pages) ,
- User manual (299 pages)
Table of Contents
Advertisement
Quick Links
Advertisement
Chapters
Table of Contents

Related Manuals for Uconnect 5.0


Summary of Contents for Uconnect 5.0
- Page 1 Uconnect ® Owner’s Manual Supplement...
-
Page 2: Identifying Your Radio 3
UCONNECT® PHONE ............21 UCONNECT® 5.0 VOICE RECOGNITION QUICK TIPS ......27 SETTINGS MAIN MENU . - Page 4 IDENTIFYING YOUR RADIO CONTENTS ▫ Uconnect® 5.0 System w/o Integrated Center IDENTIFYING YOUR RADIO ....4 Stack ....... .7 ▫...
- Page 5 4 IDENTIFYING YOUR RADIO IDENTIFYING YOUR RADIO Uconnect® 5.0 w/o Integrated Center Stack Uconnect® 5.0 w/Integrated Center Stack Key Features: • 5” Touchscreen • Three buttons on either side of the display • Hands-free/Bluetooth® • SiriusXM Satellite Radio (If Equipped)
-
Page 6: Radio Mode.
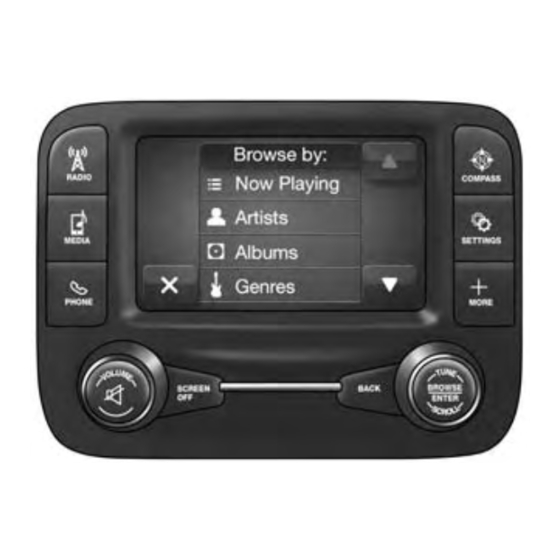
IDENTIFYING YOUR RADIO 5 Uconnect® 5.0 System With Integrated Center 2 — COMPASS Stack Push the COMPASS button on the faceplate to display the current direction of the vehicle. 3 — CLIMATE Push the Climate button on the faceplate to access the Climate Controls. - Page 7 FM or SXM bands. Seek through tracks in CD Rotate the rotary knob to adjust the Volume. Push the (if equipped) or iPod® modes. VOLUME/MUTE button to mute the system. 9 — PHONE Push the PHONE button on the faceplate to access the Uconnect® Phone feature.
- Page 8 IDENTIFYING YOUR RADIO 7 Uconnect® 5.0 System w/o Integrated Center 2 — COMPASS Stack Push the COMPASS button on the faceplate to display the current direction of the vehicle. 3 — SETTINGS Push the SETTINGS button on the faceplate to display the customer programmable features.
- Page 9 Push the BACK button to return to a previous menu or Push the PHONE button on the faceplate to access the screen. Uconnect® Phone feature. 7 — SCREEN OFF 10 — MEDIA Push the SCREEN OFF button to turn the touchscreen Pushing the MEDIA button on the faceplate will allow OFF.
-
Page 10: Table Of Contents
RADIO MODE CONTENTS ▫ SiriusXM Satellite Radio Mode — If Equipped . .12 RADIO MODE......10 ▫... -
Page 11: Radio Mode
10 RADIO MODE RADIO MODE Push the VOLUME/MUTE button to mute the system. Push the VOLUME/MUTE button again to unmute the The radio is equipped with the following modes: system. • AM Enter/Browse & Tune/Scroll Control • FM Turn the rotary TUNE/SCROLL control knob clockwise •... -
Page 12: Setting Presets
RADIO MODE 11 Fast Seek Up stations or channel at a faster rate, the radio stops at the next available station or channel when the button on the Press and hold the “Seek Up” button on the touch- touchscreen is released. screen to advance the radio through the available stations or channels at a faster rate, the radio stops at the next Setting Presets... -
Page 13: Siriusxm Satellite Radio Mode - If Equipped
12 RADIO MODE SiriusXM Satellite Radio Mode — If Equipped Including: • A huge On Demand catalog. SiriusXM Satellite Radio uses direct satellite-to-receiver broadcasting technology to provide clear, coast to coast • Xtra Channels featuring SiriusXM Latino — A collec- radio content. -
Page 14: Audio
RADIO MODE 13 contiguous USA and D.C. Our SiriusXM satellite service Audio is also available in PR (with coverage limitations). Our 1. Push the SETTINGS button on the right side of the Internet radio service is available throughout our satellite radio faceplate. -
Page 15: Clock Setting
14 RADIO MODE • Balance/Fade — Press the “Balance/Fade” button Clock Setting on the touchscreen to adjust the sound from the 1. If a SETTINGS button on the right side of faceplate speakers. Use the “arrow” button on the touch- exists, push this button. - Page 16 MEDIA MODE CONTENTS ▫ USB/iPod® Mode ..... .19 MEDIA MODE ......16 ▫...
-
Page 17: Media Mode
16 MEDIA MODE MEDIA MODE You can press the “Source,” “Pause/Play” or the “Info” button on the touchscreen for artist information on the Media Mode is entered by pushing the MEDIA button current song playing. located on the faceplate. Once in Media Mode, press the “Source”... - Page 18 MEDIA MODE 17 Fast Seek Down Shuffle Press and hold the “Left Arrow” button on the Press the “Shuffle” button on the touchscreen to play the touchscreen and the desired mode will begin to rewind selections on the USB/iPod® device in random order to through the current track until the button on the touch- provide an interesting change of pace.
-
Page 19: Disc Mode - If Equipped
18 MEDIA MODE Disc Mode — If Equipped If you insert a Disc with the ignition ON and the radio ON, the unit will switch to Disc mode and begin to play Your vehicle may have a remote Disc player located in when you insert the Disc. -
Page 20: Usb/Ipod® Mode
MEDIA MODE 19 USB/iPod® Mode made you can chose from the available media by pressing the button on the touchscreen. Press the “Exit” button on USB/iPod® Mode is entered by either inserting a USB the touchscreen if you wish to cancel the browse func- Jump Drive or iPod®... -
Page 21: Bluetooth® Mode
VOLUME/MUTE rotary knob, or with the details. volume of the attached device. Once the Bluetooth® device is paired to the Uconnect® The vehicle radio unit is acting as the amplifier for audio system, push the MEDIA button located on the left side output from the Auxiliary device. - Page 22 ▫ Receiving A Call — Accept (And End) ..25 Uconnect® PHONE ..... .22 ▫ Pairing A Phone ..... . .22 ▫...
-
Page 23: Uconnect® Phone
Uconnect® PHONE Pairing A Phone The Uconnect® Phone is a voice-activated, hands-free, To use the Uconnect® Phone feature, you must first pair in-vehicle communications system with Voice Command your Bluetooth® phone with the Uconnect® system. Capability (see Voice Command section). - Page 24 The last phone connected will have the highest displayed. priority. NOTE: During the pairing stage a screen is displayed For assistance in pairing your phone, contact Uconnect® indicating the progress of the operation. customer support: • From the Phone screen you can always pair a mobile •...
-
Page 25: Phonebook Download - Phonebook Transfer From Mobile Phone
If equipped and specifically supported by your phone, • Depending on the maximum number of entries down- Uconnect® Phone will ask you if you want to download loaded, there may be a short delay before the latest names (text names) and number entries from your mobile downloaded names can be used. -
Page 26: Making A Phone Call
Changing The Volume 1. When an incoming call rings or is announced on Uconnect®, push the PHONE button on the faceplate. 1. Start a dialogue by pushing the PHONE button on the faceplate, then adjust the volume during a normal call. - Page 28 Uconnect® VOICE RECOGNITION ...28 ▫ Introducing Uconnect® ....28 ▫ Phone ......33 ▫...
-
Page 29: Uconnect® Voice Recognition
Uconnect® VOICE RECOGNITION Introducing Uconnect® Start using Uconnect® Voice Recognition with these helpful quick tips. It provides the key Voice Commands and tips you need to know to control your Uconnect® 5.0 system. Key Features: • 5” touchscreen • Three buttons on either side of the display... -
Page 30: Get Started
Uconnect® 5.0 VOICE RECOGNITION QUICK TIPS 29 Get Started All you need to control your Uconnect® system with your voice are the buttons on your steering wheel. 1. Visit UconnectPhone.com to check mobile device and feature compatibility and to find phone pairing in- structions. -
Page 31: Basic Voice Commands
30 Uconnect® 5.0 VOICE RECOGNITION QUICK TIPS Basic Voice Commands The basic Voice Commands below can be given at any point while using your Uconnect® system. Push the VR button . After the beep, say • Cancel to stop a current voice session •... -
Page 32: Radio
Uconnect® 5.0 VOICE RECOGNITION QUICK TIPS 31 • Tune to Satellite Channel Hits 1 TIP: At any time, if you are not sure of what to say or want to learn a Voice Command, push the VR button and say “Help.” The system will provide you with a list of commands. -
Page 33: Media
32 Uconnect® 5.0 VOICE RECOGNITION QUICK TIPS Media TIP: Press the “Browse” button on the touchscreen to see all of the music on your iPod® or USB device. Your Voice Uconnect® offers connections via USB, SD, Bluetooth® Command must match exactly how the artist, album, and Auxiliary ports (If Equipped). -
Page 34: Phone
Uconnect® 5.0 VOICE RECOGNITION QUICK TIPS 33 Phone TIP: When providing a Voice Command, push the PHONE button and say “Call,” then pronounce the Making and answering hands-free phone calls is easy name exactly as it appears in your phone book. When a with Uconnect®. -
Page 35: Voice Text Reply
. After the beep, say... “Reply” Call me. Are you there late. yet? 2. Listen to the Uconnect® prompts. After the beep, I’ll call you I need direc- See you in repeat one of the pre-defined messages and follow the later. -
Page 36: Additional Information
Uconnect® 5.0 VOICE RECOGNITION QUICK TIPS 35 Additional Information DriveUconnect.com © 2014 Chrysler Group LLC. All rights reserved. Mopar® Uconnect® System Support 1-877-855-8400 and Uconnect® are registered trademarks and Mopar Mon. – Fri., 7:00 am – 12:00 am, ET Owner Connect is a trademark of Chrysler Group LLC. - Page 38 SETTINGS MAIN MENU CONTENTS ▫ Doors & Locks — If Equipped ... . .40 SETTINGS MAIN MENU ....38 ▫...
-
Page 39: Settings Main Menu
38 SETTINGS MAIN MENU SETTINGS MAIN MENU Language Push the SETTINGS button on your faceplate, if one When in this display, you may select one of three exists, to display the Settings Main Menu. If not, push the languages for all display nomenclature. Press “Lan- MORE button on the faceplate then the “Settings”... -
Page 40: Voice - If Equipped
When in this display, you may turn on or shut off the Refer to “Understanding Your Instrument Panel/ sound heard when a touchscreen button is pressed. Press Uconnect® System” section in your vehicle Owner’s the “Touchscreen Beep” button on the touchscreen and Manual for details. -
Page 41: Auto-On Comfort - If Equipped
Doors & Locks — If Equipped Compass Settings Refer to “Understanding Your Instrument Panel/ Compass Variance Uconnect® System” section in your vehicle Owner’s Compass Variance is the difference between Magnetic Manual for details. North and Geographic North. To compensate for the Heated Seats —... - Page 42 SETTINGS MAIN MENU 41 NOTE: Keep magnetic materials away from the top of the instrument panel, such as iPod’s, Mobile Phones, Laptop Computers and Radar Detectors. This is where the com- pass module is located, and it can cause interference with the compass sensor, and it may give false readings.
-
Page 43: Audio
“Yes” button Phone/Bluetooth® on the touchscreen popup and completing one or more Refer to the “Uconnect® Phone” section in this manual 360-degree turns (in an area free from large metal or for details. - Page 44 MORE MAIN MENU CONTENTS MORE MAIN MENU .....44 ▫ Clock .......44...
- Page 45 44 MORE MAIN MENU MORE MAIN MENU Push the MORE button located on the faceplate to display the More Main Menu. The More Main Menu may contain the following options: Clock Refer to the “Uconnect® 5.0/Radio Mode” section in this manual for details.
- Page 46 SAFETY GUIDELINES ....46 ▫ Safe Usage Of The Uconnect® System ..46 ▫ FCC Declaration ..... . .48 ▫...
-
Page 47: Safety Guidelines
Uconnect® features and applications in this ve- that still allows you to hear outside traffic and emer- hicle. Only use Uconnect® when it is safe to do so. gency vehicles. Failure to do so may result in an accident involv- ing serious injury or death. -
Page 48: Disc Drive
SAFETY GUIDELINES 47 • Permanent hearing loss may occur if you play your • Do not spray any liquid or caustic chemicals directly music or the system at loud volumes. Exercise caution on the screen! Use a clean and dry micro fiber lens when setting the volume on your system. -
Page 49: Fcc Declaration
48 SAFETY GUIDELINES FCC Declaration If this equipment does cause harmful interference to radio or television reception, which can be determined by This device complies with Part 15 of the FCC Rules and turning the equipment off and on, the user is encouraged with Industry Canada license-exempt RSS standard(s). - Page 50 SAFETY GUIDELINES 49 The internal wireless radio operates within guidelines found in radio frequency safety standards and recom- mendations, which reflect the consensus of the scientific community. The radio manufacturer believes the internal wireless radio is safe for use by consumers. The level of energy emitted is far less than the electromagnetic energy emit- ted by wireless devices such as mobile phones.
- Page 51 15UC5-526-AC Third Edition Uconnect ® Chrysler Group LLC Printed in the USA...
Need help?
Do you have a question about the 5.0 and is the answer not in the manual?
Questions and answers