Table of Contents
Advertisement
Quick Links
Advertisement
Chapters
Table of Contents

Related Manuals for Uconnect 5.0 NAV


Summary of Contents for Uconnect 5.0 NAV
- Page 1 Uconnect 5.0/5.0 NAV Owner’s Manual Supplement...
-
Page 2: Safety Guidelines 3
ALL ABOUT UCONNECT ........ - Page 4 CYBERSECURITY ......5 ▫ Safe Usage Of The Uconnect System ..4...
-
Page 5: Safety Guidelines
Only use that still allows you to hear outside traffic and emer- Uconnect when it is safe to do so. Failure to do so gency vehicles. may result in an accident involving serious injury or death. -
Page 6: Touchscreen
SAFETY GUIDELINES 5 • Permanent hearing loss may occur if you play your • Do not spray any liquid or caustic chemicals directly music or the system at loud volumes. Exercise caution on the screen! Use a clean and dry micro fiber lens when setting the volume on your system. - Page 7 • ONLY insert media (e.g., USB, SD card, or CD) into vehicle systems may still exist, even if the most recent your vehicle if it came from a trusted source. Media version of vehicle software (such as Uconnect software) is of unknown origin could possibly contain mali- installed.
- Page 8 • Routinely check www.driveuconnect.com/software-update learn about available Uconnect software updates. • Only connect and use trusted media devices (e.g. personal mobile phones, USBs, CDs). Privacy of any wireless and wired communications can- not be assured. Third parties may unlawfully intercept information and private communications without your consent.
- Page 10 INTRODUCTION CONTENTS UCONNECT 5.0 SYSTEM ....10 UCONNECT 5.0 SYSTEM W/NAVIGATION — IF EQUIPPED ......13...
-
Page 11: Introduction 9
10 INTRODUCTION UCONNECT 5.0 SYSTEM... - Page 12 Push the MORE button on the faceplate to access addi- tional options such as: Trip, Clock and Outside Temp. 2 — SETTINGS 6 — PHONE Push the SETTINGS button to access the Uconnect setting features. Push the PHONE button to access the Uconnect Phone feature.
- Page 13 12 INTRODUCTION 8 — MEDIA Pushing the MEDIA button will allow you to switch to Media mode (USB/iPOD, AUX or Bluetooth.) 9 — RADIO Push the RADIO button on the faceplate to enter Radio Mode. The different tuner modes; AM, FM and SXM – If Equipped can be selected by pushing the corresponding button on the touchscreen while in the Radio Mode.
-
Page 14: Equipped
INTRODUCTION 13 UCONNECT 5.0 SYSTEM W/NAVIGATION — IF EQUIPPED... - Page 15 Push the MORE button on the faceplate to access addi- tional options such as: Trip, Clock, Outside Temp or 2 — SETTINGS Compass. Push the SETTINGS button to access the Uconnect setting 6 — PHONE features. Push the PHONE button to access the Uconnect Phone 3 —...
- Page 16 INTRODUCTION 15 8 — MEDIA Pushing the MEDIA button will allow you to switch to Media mode (USB/iPOD, AUX or Bluetooth.) 9 — RADIO Push the RADIO button on the faceplate to enter Radio Mode. The different tuner modes; AM, FM and SXM – If Equipped can be selected by pushing the corresponding button on the touchscreen while in the Radio Mode.
- Page 18 CONTENTS WHAT IS UCONNECT? ....18 IDENTIFYING YOUR RADIO ....20...
-
Page 19: What Is Uconnect
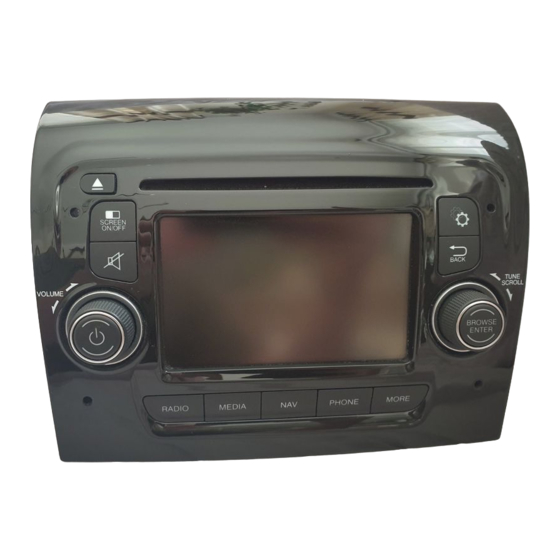
WHAT IS UCONNECT? Before you drive, familiarize yourself with the easy-to- use Uconnect System. • The Uconnect Voice Command And Uconnect Phone Buttons On Your Steering Wheel • The buttons let you use your voice to give commands, make phone calls, respond to text messages hands- free, enter navigation destinations and control your radio and media devices. - Page 20 ALL ABOUT UCONNECT 19 1 — Uconnect Phone Hang Up Button 8 — Settings Button 2 — Uconnect Voice Command Button 9 — Back Button 3 — Uconnect Phone Mute Button 10 — Browse/Enter — Tune/Scroll 4 — Uconnect Phone Pick Up Button 11 —...
-
Page 21: Identifying Your Radio
ALWAYS drive safely with your hands on the steer- ing wheel. You have full responsibility and assume all risks related to the use of the Uconnect features and applications in this vehicle. Only use Uconnect when it is safe to do so. Failure to do so may result in an accident involving serious injury or death. -
Page 22: Table Of Contents
RADIO MODE CONTENTS ▫ Setting Presets......24 RADIO MODE......22 ▫... -
Page 23: Radio Mode
Only use Press and release the “Seek Up” button to tune the Uconnect when it is safe to do so. Failure to do so radio to the next listenable station or channel. may result in an accident involving serious injury or death. -
Page 24: Direct Tune
RADIO MODE 23 Seek Down Direct Tune Press and release the “Seek Down” button to tune the radio to the next listenable station or channel. During a Seek Down function, if the radio reaches the starting station after passing through the entire band two times, the radio will stop at the station where it began. -
Page 25: Setting Presets
24 RADIO MODE Press the available number button to begin selecting a Setting Presets desired station. Once a number has been entered, any numbers that are no longer possible (stations that cannot be reached) will become deactivated/grayed out. If you accidently entered the wrong station number, press the “CLR”... -
Page 26: Siriusxm Satellite Radio Mode - If Equipped
RADIO MODE 25 When you are receiving a station that you wish to music plus sports, news, talk and entertainment. Get all commit into memory, press and hold the desired num- the premium programming, including Howard Stern, bered button for more that two seconds or until you hear every NFL game, Oprah Radio, every MLB and NHL a confirmation beep. -
Page 27: Audio
26 RADIO MODE coverage limitations). Our Internet radio service is avail- Audio able throughout our satellite service area and in AK and HI. © 2015 SiriusXM Radio Inc. Sirius, XM and all related marks and logos are trademarks of SiriusXM Radio Inc. Service available in Canada;... - Page 28 RADIO MODE 27 Equalizer Balance Press the “Equalizer” button to adjust the Bass, Mid and Press the “Balance” button to adjust the sound from the Treble. Use the “+” or “–” buttons to adjust the equalizer speakers. Use the “arrow” button to adjust the sound to your desired settings.
- Page 29 28 RADIO MODE Auto On Radio Press the “Auto On Radio” button to set how the radio behaves when the Ignition is switched to ON. The options are: On, Off or Recall Last to the last turned to stop condition. Press the “back arrow” button when completed.
- Page 30 MEDIA MODE CONTENTS ▫ AUX Mode ......32 MEDIA MODE ......30 ▫...
-
Page 31: Media Mode
• Playlists features and applications in this vehicle. Only use • Albums • Folders Uconnect when it is safe to do so. Failure to do so may result in an accident involving serious injury • Genres or death. You can select the “Source” button, “Pause/Play” button or the “Info”... -
Page 32: Common Media Functions
MEDIA MODE 31 Common Media Functions Fast Seek Down Seek Up /Down Press and hold the “Seek Down” button and the desired mode will begin to rewind through the current Press and release the “Seek Up” button for the next track until the button is released. -
Page 33: Aux Mode
32 MEDIA MODE order to provide an interesting change of pace. Press the Inserting USB/iPod Device button a second time to turn this feature off. Gently insert the USB/iPod device into the USB Port. If Repeat you insert a USB/iPod device with the ignition ON, the unit will switch to USB/iPod mode and begin to play Press the Repeat button to replay the selection on the when you insert the device. - Page 34 MEDIA MODE 33 or by pushing the MEDIA mode button located below the Inserting Auxiliary Device display. Once in MEDIA mode, press the “Source” button Gently insert the Auxiliary device cable into the AUX and select AUX. Port. If you insert a Auxiliary device with the ignition ON, the unit will switch to AUX mode and begin to play when you insert the device cable.
-
Page 35: Bluetooth Mode
Uconnect Phone to communicate with the Uconnect System. NOTE: See the pairing procedure in this manual for further details. Once the Bluetooth device is paired to the Uconnect System, push the MEDIA button. Once in MEDIA mode, press the “Source” button and select Bluetooth. - Page 36 UCONNECT VOICE RECOGNITION ..36 ▫ Introducing Uconnect ....36 ▫ Phone ......41 ▫...
-
Page 37: Uconnect Voice Recognition
Uconnect features and applications in this vehicle. Only use Uconnect when it is safe to do so. Failure to do so may result in an accident involving serious injury or death. -
Page 38: Get Started
VOICE RECOGNITION QUICK TIPS Get Started All you need to control your Uconnect system with your voice are the buttons on your steering wheel. 1. Visit UconnectPhone.com to check mobile device and feature compatibility and to find phone pairing in- structions. -
Page 39: Basic Voice Commands
38 VOICE RECOGNITION QUICK TIPS Basic Voice Commands The basic Voice Commands below can be given at any point while using your Uconnect system. Push the VR button . After the beep, say • Cancel to stop a current voice session •... -
Page 40: Radio
VOICE RECOGNITION QUICK TIPS Radio Use your voice to quickly get to the AM, FM or SiriusXM Satellite Radio stations you would like to hear. (Subscrip- tion or included SiriusXM Satellite Radio trial required.) Push the VR button . After the beep, say •... -
Page 41: Media
TIP: Press the “Browse” button on the touchscreen to see all of the music on your iPod or USB device. Your Voice Uconnect offers connections via USB, SD, Bluetooth and Command must match exactly how the artist, album, Auxiliary ports (If Equipped). Voice operation is only song and genre information is displayed. -
Page 42: Phone
Making and answering hands-free phone calls is easy name exactly as it appears in your phone book. When with Uconnect. When the Phonebook button is illumi- a contact has multiple phone numbers, you can say nated on your touchscreen, your system is ready. Check “Call John Smith work.”... -
Page 43: Voice Text Reply
Are you there late. ply” yet? I’ll call you I need direc- See you in 2. Listen to the Uconnect prompts. After the beep, repeat later. tions. <number> of one of the pre-defined messages and follow the system minutes. prompts. -
Page 44: Additional Information
Yelp logo, Yelp burst and related marks are registered Mon. – Fri., 8:00 am – 8:00 pm, ET trademarks of Yelp. Sat., 9:00 am – 5:00 pm, ET Sun., Closed Uconnect Access Services Support 1-855-792-4241. Please have your Uconnect Security PIN ready when you call. - Page 46 ▫ Mute (Or Unmute) Microphone During Call . . .50 UCONNECT PHONE .....46 ▫ Pairing A Phone ..... . .47 ▫...
-
Page 47: Uconnect Phone
Only use 1-877-855-8400 (24 hours a day 7 days a week) Uconnect when it is safe to do so. Failure to do so • Canadian residents - visit UconnectPhone.com or may result in an accident involving serious injury call 1-800-465-2001 (English) or 1-800-387-9983 or death. -
Page 48: Pairing A Phone
6. When prompted by the mobile phone, use its key- board to enter the PIN code shown on the system To use the Uconnect feature, you must first pair your display, or confirm on the mobile phone the PIN Bluetooth phone with the Uconnect system. Refer to displayed on the Uconnect system and select “Pair.”... -
Page 49: Phonebook Download - Phonebook Transfer From Mobile Phone
If equipped and specifically supported by your phone, favorite. The last phone connected will have the high- Uconnect will ask you if you want to download names est priority. (text names) and number entries from your mobile phone’s phonebook. -
Page 50: Making A Phone Call
“Answer” button on the radio phonebook may not be downloaded depending on the touchscreen. mobile phone and the phone’s software. • This downloaded phonebook cannot be edited or deleted on the Uconnect. These can only be edited on... -
Page 51: Mute (Or Unmute) Microphone During Call
50 UCONNECT PHONE Mute (Or Unmute) Microphone During Call If this function is not supported by the phone, the corresponding button is deactivated (greyed out). During a call, push the “Voice Command” button the steering wheel. When a text message is received, the display will show a screen where the options “Listen,”... -
Page 52: Sms Message Options
Bluetooth connections Uconnect system is speaking. Please note the volume menu for a device registered as Uconnect. After enabling setting for Uconnect is different than the audio system. this function on the mobile phone, it must be discon- nected and reconnected with the system to make it effective. - Page 54 MORE BUTTON CONTENTS ▫ Clock .......54 MORE MAIN MENU .....54 ▫...
- Page 55 54 MORE BUTTON MORE MAIN MENU Clock Push the MORE button on the faceplate to display the Show the Clock in full screen mode. More Main Menu. The More Main Menu contains the Compass following options: Press the “Compass” button to display the compass. Trip Computer NOTE: All features listed may not be available on your Press the “Trip”...
- Page 56 NAVIGATION CONTENTS NAVIGATION (UCONNECT 5.0N) — IF EQUIPPED ......56 ▫ Read Me First ......56...
- Page 57 Uconnect features and applications in this vehicle. Only use Uconnect when it is safe to do so. Failure to do so may result in an accident involving serious injury or death.
- Page 58 NAVIGATION 57 Setting Up Please refer to your dealer for more information on the content update procedure. When you first switch on navigation, you have to answer a few set-up questions. Answer the questions by pressing Safety Settings the touchscreen. We recommend using the safety settings to make your GPS Reception driving as safe as possible.
- Page 59 58 NAVIGATION Planning A Route You can change the country or state setting by press- ing the state icon in the upper right corner of the To plan a route, do the following: screen. 1. Press the touchscreen to open the Main Menu. 4.
- Page 60 NAVIGATION 59 5. Enter the street name. 6. Enter the house number, then press the “OK” button. Streets with similar names are shown in the list while you type. When the correct street name appears in the list, press the name to select the destination.
- Page 61 60 NAVIGATION 7. The location is shown on the map. Press the “Select” 8. When the new route is shown, press the “Done” button to continue or press the “Back” button to enter button. another address. For more information about the route, press the “De- NOTE: If you want your final destination to be a parking tails”...
- Page 62 NAVIGATION 61 To change your route, for example, to travel via a Safety Mode particular location or to select a new destination, press The navigation SW will switch to “Safety Mode,” with a the “Change route” button. dedicated menu structure, when driving above a thresh- old speed of 5 mph (8.0 kph).
- Page 63 62 NAVIGATION In Safety mode, you can enter a destination (without the Route Summary use of typewriter, see below), go into map display, and The route summary shows an overview of your route, the toggle three settings. The “Navigate to” submenu in remaining distance to your destination and the remain- Safety Mode has reduced functionality: ing estimated journey time.
- Page 64 NAVIGATION 63 Selecting A Route Type The types of route you can choose from are as follows: • Every Time I Plan — Will ask you the type of route Every time you plan a route, you can choose to be asked about the type of route you want to plan.
- Page 65 64 NAVIGATION • Shortest route — Shortest distance between the loca- After entering a destination, press the “YES” button tions you set. This may not be the quickest route, when asked about an arrival time to enter a preferred especially if the shortest route is through a town or arrival time.
- Page 66 NAVIGATION 65 You will arrive 55 minutes before the arrival time you entered. If the estimated arrival time is more than five minutes before the time you entered, it is shown in green. You will arrive 3 minutes before the arrival time you entered. If the estimated arrival time is less than 5 minutes before the time you entered, it is shown in yellow.
- Page 67 66 NAVIGATION Navigation Menu Options When you press the “Drive to” button you can set your destination in many ways, not just by entering the address. The other options are listed below: Home Press this button to navigate to your Home location. You will probably use this button more than any other.
- Page 68 NAVIGATION 67 Address Press this button to enter an address as your destination. Recent Destination Press this button to select your destination from a list of places you have recently used as destinations.
- Page 69 68 NAVIGATION Point Of Interest Press this button to navigate to a Point of Interest (POI). Latitude Longitude Press this button to enter a destination using latitude and longitude values.
- Page 70 NAVIGATION 69 Position Of Last Stop Press this button to select your last recorded position as your destination. Planning A Route In Advance week. Navigation uses IQ Routes when planning a route. IQ Routes calculates routes based on the real You can use your navigation system to plan a route in average speeds measured on roads.
- Page 71 70 NAVIGATION 2. Press the “Plan route” button. 6. Choose the date and time that you will make the journey you are planning. This button is shown when no route has been planned. Navigation uses IQ Routes to work out the best possible route at that time.
- Page 72 NAVIGATION 71 You can then select from the following options: Show Instructions Press this button for a list of all the turn instructions on the route. This is very useful if you need to explain a route to someone else. Show Map Of Route Press this button to see an overview of the route using the map browser.
- Page 73 72 NAVIGATION Show Route Demo Press this button to watch a demo of the journey. You can interrupt the demo at any time by pressing the screen. Show Route Summary Press this button to open the route summary screen.
- Page 74 NAVIGATION 73 Show Destination Press this button to see a preview of your destination. You can navigate to a parking lot near your destination, and view any available information about your destination, for example, the phone number. Voice Control Using Voice Control About Voice control WARNING! Instead of pressing the touchscreen to control your...
- Page 75 74 NAVIGATION The following example shows how to use voice control to 3. If the command is correct, say “Yes.” plan a journey to your Home address: If the command is incorrect, say “No” and repeat the command after you hear the prompt and tone again. 1.
- Page 76 NAVIGATION 75 The Driving View Press the center of the touchscreen, at any time, to open the Main Menu. The Driving View About The Driving View When your TomTom navigation system starts for the first 1. Zoom button time, you are shown the Driving View along with de- Press the magnifying glass to show buttons for zoom- tailed information about your current position.
- Page 77 76 NAVIGATION 2. Your current position 7. Navigation instruction for the road ahead and the distance to next instruction 3. Road sign information or the next street name If the second instruction is less than 150m after the 4. Remaining journey time, the remaining distance and first instruction, you see it shown immediately instead your estimated arrival time of the distance.
- Page 78 NAVIGATION 77 Advanced Lane Guidance Using Lane Guidance About Lane Guidance There are two types of lane guidance: NOTE: Lane guidance is not available for all junctions or 1. Lane images in all countries. Your navigation system helps you prepare for motorway exits and junctions by showing the correct driving lane for your planned route.
- Page 79 78 NAVIGATION NOTE: Press anywhere on the touchscreen to return to NOTE: If no lane guidance is shown in the status bar and the Driving View. all lanes are highlighted, you can use any lane. 2. Instructions in the status bar Changing Your Route Making Changes To Your Route After you plan a route, you may want to change the route...
- Page 80 NAVIGATION 79 Change Route Press this button to change the current route. This button is only shown while there is a planned route. Change Route Menu To change the current route or your destination, press one of the following buttons: Change Destination Press this button to change the current destination.
- Page 81 80 NAVIGATION Avoid Roadblock Press this button while driving on a planned route, to avoid a roadblock or traffic congestion on the road ahead. Your navigation system will suggest a new route which avoids the roads on your current route for the selected distance. Calculate Alternative Press this button to find an alternative to the current route.
- Page 82 NAVIGATION 81 Travel Via Press this button to change your route by selecting a location you want to travel past, maybe so you can meet someone on the way. When you select a location to travel past, you are shown the same options and asked to enter the new address in the same way as when you plan a new route.
- Page 83 82 NAVIGATION Adding The First Waypoint To Your Route CAUTION! To add the first waypoint to your route, do the following: When a new route is calculated, you may be asked 1. Press the touchscreen to bring up the Main menu. to turn off the current road.
- Page 84 NAVIGATION 83 Adding Further Waypoints To Your Route 6. Press the “Done” button. On the route summary screen, a message confirms that To add more waypoints to your route after the first one the route is being recalculated to include your way- has been added, do the following: points.
- Page 85 84 NAVIGATION 4. Press the waypoint you want to move up or down. You will see a touchscreen with the name of your waypoint at the top. You will see a touchscreen with the name of your waypoint at the top. 5.
- Page 86 NAVIGATION 85 5. Press the “Reactivate” button. View Map The waypoint is deleted and reinserted into the list of waypoints that haven’t yet been visited. View Map About Viewing The Map You can view the map in the same way as you might look at a traditional paper map.
- Page 87 86 NAVIGATION 2. Find button Sounds And Voices Press this button to find specific addresses, favorites or About Sounds And Voices Points of Interest. Your TomTom navigation system uses sound for some or 3. Zoom bar all of the following: Zoom in and out by moving the slider.
- Page 88 NAVIGATION 87 You can turn navigation instructions on/off by doing the Settings following: About Settings • In the Driving view — Press the central panel on the You can change the way your navigation system looks status bar to hear navigation instructions again, if they and behaves.
- Page 89 88 NAVIGATION Use Day Colors Press this button to display the map in brighter colors. Turn Off Voice Guidance Press this button to switch off voice guidance. You will no longer hear spoken route instructions but you will still hear information such as traffic information and warnings. Voice guidance is also switched off when the main unit volume is muted.
- Page 90 NAVIGATION 89 Turn On Voice Guidance Press this button to switch on voice guidance and hear spoken route instructions. Voice Settings Press this button to set the type of spoken directions and other route instructions that your navigation system will read aloud.
- Page 91 90 NAVIGATION Make Your Own Menu Press this button to add up to six buttons to your own personalized menu. If there are only one or two buttons in your menu, both buttons are shown in the Driving view. If you have three or more buttons in your menu, then a single button is shown in the Driving view which opens your menu when pressed.
- Page 92 NAVIGATION 91 To view or change an existing Favorite, press one of the items in the list. To see more Favorites on the map, press the “left or right” buttons.
- Page 93 92 NAVIGATION Home Location Press this button to set or change your Home location. You enter the address in the same way as you do when you plan a route. Your Home location provides an easy way to plan a route to an important location. For most people, your Home location will be your home address.
- Page 94 NAVIGATION 93 Route Types travel on these lanes, you may need to have more than one person in the vehicle, for example, or the vehicle may Set the type of route you want your navigation system to need to use environmentally-friendly fuel. calculate.
- Page 95 94 NAVIGATION Status Bar Press this button to select the information you want to see on the status bar: • Horizontal — Show the status bar at the bottom of the Driving view. • Vertical — Show the status bar on the right-hand side of the Driving view. •...
- Page 96 NAVIGATION 95 Safety Settings Press this button to select the safety features you want applied to your navigation. Map Colors Press this button to select the color schemes for day and night map colors for 2D and 3D mode. Press the “Search” button to search for a color scheme by typing the name.
- Page 97 96 NAVIGATION 2D/3D Settings Press this button to set the default view of the map. To switch between 2D and 3D views while driving, press the left side of the status bar in Driving View. It is sometimes easier to view the map from above, such as when navigating a complex road network.
- Page 98 NAVIGATION 97 Switch Map Press this button to select the map you want to use for route planning and navigation. Although you can store more than one map on the navigation system, you can only use one map at a time for planning and navigation. To switch from the current map to plan a route in another country or region, simply press this button.
- Page 99 98 NAVIGATION Manage POIs Press this button to manage your own Point of Interest (POI) categories and locations. You can set your navigation system to let you know when you are near to selected POI locations. For example, you could set the navigation system to let you know when you are approaching a gas station.
- Page 100 NAVIGATION 99 Units Press this button to set the units used for navigation features such as route planning. Keyboard Press this button to select the keyboards that will be available for your use and the layout of the Latin keyboard. You use the keyboard to enter names and addresses, such as when you plan a route or search for the name of a town or a local restaurant.
- Page 101 100 NAVIGATION GPS Status Press this button to see the current status of GPS reception on your navigation system.
- Page 102 NAVIGATION 101 Advanced Settings Press this button to select the following advanced settings: • Show house number before street name — When this setting is selected, ad- dresses are shown with the house number followed by the street name, such as 10 Downing Street.
- Page 103 102 NAVIGATION Advanced Settings Press this button to select the following advanced settings: • Show lane images — When this setting is selected, a graphical view of the road ahead shows which lane you need when you approach a junction or motorway exit.
- Page 104 NAVIGATION 103 Reset Factory Settings Press this button to delete all your personal navigation settings and restore the standard factory settings to your navigation system. This is not a software update and will not affect the version of the software application installed on your system.
- Page 105 104 NAVIGATION Navigation Updates 5. Remove the USB device and connect it to a computer. The Navigation maps can be updated An updated map can now be downloaded to the USB using a USB device to download the device using the TomToM HOME application on the most recent maps.
- Page 106 NAVIGATION 105 Here are some examples: 4. If there are no POI categories or the one you want to use does not exist, Press the “Add POI” category and • Restaurants create a new category. • Hotels Every POI must be assigned to a •...
- Page 107 106 NAVIGATION 8. The POI is created and saved in the selected category. NOTE: If you already know the name of the POI you want to use, you can press the “Search by name” button Using POIs To Plan Route to enter the name and select this location.
- Page 108 NAVIGATION 107 9. Press the name of the parking lot you want to use and The types of POI you have selected are shown as symbols press the “Done” button when the route has been on the map. calculated. Setting Warnings For POIs Your navigation system starts to guide you to the You can set a warning sound to be played when you parking lot.
- Page 109 108 NAVIGATION 3. Set the distance as 500 yards and press the “OK” Manage POIs button. Press the “Manage POIs” button to manage your POI 4. Press the “Sound effect” button and then press the categories and locations. “Next” button. You can set your navigation system to 5.
- Page 110 NAVIGATION 109 • Add POI — Press this button to add a location to one Help of your own POI categories. About Getting Help • Warn when near POI — Press this button to set your Press the “Help” button in the Main menu to navigate to system to warn you when you are near selected POIs.
- Page 111 110 NAVIGATION 4. Select the type of service you require, for example, 6. To navigate your way to the center by vehicle, press Nearest hospital. the “Navigate there” button. Your navigation system starts guiding you to your 5. Select a center from the list, the nearest is shown at the destination.
- Page 112 NAVIGATION 111 Drive To Help Press this button to plan a driving route to a service center. Where Am I Press this button to see your current location on the map.
- Page 113 112 NAVIGATION What Can I Say Press this button to see a list of commands you can say when using voice control. Guided Tours Press this button to view a selection of guided tours relating to your navigation system.
- Page 114 NAVIGATION 113 Safety And Other Guides Press this button to read a selection of guides, including a First Aid guide. Favorites 1. Press the touchscreen to bring up the Main menu. About Favorites 2. Press the “Drive to” button. Favorites provide an easy way to select a location with- 3.
- Page 115 114 NAVIGATION Changing The Name Of A Favorite Deleting A Favorite To change the name of a Favorite, do the following: To delete a Favorite, do the following: 1. Press the touchscreen to bring up the Main menu. 1. Press the touchscreen to bring up the Main menu. 2.
- Page 116 NAVIGATION 115 Important Safety Notices And Warnings This Document Global Positioning System Great care was taken in preparing this document. Con- stant product development may mean that some infor- The Global Positioning System (GPS) is a satellite-based mation is not entirely up to date. The information in this system that provides location and timing information document is subject to change without notice.
- Page 117 116 NAVIGATION www.tomtom.com/en_us/legal/ for warranties and us.support.tomtom.com/app/answers/list. Upon re- end user license agreements applying to this product. quest, we will send you a CD with the corresponding source code. © 2015 TomTom. All rights reserved. This material is proprietary and the subject of copyright protection Linotype, Frutiger and Univers are trademarks of Lino- and/or database rights protection and/or other intellec- type GmbH registered in the U.S.
- Page 118 Printed in the USA ©2015 FCA US LLC. All Rights Reserved. Chrysler, Dodge, Jeep, Ram, Mopar and Uconnect are trademarks of FCA US LLC. FIAT is a registered trademark of FCA Group Marketing S.p.A., used under license by FCA US LLC.
Need help?
Do you have a question about the 5.0 NAV and is the answer not in the manual?
Questions and answers