Table of Contents
Advertisement
Advertisement
Table of Contents

Related Manuals for Uconnect 3


Summary of Contents for Uconnect 3
- Page 1 UCONNECT 3 WITH 5” INCH DISPLAY...
-
Page 2: Safety And General Information 3
SAFETY AND GENERAL INFORMATION ........ - Page 4 GENERAL INFORMATION ....6 ▫ Safe Usage Of The Uconnect System ...4 ▫ External Audio Sources ....6 ▫...
- Page 5 • Read all instructions in this manual carefully before ing wheel. You have full responsibility and assume all risks related to the use of the Uconnect features using your system to ensure proper usage! and applications in this vehicle. Only use Uconnect •...
-
Page 6: Care And Maintenance
SAFETY AND GENERAL INFORMATION 5 • Do not spray any liquid or caustic chemicals directly on Exposure To Radio Frequency Radiation the screen! Use a clean and dry micro fiber lens cleaning The internal wireless radio operates within guidelines cloth in order to clean the touchscreen. found in radio frequency safety standards and recommen- •... -
Page 7: Fcc Declaration
6 SAFETY AND GENERAL INFORMATION FCC Declaration GENERAL INFORMATION General Information External Audio Sources The following regulatory statement applies to all Radio Other electronic devices (e.g. iPod, PDA, etc.) can be used Frequency (RF) devices equipped in this vehicle: on the car. Some of them may cause electromagnetic interference however. - Page 8 CONTENTS ▫ Uconnect Settings ..... . .10 UCONNECT 3 WITH 5-INCH DISPLAY..8...
-
Page 9: Introduction 7
8 INTRODUCTION UCONNECT 3 WITH 5-INCH DISPLAY Uconnect 3 With 5–Inch Display System Key Features: 1 — RADIO • 5” Touchscreen Push the RADIO button on the faceplate to enter Radio Mode. The different tuner modes; AM, FM and SXM (if •... - Page 10 INTRODUCTION 9 3 — SETTINGS 7 — SCREEN OFF Push the SETTINGS button on the faceplate to display the Push the SCREEN OFF button to turn the touchscreen OFF. customer programmable features. To turn the touchscreen back ON, just press the screen.
-
Page 11: Uconnect Settings
• Units • Phone/Bluetooth • Voice • Radio Setup • Clock & Date • Restore Settings • Safety/Assistance • Clear Personal Data • Brakes Refer to “Uconnect Settings” in the Owner’s Manual for • Lights further information. • Doors & Locks... -
Page 12: Table Of Contents
RADIO MODE CONTENTS ▫ Direct Tune Functions ....13 OPERATING RADIO MODE ....12 ▫... -
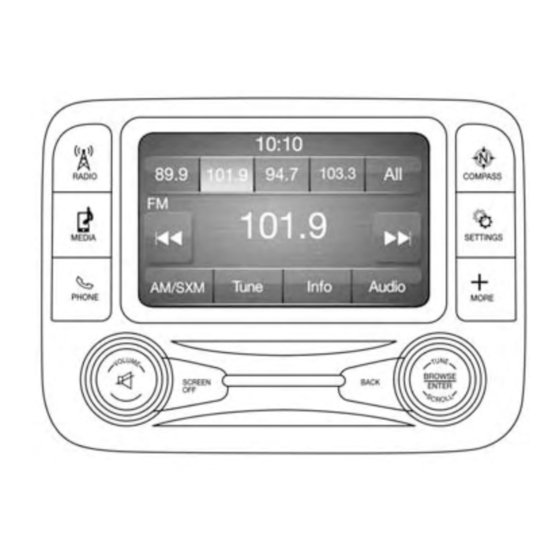
Page 13: Radio Mode 1
1 — Station Presets 5 — Info 2 — All Presets 6 — Tune Tune/Scroll Control 3 — SEEK Up 7 — AM/FM/SXM Turn the rotary TUNE/SCROLL control knob clockwise to 4 — Audio 8 — SEEK Down increase or counterclockwise to decrease the radio station frequency. -
Page 14: Seek Functions
RADIO MODE 13 Seek Functions Fast Seek Down Seek Up Press and hold the “Seek Down” button on the touch- screen to advance the radio through the available sta- Press and release the “Seek Up” button on the touch- tions or channel at a faster rate, the radio stops at the screen to tune the radio to the next listenable station or next available station or channel when the button on the channel. -
Page 15: Setting Presets
14 RADIO MODE including SiriusXM Latino, offering 20 channels of commer- If the screen displays Acquiring Signal, you may need to cial free music, news, talk, comedy, sports and more dedi- change the vehicle’s position to receive a signal. In most cated to Spanish language programming. -
Page 16: Clock Settings
RADIO MODE 15 3. The Audio Menu shows the following options for you to decrease the radio volume relative to a decrease in customize your audio settings: vehicle speed. Press the “Back Arrow” button on the • Auto Play touchscreen when done. - Page 18 MEDIA MODE CONTENTS OPERATING MEDIA MODE ....18 IPOD/USB MODE ......20 ▫...
-
Page 19: Media Mode 1
1 — SEEK Down 5 — Pause/Play • Playlists 2 — SEEK Up 6 — Source 3 — Additional Functions 7 — Browse • Folders 4 — Info You can press the “Source,” “Pause/Play” or the “Info” button on the touchscreen for artist information on the Media Mode is entered by pushing the MEDIA button current song playing. - Page 20 MEDIA MODE 19 Seek Up/Seek Down Track Selection (Browse) Seek Up /Seek Down Press the “Browse” button on the touchscreen to scroll through and select a desired track on the iPod, MP3 player, Press and release the “Right Arrow” button on the phone, or USB.
- Page 21 See the pairing procedure within this manual. the start of track 1. Once the Bluetooth device is paired to the Uconnect system, push the MEDIA button located on the faceplate. Once in Media Mode, press the “Source” button on the touchscreen and select “Bluetooth.”...
- Page 22 AUX Mode is entered by inserting a AUX device using a Your vehicle may have a remote Disc player located in the stereo cable with a 3.5 mm audio jack into the AUX port, or center console storage bin. by pushing the MEDIA button located on the faceplate.
- Page 23 22 MEDIA MODE Browse Press the “Browse” button on the touchscreen to scroll through and select a desired track on the Disc. Press the “Exit” button on the touchscreen if you wish to cancel the browse function. Eject Button — Ejecting a Disc Push the EJECT button to eject the Disc.
- Page 24 ▫ Setting A Mobile Phone Or A Bluetooth Audio UCONNECT PHONE FEATURES ... . .31 Device As Favorite..... . .28 ▫...
- Page 25 The Uconnect Phone is a voice-activated, hands-free, in-vehicle communications system with Voice Command Capability (see Voice Command section). The Uconnect Phone allows you to dial a phone number with your mobile phone using simple voice commands. NOTE: The Uconnect Phone requires a mobile phone equipped with the Bluetooth Hands-Free Profile.
- Page 26 Pairing A Phone • Compose phone numbers (using the graphic keypad on the display) To begin using your Uconnect Phone, you must pair your compatible Bluetooth enabled mobile phone. Mobile phone • Display and call the contacts on the mobile phone...
- Page 27 5. If No is selected, and you still would like to pair a Bluetooth audio device can be connected to the mobile phone, press the “Settings” button from the Uconnect system at a time. If “No” is selected, simply Uconnect Phone main screen. select “Uconnect” from the mobile phone/audio device •...
- Page 28 PHONE MODE 27 NOTE: The names in the phonebook which do not contain Disconnection phone numbers or where both fields (name and surname) To disconnect a specific mobile phone or Bluetooth audio are empty will not be displayed. device, proceed as follows: Connection •...
- Page 29 • A confirmation screen will appear on the display: If equipped and specifically supported by your phone, Uconnect Phone will ask you if you want to download • Press Yes to delete the device names (text names) and number entries from your mobile •...
- Page 30 • This downloaded phonebook cannot be edited or deleted 2. After the BEEP, say “dial” (or “call” a full name or on the Uconnect Phone. These can only be edited on the phone number). mobile phone. The changes are transferred and updated to Recent Calls Uconnect Phone on the next phone connection.
- Page 31 Answering Or Ignoring A Call With No Call Currently graphic keyboard of the display. In Progress Redial When an incoming call rings or is announced on Uconnect, push the PHONE button. To call the number/contact of last call made, press the Redial button.
- Page 32 PHONE MODE 31 Transferring/Call Continuation UCONNECT PHONE FEATURES Transferring Mute/Unmute The ongoing calls can be transferred from the mobile 1. During a call, push the VOICE COMMAND button on phone to the system and vice versa without ending the call.
- Page 34 OPERATING VOICE RECOGNITION...34 ▫ Introducing Uconnect.....34 ▫ Phone ....... .38 ▫...
- Page 35 How To Activate Voice Commands quick tips. It provides the key Voice Commands and tips 1. Visit UconnectPhone.com to check mobile device and you need to know to control your Uconnect 3 system. Key feature compatibility and to find phone pairing instruc- Features: tions.
- Page 36 VR or PHONE button and saying a Voice Command from current category. All you need to control your Uconnect system with your voice are the buttons on your steering wheel. 1 — Push To Initiate Or To Answer A Phone Call, Send Or Receive A Text 2 —...
- Page 37 Basic Voice Commands Radio The basic Voice Commands below can be given at any Use your voice to quickly get to the AM or FM radio point while using your Uconnect system. stations. Push the VR button . After the beep, say Push the VR button .
- Page 38 VOICE RECOGNITION QUICK TIPS 37 Media Uconnect offers connections via USB, SD, Bluetooth and Auxiliary ports (If Equipped). Voice operation is only available for connected USB and iPod devices. (Remote CD player optional and not available on all vehicles.) Push the VR button .
- Page 39 PHONE button . After the beep, say... “Reply” contact has multiple phone numbers, you can say “Call John Smith work.” 2. Listen to the Uconnect prompts. After the beep, repeat one of the pre-defined messages and follow the system prompts.
- Page 40 © 2017 FCA US LLC. All rights reserved. Mopar and UconnectPhone.com. Apple iPhone iOS6 or later supports Uconnect are registered trademarks and Mopar Owner reading incoming text messages only. Connect is a trademark of FCA US LLC. Android is a trademark of Google Inc.
- Page 42 18UC35-526-AA ©2017 FCA US LLC. All Rights Reserved. Chrysler, Dodge, Jeep, Ram, Mopar and Uconnect are trademarks of FCA US LLC. First Edition FIAT is a registered trademark of FCA Group Marketing S.p.A., Uconnect 3 with 5" Display used under license by FCA US LLC.
Need help?
Do you have a question about the 3 and is the answer not in the manual?
Questions and answers