Uconnect 5.0 Owner's Manual Supplement
Car navigation system
Hide thumbs
Also See for 5.0:
- Owner's manual supplement (140 pages) ,
- Owner's manual (99 pages) ,
- User manual (299 pages)
Table of Contents
Advertisement
Quick Links
Advertisement
Chapters
Table of Contents

Related Manuals for Uconnect 5.0


Summary of Contents for Uconnect 5.0
- Page 1 Uconnect 5.0 Owner’s Manual Supplement...
-
Page 2: Safety Guidelines
UCONNECT PHONE ............31 UCONNECT 5.0 VOICE RECOGNITION QUICK TIPS ....... . 39 UCONNECT SETTINGS . -
Page 4: Table Of Contents
▫ FCC Declaration ......5 SAFE USAGE OF THE UCONNECT SYSTEM ..4 ▫ Touchscreen ......4 ▫... -
Page 5: Safe Usage Of The Uconnect System
4 SAFETY GUIDELINES SAFE USAGE OF THE UCONNECT SYSTEM Touchscreen • Read all instructions in this manual carefully before • Do NOT attach any object to the touchscreen, doing using your system to ensure proper usage! so can result in damage to the touchscreen. -
Page 6: Fcc Declaration
SAFETY GUIDELINES 5 Disc Player NOTE: This equipment has been tested and found to comply with the limits for a Class B digital device, pursu- • Do not insert any damaged, warped, scratched or dirty ant to Part 15 of the FCC Rules. These limits are designed discs into the Disc Player. -
Page 7: Cybersecurity
6 SAFETY GUIDELINES Information About Radio Frequency Radiation CYBERSECURITY Your vehicle may be a connected vehicle and may be Exposure To Radio Frequency Radiation equipped with both wired and wireless networks. These The radiated output power of the this internal wireless networks allow your vehicle to send and receive infor- radio is far below the FCC radio frequency exposure mation. - Page 8 WARNING! (Continued) vehicle systems may still exist, even if the most recent • As always, if you experience unusual vehicle be- version of vehicle software (such as Uconnect software) is havior, take your vehicle to your nearest authorized installed. dealer immediately.
- Page 9 8 SAFETY GUIDELINES Privacy of any wireless and wired communications can- not be assured. Third parties may unlawfully intercept information and private communications without your consent. For further information, refer to “Onboard Di- agnostic System (OBD II) Cybersecurity” in “Maintaining Your Vehicle”...
- Page 10 IDENTIFYING YOUR RADIO CONTENTS ▫ Uconnect 5.0 System w/o Integrated Center IDENTIFYING YOUR RADIO ....10 Stack .......12 ▫...
-
Page 11: Identifying Your Radio 9
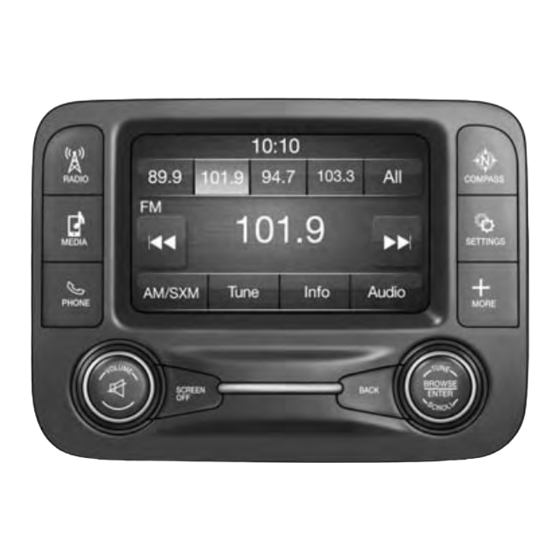
10 IDENTIFYING YOUR RADIO IDENTIFYING YOUR RADIO Uconnect 5.0 w/o Integrated Center Stack Uconnect 5.0 w/Integrated Center Stack Key Features: • 5” Touchscreen • Three buttons on either side of the display • Hands-free/Bluetooth • SiriusXM Satellite Radio (If Equipped) -
Page 12: Stack
IDENTIFYING YOUR RADIO 11 Uconnect 5.0 System With Integrated Center Stack 2 — COMPASS Push the COMPASS button on the faceplate to display the current direction of the vehicle. 3 — CLIMATE Push the CLIMATE button on the faceplate to access the Climate Controls. - Page 13 12 IDENTIFYING YOUR RADIO 6 — BACK Uconnect 5.0 System w/o Integrated Center Stack Push the BACK button to return to a previous menu or screen. 7 — SCREEN OFF Push the SCREEN OFF button to turn the touchscreen OFF.
- Page 14 Push the ENTER/BROWSE button to accept a high- lighted selection on the screen. Rotate the TUNE/ Push the PHONE button on the faceplate to access the SCROLL rotary knob to scroll through a list or tune a Uconnect Phone feature. radio station.
- Page 15 14 IDENTIFYING YOUR RADIO 10 — MEDIA Pushing the MEDIA button on the faceplate will allow you to switch to Media mode (USB/iPOD, AUX, SD Card, Bluetooth and CD — if equipped).
- Page 16 RADIO MODE CONTENTS ▫ SiriusXM Satellite Radio Mode — If Equipped . .18 RADIO MODE OPERATION....16 ▫ Volume/Mute ......16 ▫...
-
Page 17: Radio Mode Operation
16 RADIO MODE RADIO MODE OPERATION Push the RADIO button on the faceplate to enter Radio Mode. The different tuner modes; AM, FM, and SXM, can then be selected by pressing the corresponding button on the touchscreen in the Radio mode. Volume/Mute Rotate the VOLUME/MUTE rotary knob to adjust the Volume. -
Page 18: Seek Functions
RADIO MODE 17 Seek Functions Seek Down Seek Up Press and release the “Seek Down” button on the touchscreen to tune the radio to the next listenable Press and release the “Seek Up” button on the station or channel. touchscreen to tune the radio to the next listenable station or channel. -
Page 19: Setting Presets
18 RADIO MODE Setting Presets SiriusXM Satellite Radio Mode — If Equipped The Presets are available for all Radio Modes, and are SiriusXM Satellite Radio uses direct satellite-to-receiver activated by pressing any of the four “Preset” buttons on broadcasting technology to provide clear, coast to coast the touchscreen, located at the top of the screen. - Page 20 RADIO MODE 19 Including: available only to those at least 18 and older in the 48 contiguous USA and D.C. Our SiriusXM satellite service • A huge On Demand catalog. is also available in PR (with coverage limitations). Our • Xtra Channels featuring SiriusXM Latino — A collec- Internet radio service is available throughout our satellite tion of Spanish-language channels.
-
Page 21: Audio
20 RADIO MODE • Balance/Fade — Press the “Balance/Fade” button Audio on the touchscreen to adjust the sound from the 1. Push the SETTINGS button on the right side of speakers. Use the “arrow” button on the touch- the radio faceplate. If the settings button is not screen to adjust the sound level from the front present, push the MORE button on the faceplate... -
Page 22: Clock Setting
RADIO MODE 21 Clock Setting 1. Push the SETTINGS button on the right side of the radio faceplate. If the settings button is not present, push the MORE button on the faceplate then the “Settings button” button on the touch- screen. - Page 24 MEDIA MODE CONTENTS ▫ USB/iPod Mode ..... . .27 MEDIA MODE OPERATION....24 ▫...
-
Page 25: Media Mode Operation
24 MEDIA MODE MEDIA MODE OPERATION Media Mode is entered by pushing the MEDIA button located on the faceplate. Once in Media Mode, press the “Source” button on the touchscreen and the desired mode button on the touchscreen. Disc (if equipped), USB, SD Card (if equipped), AUX and Bluetooth (if equipped), are the Media sources available. -
Page 26: Common Media Functions
MEDIA MODE 25 You can press the “Source,” “Pause/Play” or the “Info” Fast Seek Down button on the touchscreen for artist information on the Press and hold the “Left Arrow” button on the current song playing. touchscreen and the desired mode will begin to re- Common Media Functions wind through the current track until the button on the touchscreen is released. -
Page 27: Disc Mode - If Equipped
26 MEDIA MODE Shuffle Disc Mode — If Equipped Press the “Shuffle” button on the touchscreen to play the Your vehicle may have a remote Disc player located in selections on the USB/iPod device in random order to the center console storage bin. provide an interesting change of pace. -
Page 28: Usb/Ipod Mode
MEDIA MODE 27 If you insert a Disc with the ignition ON and the radio USB/iPod Mode ON, the unit will switch to Disc mode and begin to play USB/iPod Mode is entered by either inserting a USB when you insert the Disc. The display will show the track Jump Drive or iPod cable into the USB port, or by number and index time in minutes and seconds. -
Page 29: Aux Mode
28 MEDIA MODE Browse Inserting Auxiliary Device Press the “Browse” button on the touchscreen to select Gently insert the Auxiliary device cable into the AUX Artist, Albums, Genres, Songs, Playlists or Folders from Port. If you insert a Auxiliary device with the ignition the USB/iPod device. -
Page 30: Bluetooth Mode
Uconnect system. See the “Pairing Procedure” in this manual for further details. Once the Bluetooth device is paired to the Uconnect system, push the MEDIA button located on the faceplate. Once in Media Mode, press the “Source” button on the touchscreen and select “Bluetooth.”... - Page 32 ▫ Receiving A Call — Accept (And End) ..36 UCONNECT PHONE OPERATION ...32 ▫ Pairing A Phone ..... . .33 ▫...
-
Page 33: Uconnect Phone Operation
You have full responsibility and assume all risks related to the use of the Uconnect features and applications in this vehicle. Only use Uconnect when it is safe to do so. Failure to do so may result in an accident involving serious injury or death. -
Page 34: Pairing A Phone
The Uconnect Phone is a voice-activated, hands-free, Pairing A Phone in-vehicle communications system with Voice Command To begin using your Uconnect Phone, you must pair your Capability (see Voice Command section). compatible Bluetooth enabled mobile phone. Mobile The Uconnect Phone allows you to dial a phone number phone pairing is the process of establishing a wireless with your mobile phone using simple voice commands. - Page 35 “Uconnect” and accept the connec- tion request. 3. Select “Yes” to begin the pairing process. 6. Uconnect Phone will display an in progress screen 4. Search for available devices on your Bluetooth enabled while the system is connecting.
-
Page 36: Phonebook Download - Phonebook Transfer From Mobile Phone
Uconnect Phone, for example, after you start the and/or one Bluetooth audio device can be connected vehicle. to the Uconnect system at a time. If “No” is selected, • You may be asked for permission to initiate the phone- simply select “Uconnect” from the mobile phone/ book download. -
Page 37: Making A Phone Call
• This downloaded phonebook cannot be edited or Mute (Or Unmute) Microphone During Call deleted on the Uconnect Phone. These can only be edited on the mobile phone. The changes are trans- 1. During a call, push the VOICE COMMAND button on ferred and updated to Uconnect Phone on the next the steering wheel. -
Page 38: Changing The Volume
2. Use the radio ON/VOLUME rotary knob to adjust the volume to a comfortable level while the Uconnect system is speaking. Please note the volume setting for Uconnect phone is different than the audio system... - Page 40 UCONNECT VOICE RECOGNITION ..40 ▫ Introducing Uconnect ....40 ▫ Phone ......45 ▫...
-
Page 41: Uconnect Voice Recognition
You have full responsibility and assume all risks related to the use of the Uconnect features and applications in this vehicle. Only use Uconnect when it is safe to do so. Failure to do so may result in an accident involving serious injury or death. -
Page 42: Get Started
UCONNECT 5.0 VOICE RECOGNITION QUICK TIPS 41 Get Started All you need to control your Uconnect system with your voice are the buttons on your steering wheel. 1. Visit UconnectPhone.com to check mobile device and feature compatibility and to find phone pairing in- structions. -
Page 43: Basic Voice Commands
42 UCONNECT 5.0 VOICE RECOGNITION QUICK TIPS Basic Voice Commands The basic Voice Commands below can be given at any point while using your Uconnect system. Push the VR button . After the beep, say • Cancel to stop a current voice session •... -
Page 44: Radio
UCONNECT 5.0 VOICE RECOGNITION QUICK TIPS 43 • Tune to Satellite Channel Hits 1 TIP: At any time, if you are not sure of what to say or want to learn a Voice Command, push the VR button and say “Help.” The system will provide you with a list of commands. -
Page 45: Media
44 UCONNECT 5.0 VOICE RECOGNITION QUICK TIPS Media TIP: Press the “Browse” button on the touchscreen to see all of the music on your iPod or USB device. Your Voice Uconnect offers connections via USB, SD, Bluetooth and Command must match exactly how the artist, album, Auxiliary ports (If Equipped). -
Page 46: Phone
UCONNECT 5.0 VOICE RECOGNITION QUICK TIPS 45 Phone TIP: When providing a Voice Command, push the PHONE button and say “Call,” then pronounce the Making and answering hands-free phone calls is easy name exactly as it appears in your phone book. When with Uconnect. -
Page 47: Voice Text Reply
Can’t talk right now. I’m lost. Thanks. 2. Listen to the Uconnect prompts. After the beep, repeat one of the pre-defined messages and follow the system TIP: Your mobile phone must have the full implementa- prompts. tion of the Message Access Profile (MAP) to take advan- tage of this feature. -
Page 48: Additional Information
UCONNECT 5.0 VOICE RECOGNITION QUICK TIPS 47 Additional Information © 2015 FCA US LLC. All rights reserved. Mopar and Uconnect are registered trademarks and Mopar Owner Connect is a trademark of FCA US LLC. Android is a trademark of Google Inc. SiriusXM and all related marks and logos are trademarks of SiriusXM Radio Inc. - Page 50 ▫ Doors & Locks ......63 CUSTOMER PROGRAMMABLE FEATURES — UCONNECT 5.0 PERSONAL SETTINGS ..51 ▫ Auto Comfort Systems — If Equipped ..66 ▫...
- Page 51 50 UCONNECT SETTINGS ▫ SiriusXM Setup — If Equipped ... .72 ▫ Restore Settings......74 ▫...
-
Page 52: Customer Programmable Features
Only use press the back arrow or Done button on the touchscreen Uconnect when it is safe to do so. Failure to do so or the Back button on the faceplate to return to the may result in an accident involving serious injury previous menu. -
Page 53: Display
52 UCONNECT SETTINGS • Units Display After pressing the “Display” button on the touchscreen When in this display, you may select to have the EVIC/ the following settings will be available. DID, odometer, and navigation system (if equipped) changed between US and Metric units of measure. Press •... -
Page 54: Units
UCONNECT SETTINGS 53 • Navigation Next Turn Pop-ups Displayed In Cluster • Distance — If Equipped Select from: “mi” or “km.” When this feature is selected, the turn-by-turn directions • Fuel Consumption will appear in the display as the vehicle approaches a Select from: “MPG”... -
Page 55: Voice
54 UCONNECT SETTINGS • Torque Clock & Date After pressing the “Clock & Date” button on the touch- Select from: “lb-ft” or “Nm.” screen the following settings will be available: Voice • Set Time After pressing the “Voice” button on the touchscreen the... -
Page 56: Safety/Assistance
UCONNECT SETTINGS 55 Safety/Assistance ignition is switched to the OFF position. To set the ParkView Backup Camera Delay push the SETTINGS After pressing the “Safety/Assistance” button on the button on the faceplate, then the “Safety & Driving Assis- touchscreen the following settings will be available: tance”... - Page 57 56 UCONNECT SETTINGS • Fixed ParkView Backup Camera Guidelines system will warn you of a possible collision with the vehicle in front of you when you are farther away. This Fixed ParkView Backup Camera Guidelines Your vehicle gives you the most reaction time. To change the setting for may be equipped with the ParkView Rear Back Up more dynamic driving, select the Near setting.
- Page 58 The Front ParkSense Chime Volume settings can be selected When this feature is selected, the ABA applies additional from the DID or Uconnect System. The chime volume brake pressure when the driver requests insufficient brake settings include LOW, MEDIUM, and HIGH. The factory pressure to avoid a potential frontal collision.
- Page 59 58 UCONNECT SETTINGS • Rear ParkSense Braking Assist — If Equipped • Tilt Side Mirrors In Reverse When this feature is selected, the park assist system will When this feature is selected, the exterior sideview detect objects located behind the vehicle and utilize mirrors will tilt downward when the ignition is in the autonomous braking to stop the vehicle.
- Page 60 UCONNECT SETTINGS 59 • Electric Power Steering — If Equipped • Blind Spot Alert The Steering Feel Options feature will allow you to adjust When this feature is selected, the Blind Spot Alert feature the steering effort and feel. Press the “Sport” button on...
-
Page 61: Brakes
60 UCONNECT SETTINGS NOTE: If your vehicle has experienced any damage in Brakes the area where the sensor is located, even if the fascia is After pressing the “Brakes” button on the touchscreen not damaged, the sensor may have become misaligned. -
Page 62: Lights
UCONNECT SETTINGS 61 • Headlight Off Delay door is open, the vehicle is at a standstill, and there is no attempt to depress the brake pedal or accelerator pedal, When this feature is selected, it allows the adjustment of the park brake will automatically engage to prevent the the amount of time the headlights remain on after the vehicle from rolling. - Page 63 62 UCONNECT SETTINGS • Greeting Lights • Auto Dim High Beams — If Equipped When this feature is selected, it automatically turns on When this feature is selected, the high beam headlights the headlights after unlocking the vehicle with key fob.
-
Page 64: Doors & Locks
UCONNECT SETTINGS 63 • Cornering Lights the passive entry feature. To make your selection, press the “Flash Lights With Sliding Door” button on the When this feature is selected, the headlights turn relative touchscreen, and select from “On” or “Off. - Page 65 64 UCONNECT SETTINGS • Flash Lights With Lock • Memory Linked to Fob — If Equipped When this feature is selected, the exterior lights will flash This feature provides automatic driver seat positioning to when the doors are locked or unlocked with the Remote enhance driver mobility when entering and exiting the Keyless Entry (RKE) transmitter.
- Page 66 UCONNECT SETTINGS 65 • Remote Door Unlock • Sliding Door Alert This feature will allow you to program your remote door When this feature is selected, a chime plays when the locks to open “All doors” or only the “Driver door” with sliding door reverses or an obstacle is sensed.
-
Page 67: Auto Comfort Systems - If Equipped
66 UCONNECT SETTINGS • Hands Free Sliding Door Engine Off Options After pressing the “Engine Off Options” button on the When this feature is selected, hands free technology auto- touchscreen the following settings will be available. matically opens or closes the power sliding door. To make your selection, press the “Hands Free Sliding Door”... -
Page 68: Suspension - If Equipped
When this feature is selected, the power window When this feature is selected, the radio will stay on for a switches, radio, Uconnect phone system (if equipped), preset time after the ignition key is turned to STOP/OFF. DVD video system (if equipped), power sunroof (if To change the Radio Off Delay status, press the “0 MIN”... - Page 69 68 UCONNECT SETTINGS • Flash Lights With Lower • Automatic Aero Mode (1500 Model Only) When this feature is selected, the front and rear turn When this feature is selected the Ride Height will auto- signals will flash when the RKE transmitter REMOTE matically be adjusted depending on the vehicle speed.
-
Page 70: Trailer Brake
UCONNECT SETTINGS 69 • Wheel Alignment Mode • Trailer Brake Type This feature prevents auto leveling of the air suspension When this feature is selected, the Trailer Brake Type can while performing a wheel alignment service. Before be changed between “Light Electric,” “Heavy Electric,”... -
Page 71: Audio
70 UCONNECT SETTINGS • Perform Compass Calibration NOTE: Keep magnetic materials away from the top of the instrument panel, such as iPod’s, Mobile Phones, Lap- Press the “Calibration” button on the touchscreen to change tops and Radar Detectors. This is where the compass this setting. - Page 72 UCONNECT SETTINGS 71 • Balance/Fade • Loudness — If Equipped This feature allows you to adjust the Balance and Fade This feature improves sound quality at lower volumes. settings. Press and drag the speaker icon or use the To make your selection, press the “Loudness” button on arrows to adjust, tap the “C”...
-
Page 73: Phone/Bluetooth
Phone/Bluetooth system. For further information, refer with only a few seconds left to play. To make your to your Uconnect Supplement Manual. selection, press the “Tune Start” button on the touch- screen, select “On” or “Off.”... -
Page 74: Radio Setup
UCONNECT SETTINGS 73 undesirable channels while scanning. To make your selec- Radio Setup tion, press the “Channel Skip” button on the touchscreen, After pressing the “Radio Setup” button on the touch- select the channels you would like to skip followed by screen the following settings will be available. -
Page 75: Restore Settings
74 UCONNECT SETTINGS • Regional Clear Personal Data After pressing the “Clear Personal Data Settings” button When this feature is selected it forces regional service- on the touchscreen the following settings will be avail- following enabling automatic switching to network sta- able: tions. - Page 76 MORE BUTTON CONTENTS MORE MAIN MENU .....76...
- Page 77 76 MORE BUTTON • Headrest Fold MORE MAIN MENU Push the MORE button located on the faceplate to Press the “Headrest Fold” button to fold the headrests. display the MORE Main Menu. The MORE Main • Mirror Dimming Menu may contain the following options: Press the “Mirror Dimmer”...
- Page 78 Printed in the USA ©2015 FCA US LLC. All Rights Reserved. Chrysler, Dodge, Jeep, Ram, Mopar and Uconnect are trademarks of FCA US LLC. FIAT is a registered trademark of FCA Group Marketing S.p.A., used under license by FCA US LLC.
Need help?
Do you have a question about the 5.0 and is the answer not in the manual?
Questions and answers