Table of Contents
Advertisement
Quick Links
Download this manual
See also:
Service Manual
1150i-English_Manuals 6/10/16 9:56 AM Page 1
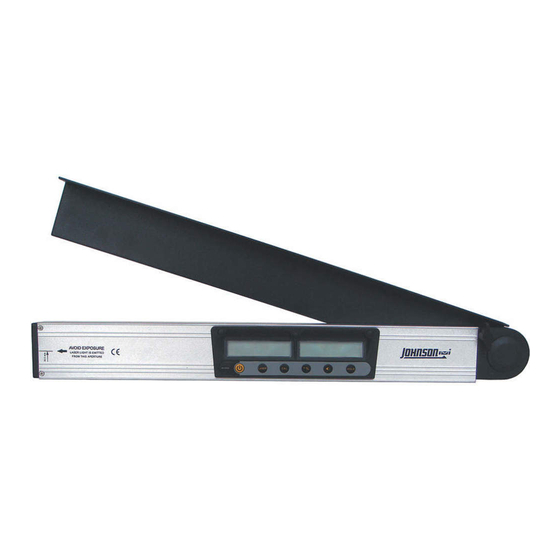
Magnetic Digital Level & Angle Locator
with Dot Laser
Model No. 40-6065
Instruction Manual
Congratulations on your choice of this Magnetic Digital Level & Angle
Locator with Dot Laser. We suggest you read this instruction manual
thoroughly before using the instrument. Save this instruction manual
for future use.
This is a Class IIIa laser tool and is manufactured to comply
with CFR 21, parts 1040.10 and 1040.11 as well as international
safety rule IEC 285.
The laser also complies with EMC Test according to
EN61000-6-3; 2001+A11:2004, EN 6100-6-1:2011, EN 6100-4-2, EN
61000-4-3, EN 60825, FCC Test according to PART 15.
©2016 Johnson Level & Tool - Rev. 3
1
Advertisement
Table of Contents

Related Manuals for Johnson 40-6065


Summary of Contents for Johnson 40-6065
- Page 1 CFR 21, parts 1040.10 and 1040.11 as well as international safety rule IEC 285. The laser also complies with EMC Test according to EN61000-6-3; 2001+A11:2004, EN 6100-6-1:2011, EN 6100-4-2, EN 61000-4-3, EN 60825, FCC Test according to PART 15. ©2016 Johnson Level & Tool - Rev. 3...
-
Page 2: Table Of Contents
• Automatic digit inversion for overhead measurements • Working range of angle measurement 0 to 182.5º • Automatic shut-off • Hold-function to hold measurement • Visible laser beam to extend working range ©2016 Johnson Level & Tool - Rev. 3... -
Page 3: Safety Instructions
Use of non-Johnson ® parts and accessories will void warranty. DANGER Class IIIa Laser Product Max. Power Output: Wavelength: 640-660nm THIS TOOL EMITS LASER RADIATION. DO NOT STARE INTO BEAM. AVOID DIRECT EYE EXPOSURE. ©2016 Johnson Level & Tool - Rev. 3... -
Page 4: Location/Content
1150i-English_Manuals 6/10/16 9:56 AM Page 4 4. Location/Content of Warning Labels ©2016 Johnson Level & Tool - Rev. 3... -
Page 5: Location Of Parts/Components
1150i-English_Manuals 6/10/16 9:56 AM Page 5 5. Location of Part/Components Battery Compartment Angle Level Arm LCD Displays Laser Point Locking Panel Screw ©2016 Johnson Level & Tool - Rev. 3... -
Page 6: Operating Instructions
2. Remove the 3 screws on the button battery cover and open battery compartment. 3. Replace the old battery with a new battery. 4. Put the battery cover back on. 5. Check angle calibration. ©2016 Johnson Level & Tool - Rev. 3... -
Page 7: Using The Product
Press and hold this key (more than one second) and the unit will enter angle calibra- tion mode. See “Self-Check and Calibration” section. ©2016 Johnson Level & Tool - Rev. 3... - Page 8 The measured angle reading will be held. The display will flash and the angle measurement will not change. Press and release the key again (unit will beep once) will stop the “hold” mode and measured value will change with the incline. ©2016 Johnson Level & Tool - Rev. 3...
- Page 9 Incline Incline Indication Indication The following figure shows that the level is level or plumb. ©2016 Johnson Level & Tool - Rev. 3...
- Page 10 You can lock the arm at any angle within the range of 0º to 180º. The laser point will be parallel with the reference plane Reference plane Display window Measuring the inclining angle to the level plane. ©2016 Johnson Level & Tool - Rev. 3...
-
Page 11: Self-Check & Fine Calibration
Note the reading after ten seconds. Then rotate the angle level 180° on the same plane. After another ten seconds note the second angle reading. Calibration is necessary if the difference between the two measuring readings is over 0.2°. ©2016 Johnson Level & Tool - Rev. 3... - Page 12 4. Then do the same thing for the vertical with both the logo on the top and with the logo on the bottom. ©2016 Johnson Level & Tool - Rev. 3...
- Page 13 1. Place level on a horizontal surface and apply power to product. 2. With angle arm fully closed, press and hold Laser/Cal button until it shows a -1-. 3. Fully open angle arm. ©2016 Johnson Level & Tool - Rev. 3...
- Page 14 4. Press the Laser/Cal button again to display -2-. After about 2 seconds, display should revert back to measuring mode, displaying “180.0°” 5. The angle calibration is completed. Verify calibration by closing angle arm. Note that right display reads “0.0°” ©2016 Johnson Level & Tool - Rev. 3...
-
Page 15: Technical Specifications
Battery Life Approx. battery life 70 hours continuous use Dimensions 23.6" x 2.48" x 1.57" (600 x 63 x 40mm) Weight 2.64 lbs (1.2kg) Working Temperature 14°F to 113°F (-10°C to +45°C) ©2016 Johnson Level & Tool - Rev. 3... -
Page 16: Care And Handling
Keep the laser unit dry and clean, especially the laser output • window. Remove any moisture or dirt with a soft, dry cloth. Do not use harsh chemicals, strong detergents or cleaning solvents • to clean the laser unit. ©2016 Johnson Level & Tool - Rev. 3... -
Page 17: Product Warranty
1150i-English_Manuals 6/10/16 9:56 AM Page 17 11. Product Warranty Johnson Level & Tool offers a three year limited warranty on each of its products. You can obtain a copy of the limited warranty for a Johnson Level & Tool product by contacting Johnson Level & Tool's Customer Service Department, as provided below, or by visiting our web site at www.johnsonlevel.com. -
Page 18: Warranty Registration
PLEASE NOTE THAT IN ADDITION TO ANY OTHER LIMITATIONS OR CONDITIONS OF JOHNSON LEVEL & TOOL'S LIMITED WARRANTY, JOHNSON LEVEL & TOOL MUST HAVE RECEIVED YOUR PROPERLY COMPLETED WARRANTY CARD AND... -
Page 19: Troubleshooting
• If the laser turns off after a short time, clean the battery terminals and install new, name brand, alkaline batteries. • If the unit will not calibrate, contact an authorized Johnson service center or Johnson Level & Tool’s Customer Service Department. - Page 20 1150i-English_Manuals 6/10/16 9:56 AM Page 20 ©2016 Johnson Level & Tool - Rev. 3...
Need help?
Do you have a question about the 40-6065 and is the answer not in the manual?
Questions and answers