Table of Contents
Advertisement
Quick Links
2891i-1English_Manuals 6/4/18 10:23 AM Page 1
Self-Leveling Cross and Line Laser
Model Nos. 40-6647, 40-6648, 40-6649
Instruction Manual
Congratulations on your choice of this Self-Leveling Cross and Line
Laser. We suggest you read this instruction manual thoroughly before
using the instrument and save this instruction manual for future use.
This is a Class II laser tool and is manufactured to comply with CRF 21,
parts 1040.10 and 1040.11 as well as international safety rule IEC 285.
©2018 Johnson Level & Tool - Rev. 1
1
Advertisement
Table of Contents

Related Manuals for Johnson 40-6647


Summary of Contents for Johnson 40-6647
- Page 1 This is a Class II laser tool and is manufactured to comply with CRF 21, parts 1040.10 and 1040.11 as well as international safety rule IEC 285. ©2018 Johnson Level & Tool - Rev. 1...
-
Page 2: Table Of Contents
Self-Leveling Cross and Line Laser “AA” Alkaline Batteries Description for Model 40-6647 & 40-6649 Qty. Self-Leveling Cross and Line Laser Magnetic Bracket Tinted Glasses Magnetic Target “AA” Alkaline Batteries Hard-Shell Carrying Case ©2018 Johnson Level & Tool - Rev. 1... -
Page 3: Features And Functions
• Status light alerts you to when the tool is beyond its leveling range. • Locking mechanism protects the pendulum during transportation. • 1/4″-20 tripod thread for use with most common tripods. ©2018 Johnson Level & Tool - Rev. 1... -
Page 4: Safety Instructions
Wavelength 520nm THIS TOOL EMITS LASER RADIATION. Class II laser product This device complies with 21 CFR chapter 1, DO NOT STARE INTO BEAM. Subchapter J, CFR1040.10 and 1040.11 AVOID DIRECT EYE EXPOSURE. ©2018 Johnson Level & Tool - Rev. 1... - Page 5 • Use only original Johnson ® parts and accessories purchased from your Johnson ® authorized dealer. Use of non-Johnson ® parts and accessories will void warranty. ©2018 Johnson Level & Tool - Rev. 1...
-
Page 6: Location/Content
INTO THE BEAM OR VIEW DIRECTLY 40-6647 WITH OPTICAL INSTRUMENTS Maximum Power < 1mW Wavelength 520nm Class II laser product This device complies with 21 CFR chapter 1, Subchapter J, CFR1040.10 and 1040.11 ©2018 Johnson Level & Tool - Rev. 1... -
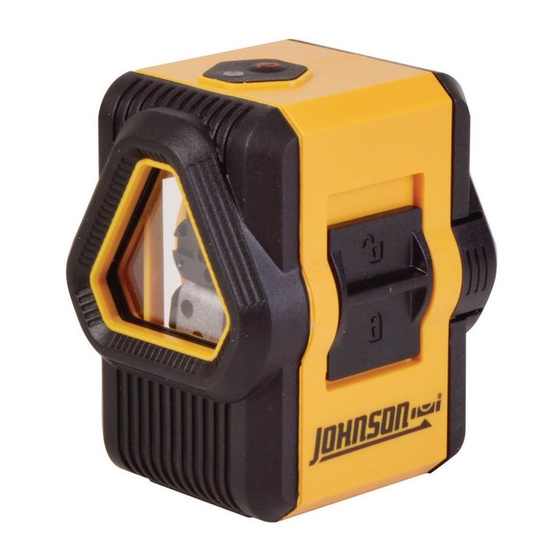
Page 7: Location Of Parts/Components
Status Light Locking Compensator/ Power Switch Battery Cover Release Tab Crossline Laser Output Window Battery Cover Plumb Line Laser Output Window Battery Cover Release Tab 1/4″- 20 Tripod Thread (underneath, not shown) ©2018 Johnson Level & Tool - Rev. 1... -
Page 8: Operating Instructions
• Use only alkaline batteries. • Remove the batteries when storing the instrument for an extended time (more than 3 months) to avoid damage to the tool should the batteries deteriorate. ©2018 Johnson Level & Tool - Rev. 1... - Page 9 This mode produces the best results when the tool is mounted on a tripod. 1. With the locking compensator down in the locked position, tap the tilt mode button to power on the unit. The status light will ©2018 Johnson Level & Tool - Rev. 1...
- Page 10 Note Laser glasses enhance beam visibility but should never be used to stare into the beam or be used as safety glasses. Eye damage may result if these directions are not followed. ©2018 Johnson Level & Tool - Rev. 1...
- Page 11 • Keep the laser unit dry and clean, especially the laser output window. Remove any moisture or dirt with a soft, dry cloth. • Do not use harsh chemicals, strong detergents or cleaning solvents to clean the unit. ©2018 Johnson Level & Tool - Rev. 1...
-
Page 12: Checking Accuracy
8. Mark on the doorway Point E. 9. Measure the distance between Point D and Point E. If this distance does not exceed 1/8″ for a 10′ high doorway, then the tool is properly calibrated. ©2018 Johnson Level & Tool - Rev. 1... - Page 13 15 ft (5m) 8 ft (2.5m) 7. Measure the distance ‘e’ from Point M to the laser line, as per the figure. If ‘e’ < 3/16″, then the tool is properly calibrated. ©2018 Johnson Level & Tool - Rev. 1...
- Page 14 A. Make a mark and label as A1. 4. Rotate the instrument 180° and make the cross dot project on the staff/wall B. Make a mark and label as B1. ©2018 Johnson Level & Tool - Rev. 1...
- Page 15 B. Make a mark and label as B2. 7. Calculate the vertical distance (A1-A2) – (B1-B2) = e 8. If e < 3/16″ at 15′, the instrument is properly calibrated. ©2018 Johnson Level & Tool - Rev. 1...
-
Page 16: Application Examples
• Installing tile or other flooring on walls and floors • Installing partitions, windows or doorways • Fixing cabinetry • As a measuring reference for checking spacing or the angle of objects ©2018 Johnson Level & Tool - Rev. 1... -
Page 17: Troubleshooting Guide
Compensator is locked Unlock compensator to allow the pendulum to self-level; operating with the compensator locked is for tilt/manual level mode at unique angles ©2018 Johnson Level & Tool - Rev. 1... -
Page 18: Technical Specifications
Dimensions 3″ x 3.5″ x 2.5″ Weight 0.725 lbs. Tripod Thread 1/4″ – 20 IP Rating IP 50 * Battery life reported with all beams enabled, as tested with lithium AA/Alkaline AA. ©2018 Johnson Level & Tool - Rev. 1... -
Page 19: Product Warranty
2891i-1English_Manuals 6/4/18 10:24 AM Page 19 11. Product Warranty Johnson Level & Tool offers a two year limited warranty on each of its products. You can obtain a copy of the limited warranty for a Johnson Level & Tool product by contacting Johnson Level & Tool's Customer Service Department, as provided below, or by visiting our web site at www.johnsonlevel.com. -
Page 20: Warranty Registration
We will never sell your information and only send you marketing information if you opt-in. To register, go to www.johnsonlevel.com/register. ©2018 Johnson Level & Tool - Rev. 1...
Need help?
Do you have a question about the 40-6647 and is the answer not in the manual?
Questions and answers