BD FACSCanto II Instructions For Use Manual
Hide thumbs
Also See for FACSCanto II:
- Quick reference manual (7 pages) ,
- User manual (184 pages) ,
- Reference manual (158 pages)
Table of Contents
Advertisement
Quick Links
For In Vitro Diagnostic Use
bdbiosciences.com
Part No. 642239 Rev. A
June 2007
BD Biosciences
2350 Qume Drive
San Jose, CA 95131-1807
USA
Tel (877) 232-8995
Fax (800) 325-9637
facservice@bd.com
Asia Pacific
Tel (65) 6-861-0633
Fax (65) 6-860-1590
BD FACSCanto II
Instructions For Use
BENEX Limited
Bay K 1 a/d
Shannon Industrial Estate
Shannon, County Clare
Ireland
Tel (353) 61-472920
Fax (353) 61-472546
Brazil
Tel (55) 11-5185-9995
Fax (55) 11-5185-9895
Canada
Toll Free (888) 259-0187
Tel (905) 542-8028
Fax (888) 229-9918
canada@bd.com
Europe
Tel (32) 2 400 98 95
Fax (32) 2 401 70 94
help.biosciences@europe.bd.com
Japan
Nippon Becton Dickinson
Company, Ltd.
Toll Free 0120-8555-90
Tel 81-24-593-5405
Fax 81-24-593-5761
Mexico
Toll Free 01-800-236-2543
Tel (52) 55 5999 8296
Fax (52) 55-5999-8288
Advertisement
Table of Contents
Troubleshooting

Related Manuals for BD FACSCanto II


Summary of Contents for BD FACSCanto II
- Page 1 BD FACSCanto II Instructions For Use For In Vitro Diagnostic Use bdbiosciences.com Part No. 642239 Rev. A June 2007 BD Biosciences BENEX Limited Canada Japan Bay K 1 a/d Nippon Becton Dickinson 2350 Qume Drive Toll Free (888) 259-0187 Company, Ltd.
- Page 2 BD Biosciences. The information in this manual is subject to change without notice. BD Biosciences reserves the right to change its products and services at any time to incorporate the latest technological developments. Although this manual has been prepared with every precaution to ensure accuracy, BD Biosciences assumes no liability for any errors or omissions, nor for any damages resulting from the application or use of this information.
- Page 3 BD Biosciences, it is the buyer/user’s responsibility to install and maintain up-to-date virus protection software. BD Biosciences does not make any warranty with respect to the workstation remaining virus free after installation. BD Biosciences is not liable for any claims related to or resulting from buyer/user's failure to install and maintain virus protection.
-
Page 5: Table Of Contents
BD FACSCanto Clinical Software Workspace ..... . . BD FACSCanto Toolbars ........ - Page 6 Reviewing Levey-Jennings Reports ......Optimizing with BD FACSDiva Software ......
- Page 7 BD FACSDiva Software ........
- Page 8 BD FACSDiva Software Acquisition ......BD FACSDiva Software Analysis ......
- Page 9 Capacity ..........BD FACS Loader Specifications ........
- Page 10 BD FACSCanto II Instructions for Use...
-
Page 11: About These Instructions
BD Biosciences recommends that first-time users of this cytometer take advantage of operator training offered with the sale of every new cytometer. The BD FACSCanto II Instructions for Use assumes you have a working knowledge of basic Microsoft® Windows® operation. -
Page 12: Conventions
File > Print” means to choose Print from the File menu. Ctrl-X When used with key names, a dash means to press two keys simultaneously. For example, Ctrl-P means to hold down the Control key while pressing the letter p. BD FACSCanto II Instructions for Use... -
Page 13: Chapter 1: Introduction
Introduction The BD FACSCanto II system is intended for use as an In Vitro Diagnostic device for identification and enumeration of lymphocyte subsets in human cells in suspension for flow cytometry. -
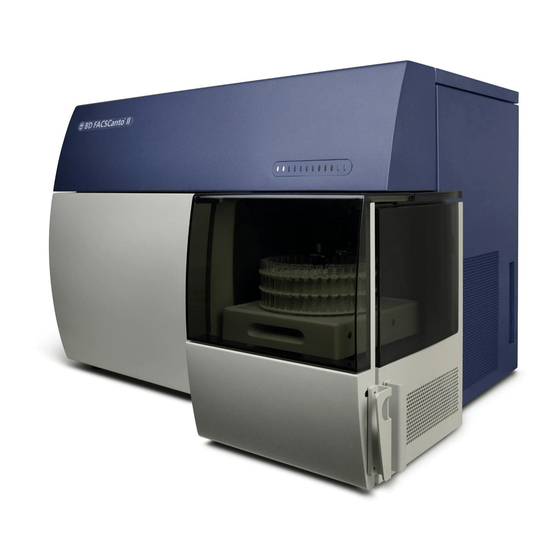
Page 14: System Components And Theory Of Operation
System Components and Theory of Operation The BD FACSCanto II system consists of a flow cytometer, a self-contained fluidics cart, and the BD FACSCanto II workstation. System options include an automated sample loader and a barcode reader. BD FACSCanto II Instructions for Use... -
Page 15: Flow Cytometer Components
Flow Cytometer Components Figure 1-1 BD FACSCanto II flow cytometer flow cell access door side door data ports optics access door acquisition indicator lights sample injection tube power button fluidics cart connections Do not place heavy objects on top of the cytometer at any time; doing so could cause alteration of data. - Page 16 The flushed sheath solution is aspirated by the aspirator arm. SIT cleaning between tubes is automatic when you use BD FACSCanto clinical software. In BD FACSDiva software, SIT cleaning between tubes is automatic unless you disable it by deselecting the SIT Flush checkbox on the Acquisition Dashboard.
- Page 17 Optics Components and Theory of Operation Once the sample moves into the flow cell, particles move in single file through the laser beams. The scattered and emitted light from these particles provides information about their size, shape, granularity, and fluorescence properties. obscuration where lasers intercept...
- Page 18 633-nm (red) laser. The 4-2 configuration octagon and trigon arrays have the filter and mirror combinations shown in Figure 1-2, and Table 1-1 on page 19. Figure 1-2 Trigon and octagon detector arrays (4-2 configuration) trigon blue-laser signal longpass mirror bandpass filter red-laser signal octagon BD FACSCanto II Instructions for Use...
- Page 19 Table 1-1 optical filters (4-2 configuration) Trigon and octagon Detector Array BP Filter or LP Mirror Intended Dye (Laser) Position LP Mirror Octagon 780/60 PE-Cy™7 (488-nm blue laser) PerCP-Cy™5.5 or PerCP blank — optical holder 585/42 530/30 FITC blank 488/10 optical holder and pinhole blank...
- Page 20 Electronics Components Power to the cytometer, lasers, and fluidics cart is supplied by a power cord from the cytometer plugged directly into a standard electrical outlet. BD recommends using an uninterrupted power supply (UPS) unit to maintain cytometer power during a power outage. The system power button turns on the cytometer and fluidics cart, and powers the lasers.
- Page 21 Figure 1-4 Detector order of acquisition indicator lights The acquisition indicator lights can be switched off. The on/off switch is located inside the flow cell access cover. Figure 1-5 Acquisition indicator light switch acquisition indicator flow cell access cover light switch Chapter 1: Introduction...
-
Page 22: Fluidics Cart
(although the cart can be hooked up to an in-house air source). Figure 1-6 Fluidics cart BD FACSFlow cubitainer 10-L waste container door access knob condensation trap BD FACSCanto II Instructions for Use... - Page 23 Containers and Ports BD FACS shutdown solution BD FACSClean solution port port and cubitainer and cubitainer waste port BD FACSFlow port waste BD FACSFlow cubitainer container fluidics filters Chapter 1: Introduction...
- Page 24 Under ordinary circumstances, you do not need to adjust any of the switches on the cart’s power panel. Leave the auxiliary air supply switch off unless the cart has been attached to an in-house air supply by BD Biosciences service personnel. Leave the cart circuit breaker on at all times.
-
Page 25: Bd Facs Loader (Optional)
BD FACS Loader (Optional) The BD FACS™ Loader automatically introduces prepared samples to the cytometer. Two sliding doors protect you from moving parts during operation. The Loader is controlled by BD FACSCanto clinical software or BD FACSDiva software. Chapter 1: Introduction... - Page 26 Not all manufactured 12 x 75-mm tubes have been checked for proper functionality on the Loader. BD Biosciences has validated only disposable, 12 x 75-mm BD Falcon polystyrene test tubes, BD Trucount tubes, and BD FACS 7-color setup bead tubes.
-
Page 27: Barcode Reader (Optional)
BD FACSCanto II computer workstation. The barcode reader reads most barcode standards, including Codabar, Code 128, Code 39 with checksum, and PDF417. It reads information from the BD FACS™ 7-color setup beads label into BD FACSCanto clinical software, and also reads coded patient information into a worklist. -
Page 28: System Requirements
Both included software packages must be installed: • BD FACSCanto clinical software v2.1 Do not read FCS files created with v2.1 into previous versions of BD FACSCanto clinical software. Previous versions will show incorrect results. • BD FACSDiva software v6.0 NOTICE BD FACSDiva software v6.0 must be installed for BD FACSCanto... - Page 29 Fluids Required for External Cleaning • BD FACSClean solution • Deionized (DI) water Setup Beads BD FACS 7-color setup beads for use with BD FACSCanto clinical software Chapter 1: Introduction...
- Page 30 BD FACSCanto II Instructions for Use...
-
Page 31: Chapter 2: Software Windows And Toolbars
Software Windows and Toolbars • BD FACSCanto Clinical Software Workspace on page 32 • BD FACSCanto Toolbars on page 33 • BD FACSDiva Software Workspace on page 34... -
Page 32: Bd Facscanto Clinical Software Workspace
Table 2-2 Main window components Component Function a. menu bar Contains the File, View, Worklist, Cytometer, Tools, and Help menus b. toolbars Contains buttons that provide quick access to menu commands; see BD FACSCanto Toolbars on page 33. BD FACSCanto II Instructions for Use... -
Page 33: Bd Facscanto Toolbars
• Detectors tab • Thresholds tab • Spectral Overlap tab i. docking area Provides a default home for the Carousel, Status, and cytometer control windows BD FACSCanto Toolbars Worklist toolbar Standard toolbar optimize skip end new anal. logout new acq. -
Page 34: Bd Facsdiva Software Workspace
( in the figure). Figure 2-10 BD FACSDiva workspace Click a button in the Workspace toolbar to hide or show the corresponding window. Most windows can be resized by dragging a border or corner. BD FACSCanto II Instructions for Use... - Page 35 The Browser lists folders, experiments, and experimental elements in a hierarchical view, provides an interface for setting up experiments, and contains a current tube pointer (c) indicating the tube for which acquisition or analysis data will be shown. Only one experiment can be open at a time.
- Page 36 Use the Inspector to view or modify the attributes of one or more objects in the worksheet or Browser. The contents of the Inspector change depending on what is selected. For example, this Inspector shows plot options. BD FACSCanto II Instructions for Use...
- Page 37 The Worksheet window is where you create global or normal worksheets containing plots, gates, statistics, and custom text. Plots on a global worksheet show data for the tube selected with the current tube pointer. Global worksheets are indicated by green tabs (a). Plots on a normal worksheet are tube specific.
- Page 38 BD FACSCanto II Instructions for Use...
-
Page 39: Chapter 3: Barcode Reader Option
Barcode Reader Option This chapter contains the following information: • Installing and Using the Barcode Reader on page 40 • Cleaning the Barcode Reader on page 42 • Barcode Symbologies on page 43... -
Page 40: Installing And Using The Barcode Reader
BD FACSCanto II system is capable of reading both 1D and 2D barcode symbologies. See Barcode Symbologies on page 43. The BD FACSCanto II system supports only two uses of the 2D barcode reader: • reading information from the BD FACS 7-color setup beads label into BD FACSCanto clinical software (2D barcode symbology) •... - Page 41 Patient information is scanned from sample labels into the worklist ID field. Locate the barcode on the setup values label of BD FACS 7-color setup beads kit, or on the patient sample. For accurate results, do not photocopy or enlarge the barcodes that are included with the reagent.
-
Page 42: Cleaning The Barcode Reader
• isopropyl alcohol • ethyl alcohol (denatured grade) Do not use BD FACSClean solution or bleach to clean or disinfect the barcode reader. BD FACSCanto II Instructions for Use... -
Page 43: 1D Barcode Symbologies
By default, the barcode reader has checksums enabled. We recommend you do not disable checksums, or use barcode symbologies without checksums. 1D Barcode Symbologies BD Biosciences has evaluated the following 1D barcode symbologies for use with the BD FACSCanto II flow cytometer, and has these recommendations: Barcode Symbology... -
Page 44: 2D Barcode Symbologies
2D Barcode Symbologies BD Biosciences has evaluated 2D barcode symbology to read the target values of BD FACS 7-color setup beads when using BD FACSCanto clinical software. 2D barcode symbology is required to read all target values with one scan. -
Page 45: Chapter 4: Starting Up
Starting Up This chapter describes cytometer startup for both BD FACSCanto clinical software and BD FACSDiva software. Turn on the power to the cytometer. Figure 4-1 Flow cytometer power panel system power button The system power button turns on power to the cytometer, fluidics cart,... - Page 46 Start up the computer, launch the software, and log in. Make sure the software is connected to the cytometer. BD FACSCanto BD FACSDiva If needed, choose Cytometer > Connect. BD FACSCanto II Instructions for Use...
- Page 47 (empty) FACSFlow shutdown solution BD FACSDiva BD FACSCanto If fluidics startup does not start automatically, choose Cytometer > Fluidics Startup. To prevent fluid overflow, make sure there is no tube on the SIT at startup. Click OK at the confirmation dialog.
- Page 48 An error message might appear when you open the flow cell access door. To dismiss the message, close the door and wait 30 seconds. Check that laser warmup has finished. BD FACSCanto BD FACSDiva BD FACSCanto II Instructions for Use...
-
Page 49: Chapter 5: Cytometer Qc And Setup
Cytometer QC and Setup This chapter describes how to perform cytometer QC and setup. • Performing Automated Setup on page 50 • Optimizing with BD FACSCanto Clinical Software on page 64 • Optimizing with BD FACSDiva Software on page 76... -
Page 50: Performing Automated Setup
Run setup once every 24 hours, using BD FACS 7-color setup beads. The software tracks the time between setups and displays it in the Status window. A setup age of more than 24 hours appears in red. -
Page 51: Running Setup Using Manual Loading
Running Setup Using Manual Loading Prepare BD FACS 7-color setup beads (refer to the instructions supplied with the beads). Do not use expired beads. Doing so can cause incorrect setup results. Prepare the cytometer for manual loading. tube guide pushed back... - Page 52 Check lot ID, targets, and spectral overlap factors in the Cytometer Setup Wizard against the BD FACS 7-color setup beads label. If necessary, enter new values into the Wizard. See Figure 5-2 on page 53 for an example BD FACS 7-color setup beads label. BD FACSCanto II Instructions for Use...
- Page 53 Figure 5-2 Setup beads label (example) • To enter values with the barcode reader, go to the next section. • To enter values with the keyboard and mouse, go to page 55. If you do not need to enter new values, go to Loading Tubes on page 56. Entering Lot Information with the Barcode Reader Although data entry using barcodes is generally more reliable than manual data entry, it is not guaranteed to be 100% accurate.
- Page 54 Locate the barcode on the BD FACS 7-color setup beads label. See Figure 5-2 for an example label. Hold the barcode reader 23 cm (9 in.) from the BD FACS 7-color setup beads label and aim the barcode reader at the center of the barcode.
- Page 55 Check software entries for accuracy of reading the setup beads label. Go to Loading Tubes on page 56. Entering New Lot Information with the Keyboard Click in the Setup Lot Information window of the Wizard (Figure 5-1 on page 52). Choose the bead product, enter the lot ID and the expiration date, and click OK.
- Page 56 If the Save Setup Bead Lot Info dialog appears, click This dialog appears only if you changed lot ID values. Select Run setup in Manual mode, and click See Figure 5-4 on page 57. BD FACSCanto II Instructions for Use...
- Page 57 Figure 5-4 Insert Setup Tube dialog Always wear gloves when manually loading samples. A fluid flush of the exterior of the sample injection tube (SIT) occurs between samples that might contain biohazardous waste. When prompted, load the beads tube onto the SIT, using these steps: •...
- Page 58 The software adjusts cytometer settings to place the beads on scale. Note that it is normal for the beads to move to the baseline and back on scale during this process. BD FACSCanto II Instructions for Use...
- Page 59 If setup is unsuccessful or if setup results are out of range, do not click Finish. Note the message provided by the software (eg, Figure 5-5 on page 60) and consult BD FACSCanto Clinical Software Troubleshooting on page 199. •...
- Page 60 Run setup again Optimize setup values Proceed to Optimizing with using BD FACSCanto BD FACSCanto Clinical When prompted, clinical software Software on page 64. click save your results and continue. BD FACSCanto II Instructions for Use...
-
Page 61: Running Setup Using The Loader
76. BD FACSDiva software Running Setup Using the Loader Prepare BD FACS 7-color setup beads (refer to the instructions supplied with the beads). NOTICE Do not use setup beads after their expiration date. Doing so can cause incorrect setup results. - Page 62 For instructions, see step 3 on page 137. Install the carousel onto the Loader. For instructions, see step 4 on page 137 and step 5 on page 138. Deselect Run setup in Manual mode, and click BD FACSCanto II Instructions for Use...
- Page 63 If setup is successful, see Table 5-1 on page 60. It is important to monitor setup data for trends. See Reviewing Levey- Jennings Reports on page 74. If you are using BD FACSDiva software to acquire samples, close BD FACSCanto clinical software. Chapter 5: Cytometer QC and Setup...
-
Page 64: Optimizing With Bd Facscanto Clinical Software
Optimizing with BD FACSCanto Clinical Software During optimization, you can adjust thresholds, detector voltages, and spectral overlap values for a panel type. The software uses BD Biosciences default settings the first time you optimize. When you make changes, the new settings apply to all tubes and samples of this panel type. - Page 65 (Loader only) Make sure the optimization tubes are installed in the correct carousel positions, and click Click Chapter 5: Cytometer QC and Setup...
- Page 66 (Manual only) Install the first optimization tube when prompted, and click At the Cytometer Setup Optimization screen, click • Acquisition begins, and events appear in the plots. • Right-click the axis labels on a plot to choose other parameters. BD FACSCanto II Instructions for Use...
- Page 67 For clinical applications that use tandem conjugates such as APC-Cy7 or PE-Cy7, spectral overlap varies from lot to lot. Because BD FACSCanto clinical software setup targets the average lot, you might need to adjust spectral overlap settings for these reagents.
- Page 68 To prevent backflow into the tube, follow the tube removal NOTICE sequence exactly. For more information, see Cytometer Troubleshooting on page 190. (Manual only) When prompted, place the next tube on the SIT, and click Repeat steps 3 through 6. BD FACSCanto II Instructions for Use...
- Page 69 You can also save an electronic copy of the report and print it later. When you click Save, the software automatically saves PDF files of Application Setup Reports in C:\Program Files\BD FACSCanto Software\SetupReports. When there are no more tubes to optimize, click , and then Optimized setup results are saved to the panel name.opt file in the...
-
Page 70: Maintaining User-Specific Optimization Settings
Restore While the software is not running, The software BD Biosciences delete the panel type.opt file. automatically default settings rebuilds the panel Restart the software, and run setup. type.opt file with BD- defined settings. BD FACSCanto II Instructions for Use... -
Page 71: Using Cytometer Controls
Adjust the signal for events displayed in plots by changing detector voltages. Higher voltages amplify the signal. Lower voltages decrease the signal. BD FACSCanto clinical software automatically recalculates spectral overlap when you change detector voltages. To change a setting, click in the field containing the value you want to change. Up and down arrows and a appear. - Page 72 Enable a parameter as a threshold by selecting the checkbox beside it. Click in the associated Value field to set the threshold value (Figure 5-6 on page 73). Use one of the editing methods specified in Adjusting Detectors on page 71. BD FACSCanto II Instructions for Use...
- Page 73 Figure 5-6 Adjusting Threshold pointer (Optional) Enable and set another threshold parameter. • Select the associated checkbox. • Edit the threshold value. • Select Or (any of the parameter thresholds can be met) or And (all of the parameter thresholds must be met). Adjusting Spectral Overlap Fluorochromes emit light over a range of wavelengths.
-
Page 74: Reviewing Levey-Jennings Reports
The software automatically creates a Levey-Jennings Report from the cytometer setup data. To view the report: From the main window, select the Levey-Jennings tab. on the tab indicates an out-of-range value on the report: BD FACSCanto II Instructions for Use... - Page 75 Check the plots in the report. Parameters outside the limits set by the lab manager are shown by a red x in the affected plot. To add comments to the report, click Comments: Enter text into the Comments field (up to 2500 characters), and click OK. See Figure 5-8 on page 76.
-
Page 76: Optimizing With Bd Facsdiva Software
Optimizing with BD FACSDiva Software To optimize cytometer settings in BD FACSDiva software: Quit BD FACSCanto clinical software, if necessary. Select Exit only, and click Launch BD FACSDiva software, enter your user name and password, and click OK. BD FACSCanto II Instructions for Use... -
Page 77: Verifying Cytometer Configuration And User Preferences
Verifying Cytometer Configuration and User Preferences Do not change the cytometer configuration without consulting BD Biosciences. Doing so can invalidate results. Choose Cytometer > View Configurations and verify the current parameters. If changes are necessary, contact your Lab Manager. Verify that the filters are appropriate to run FITC, PE, PerCP-Cy5.5, PE-Cy7, APC, and APC-Cy7 fluorochromes. -
Page 78: Creating The Experiment
Click the corresponding buttons in the Workspace toolbar to display the Browser ( ), Cytometer ( ), Inspector ( ), Worksheet ( Acquisition Dashboard ( ), and Biexponential Editor ( ) windows as needed. BD FACSCanto II Instructions for Use... - Page 79 (Optional) Create a folder: Select your database icon in the Browser, and click in the Browser toolbar. Rename the folder. database icon Select the folder, click to create a new experiment. An open experiment appears. closed experiment open experiment Rename the experiment. Chapter 5: Cytometer QC and Setup...
- Page 80 NOTICE The Add button is enabled only when less than the maximum number of parameters are shown in the Inspector. • To delete, click the selection button next to the parameter and click Delete. BD FACSCanto II Instructions for Use...
-
Page 81: Applying The Setup Results
Applying the Setup Results Right-click the experiment-level cytometer settings, and choose Apply Setup. Select a setup from the Setup Catalog. BD FACSCanto clinical software generated a Lyse/No Wash and a Lyse/ Wash setup. BD FACSCanto setup BD FACSDiva setup Entries in bolded text are setups created in BD FACSDiva NOTICE software. -
Page 82: Creating Compensation Controls
Click OK. The software adds a compensation control, containing stained control tubes and one unstained control tube, to your experiment. Normal worksheets containing the appropriate plots are added for each compensation tube. BD FACSCanto II Instructions for Use... -
Page 83: Optimizing Cytometer Settings
If the software fails to respond during acquisition and you need to restart the software, perform a fluidics startup prior to resuming acquisition. See BD FACSDiva Software General Issues on page 215 for more information. Always wear gloves when manually loading samples. A fluid flush of the exterior of the sample injection tube (SIT) occurs between samples that might contain biohazardous waste. - Page 84 Once the gate is adjusted, right-click its boundary and choose Apply to All Compensation Controls. This applies your gate changes to the P1 gates on the remaining compensation worksheets. BD FACSCanto II Instructions for Use...
- Page 85 Select all fluorescence histograms on the Unstained Control worksheet. In the Plot Inspector, select the Grid checkbox: checkbox selected Gridlines are used to delineate log decades on plots. In a four-log display, values are displayed from 26–262,143. Thus, the first log decade ranges from 26–262.
- Page 86 Remove the stained sample tube. Re-install the unstained sample tube and click Wait 3 to 5 seconds, then click to record data for the unstained control tube. Data acquisition stops when acquisition criteria have been met. BD FACSCanto II Instructions for Use...
-
Page 87: Calculating Compensation
When acquisition stops, remove the tube. Do not change the PMT voltages after the first compensation tube has been recorded. To calculate compensation, all tubes must be recorded with the same PMT voltage settings. If you need to adjust the PMT voltage for a subsequent compensation tube, delete the current compensation specimen, recreate the specimen and run all the compensation tubes again. - Page 88 Enter a name for the compensation setup, and select either Link and Save to link the setup to the experiment’s cytometer settings, or Apply Only. Click OK. NOTICE BD Biosciences recommends that you confirm the compensation setup by running a process control before you run samples. BD FACSCanto II Instructions for Use...
-
Page 89: Chapter 6: Running Samples With Bd Facscanto Clinical Software
Running Samples with BD FACSCanto Clinical Software • Running an Acquisition Worklist on page 90 • Reviewing an Analysis Worklist on page 108 • Reviewing a Worklist on page 111 • Logging Out on page 113... -
Page 90: Running An Acquisition Worklist
An acquisition worklist allows you to run a group of samples, optimize cytometer settings and save the data, and obtain automated analysis. When you first open BD FACSCanto clinical software, a blank worklist appears. BD FACSCanto II Instructions for Use... -
Page 91: Entering Information Into A Worklist
, and choose a panel, or • Press Alt- to access the Panel menu, and use the arrow keys to choose a panel. panel uses Trucount tubes panel does not use Trucount tubes Chapter 6: Running Samples with BD FACSCanto Clinical Software... -
Page 92: Running A Process Control
If you select a 4-color TBNK panel that does not use BD Trucount tubes, to calculate absolute counts you need to either • enter the WBC count (x 1000) and the lymphs (%), or • enter the absolute lymphocyte count (x 1000) -
Page 93: Acquiring Samples
If the software fails to respond during acquisition and you need to NOTICE restart the software, perform a fluidics startup prior to resuming acquisition. See BD FACSCanto Software General Issues on page 199 for more information. Enter all sample information into a worklist. (Loader) Prepare to acquire with the Loader. - Page 94 A dialog appears asking if you want to save the worklist: Click ; specify a file name and storage location in the next dialog box. (Loader) The carousel briefly mixes the samples, and acquisition begins. BD FACSCanto II Instructions for Use...
- Page 95 • Center the aspirator arm under the tube. There are three sensor pins on the aspirator arm. The bottom of the tube should sit within the center of the pins. Click Chapter 6: Running Samples with BD FACSCanto Clinical Software...
- Page 96 The Acquisition tab comes into view and events appear. See Figure 6-2 on page 96. Figure 6-2 Acquisition tab Observe event data. Data recording begins as soon as the flow stabilizes. Recording stops automatically after the designated acquisition targets have been met. BD FACSCanto II Instructions for Use...
- Page 97 You can pause and edit the report during the countdown. See Inspecting Lab Reports on page 101 for instructions. (Loader) Acquisition of the next tube starts automatically. The Status and FCS File fields update as each sample is recorded. Chapter 6: Running Samples with BD FACSCanto Clinical Software...
- Page 98 SIT cleaning occurs when the aspirator arm comes to center. When cleaning is finished, you are prompted to load the next tube. If you do not unload a tube when prompted, the following NOTICE message appears. BD FACSCanto II Instructions for Use...
-
Page 99: Options During Acquisition
Inspect recorded data on the Lab Report (page 101). • Skip tubes or samples (page 106). • Stop recording and acquisition (page 106). • Add samples to a worklist (page 106). Chapter 6: Running Samples with BD FACSCanto Clinical Software... - Page 100 Decide how to apply the optimized changes and click the corresponding button. The software applies the updated settings and finishes running the tube (unless you click Cancel or Revert to Original). The software overwrites all events recorded prior to optimizing for the current tube. BD FACSCanto II Instructions for Use...
- Page 101 Specifying a Display Time for the Lab Report Countdown Choose Tools > Options. Click Select On, time to display countdown (sec). Enter a number of seconds, from 1 to 10, and click Chapter 6: Running Samples with BD FACSCanto Clinical Software...
- Page 102 You can wait until the entire worklist has completed to review plots on the Lab Report. However, if you prefer to re-gate plots during a worklist run, follow these steps. At the Lab Report Countdown dialog, click Pause. BD FACSCanto II Instructions for Use...
- Page 103 Drag the selection handle to adjust the shape or size of the gate. • Drag the gate boundary between selection handles to move the gate. Gate changes apply only to the current tube. Click Chapter 6: Running Samples with BD FACSCanto Clinical Software...
- Page 104 After you inspect the data on the Lab Report, you can elect to re-run the tube. Click at the top of the Lab Report view. Select the tubes you want to re-run, and click You can re-run all tubes or a single tube of the current sample: BD FACSCanto II Instructions for Use...
- Page 105 Verifying Report Review BD FACSCanto clinical software provides an interface where you can append a virtual signature to reviewed reports. Click at the top of the Lab Report view. Select a reviewer, and click • Select Current User for the current, logged-in user.
-
Page 106: Stopping Recording
Adding Samples to the Worklist You can add samples to a worklist when it is stopped. Click and then to stop the worklist. If a sample tube was loaded manually, remove the tube from the SIT. BD FACSCanto II Instructions for Use... -
Page 107: Importing A Worklist From Spa Software
Importing a Worklist from SPA Software You can import sample information from a worklist created in BD FACS Sample Prep Assistant (SPA) software v2.0 or v3.0. To import the worklist, all reagent and panel names must exactly match those used in BD FACSCanto clinical software. -
Page 108: Reviewing An Analysis Worklist
Reviewing an Analysis Worklist An analysis worklist allows you to reanalyze FCS files previously created by BD FACSCanto clinical software. Only FCS files created in BD FACSCanto clinical software can be processed in an analysis worklist. Do not modify BD FACSCanto FCS files with other software applications. - Page 109 To add all files in a folder (including files in subfolders), click locate and select the folder, and click Verify that the worklist contains all required files. You cannot edit an analysis worklist. Continue to add FCS files (up to 200). Chapter 6: Running Samples with BD FACSCanto Clinical Software...
- Page 110 Opening an Existing Analysis Worklist Choose File > Open Worklist. Navigate to the folder containing your saved worklists. By default, worklists are stored in C:\Program Files\BD FACSCanto Software\Worklists. From the Files of Type drop-down menu at the bottom of the window, choose Analysis Worklists (*.wka).
-
Page 111: Reviewing A Worklist
Sample marked as reviewed To review a Lab Report, do the following. Double-click the Status field for the sample that needs review. The Lab Report for that sample appears (Figure 6-3 on page 112). Chapter 6: Running Samples with BD FACSCanto Clinical Software... - Page 112 Lab Reports in the worklist. Save the worklist. Saving a worklist allows you to reanalyze data and review Lab Reports at a later time and use the worklist as a template. BD FACSCanto II Instructions for Use...
-
Page 113: Logging Out
Logging Out To stop using the software without shutting down the flow cytometer, click to log out. The next user can now log in. Chapter 6: Running Samples with BD FACSCanto Clinical Software... - Page 114 BD FACSCanto II Instructions for Use...
-
Page 115: Chapter 7: Running Samples With Bd Facsdiva Software
Running Samples with BD FACSDiva Software This section describes how to use BD FACSDiva software features to record and analyze sample data. As an example, data will be recorded and analyzed for two tubes of human peripheral blood stained with the following reagents: •... -
Page 116: Setting Up The Global Worksheet
To switch between the normal and global worksheet view, click the Global Worksheets button on the Worksheet toolbar ( BD FACSDiva software v5.0 is required to run the BD FACSCanto II flow cytometer. Older versions of BD FACSDiva software will not work with a BD FACSCanto II flow cytometer. - Page 117 TBNK_001 and TBNK_002; click OK. On the global worksheet, create plots for previewing the data. For example, create FITC vs SSC, APC vs PE-Cy7, APC vs PE, APC vs APC-Cy7, and APC vs PerCP-Cy5.5 dot plots. Chapter 7: Running Samples with BD FACSDiva Software...
-
Page 118: Recording Data
If the software fails to respond during acquisition and you need to restart the software, perform a fluidics startup prior to resuming acquisition. See BD FACSDiva Software General Issues on page 215 for more information. Always wear gloves when manually loading samples. A fluid flush of the exterior of the sample injection tube (SIT) occurs between samples that might contain biohazardous waste. - Page 119 OK. Remove the tube and repeat step 1 to properly reinstall it. While data is being acquired, draw a gate around the lymphocytes; set the other plots to show data from the lymphocyte population. Click Chapter 7: Running Samples with BD FACSDiva Software...
-
Page 120: Importing A Worklist From Spa Software
Importing a Worklist from SPA Software You can import sample information from a worklist created in BD FACS Sample Prep Assistant (SPA) software v2.0 or v3.0. (Optional) In Sample Prep Assistant software, print a report of the worklist you want to import into BD FACSDiva software. - Page 121 SPA software. If there is a discrepancy, create a new panel template in BD FACSDiva software to match the reagent panel in the SPA software; otherwise, go to step 4.
-
Page 122: Analyzing Data
Lymphocytes in the Plot Inspector. Select all plots and click the Title tab in the Plot Inspector; select the checkboxes to display the tube and specimen names in the plot titles. BD FACSCanto II Instructions for Use... - Page 123 Draw a gate around the double-positive population on the CD3 APC vs CD4 APC-Cy7 plot, and name the population T Helper. Draw a gate around the double-positive population on the CD3 APC vs CD8 PerCP-Cy5-5 plot; name the population T Cytotoxic. Chapter 7: Running Samples with BD FACSDiva Software...
- Page 124 Print the analysis. Figure 7-3 Lymphocyte analysis (example) BD FACSCanto II Instructions for Use...
-
Page 125: Reusing The Analysis
Expand the TBNK Analysis global worksheet in the Browser. On the Worksheet toolbar, click the Global Worksheets button ( ) to switch to the normal worksheet view. Create a new normal worksheet for the destination tube; rename the worksheet. Chapter 7: Running Samples with BD FACSDiva Software... - Page 126 To control where the plots are placed, create a new normal (tube- specific) worksheet before data is recorded. BD FACSCanto II Instructions for Use...
-
Page 127: Logging Out
Logging Out Log out when you are finished using BD FACSDiva software, but not ready to shut down the system. Choose File > Log Out. If the system will be used to run samples after you log out, select Log out only. - Page 128 BD FACSCanto II Instructions for Use...
-
Page 129: Chapter 8: Using The Loader With Bd Facsdiva Software
Using the Loader with BD FACSDiva Software • Getting Ready on page 130 • Assigning Carousels and Verifying Run Settings on page 132 • Preparing the Loader on page 136 • Running Samples on page 139 • Running Cleaning Tubes on the Loader on page 146... -
Page 130: Getting Ready
Select any Browser item within the open experiment, and choose Experiment > New Specimen. • Click the BD Panels tab and select a panel. • Specify the number of copies (each copy creates a new specimen in the Browser), and click OK. - Page 131 Figure 8-1 Panel Templates dialog If you imported panels, inspect the information and the cytometer settings for each panel type to make sure they are complete and appropriate. Chapter 8: Using the Loader with BD FACSDiva Software...
-
Page 132: Assigning Carousels And Verifying Run Settings
Assigning Carousels and Verifying Run Settings Choose Edit > User Preferences > Carousel tab > General tab, and make selections for printing and pausing. printing options reviewing options error handling options BD FACSCanto II Instructions for Use... - Page 133 Figure 8-2 on page 134. Click the Carousel tab > Save Options tab, and choose whether and where to automatically save the statistics results and Carousel Report. Click OK to save changes. Chapter 8: Using the Loader with BD FACSDiva Software...
- Page 134 You can choose to export the FCS data from a carousel run. Click the folder in the Export Folder column and choose a directory. C:\BDExport\FCS is the default folder. BD FACSCanto II Instructions for Use...
- Page 135 Click Print to print a record of tube and carousel assignments, as well as the FCS directory selected for each specimen. Use the printout as a guide when filling the carousels. Verify the Run Settings. Chapter 8: Using the Loader with BD FACSDiva Software...
-
Page 136: Preparing The Loader
Mix duration 3–25 seconds Allows you to set the duration of the interim mix Preparing the Loader Set up the cytometer for automatic loading. Figure 8-3 Automatic loading tube guide forward aspirator arm bar horizontal BD FACSCanto II Instructions for Use... - Page 137 For accurate results, match the tubes to those listed on the printed worklist (BD FACSCanto clinical software) or Carousel Setup (BD FACSDiva software). Print out a copy of tube assignments and use the printout as a guide when filling each carousel.
- Page 138 To run the Loader, the doors must be closed. Tubes will not load with the doors open. The currently running tube will be unloaded if you open the doors during a run. Loader doors (closed) BD FACSCanto II Instructions for Use...
-
Page 139: Running Samples
If the software fails to respond during acquisition and you need to restart the software, perform a fluidics startup prior to resuming acquisition. See BD FACSDiva Software General Issues on page 215 for more information. To activate the acquisition controls, select the first tube in your experiment with the current tube pointer. - Page 140 6 for the remaining tubes on the carousel. Load the next carousel when prompted; click Continue. When done, review the Carousel Run Report (Figure 8-6 on page 141). Any tube errors that occurred during the run are highlighted. BD FACSCanto II Instructions for Use...
-
Page 141: Skipping Or Re-Running Samples
DDMMYYYY represents the date and HHMMSS represents the time the new file was saved. • If the Automatic Saving... preference is enabled for statistics results, a new row is written to the statistics results file. Chapter 8: Using the Loader with BD FACSDiva Software... - Page 142 The carousel moves to the next tube or specimen. To re-run a tube or specimen: Click in Carousel Controls. In the dialog that appears, choose either tube or specimen. The carousel moves to re-run the selected tube or specimen. BD FACSCanto II Instructions for Use...
- Page 143 Click New Carousel and reassign the carousel rack; click OK to close the window. Click Run Carousel in Carousel Controls. In the re-run dialog that appears, select the tubes or specimens you want to re-run; click OK to close the dialog. Chapter 8: Using the Loader with BD FACSDiva Software...
-
Page 144: Adding Tubes To An Existing Carousel
In the dialog that appears, select all tubes in the carousel; click OK to close the dialog. The run begins. Stopping a Run To stop a carousel, click in Carousel Controls. The run stops and the Carousel Report appears. BD FACSCanto II Instructions for Use... -
Page 145: Running A Single Tube
In the dialog that appears, select the tube you want to run; click OK to close the dialog and begin the run. See Figure 8-7 on page 145. Figure 8-7 Single Tube Loader dialog When the tube is finished, click in the Acquisition Dashboard. Chapter 8: Using the Loader with BD FACSDiva Software... -
Page 146: Running Cleaning Tubes On The Loader
Move the current tube pointer to the first cleaning tube. Place tubes filled with the appropriate solution in the designated positions in the cleaning rack. BD recommends using at least BD FACSClean solution and DI water. Click OK to begin cleaning. BD FACSCanto II Instructions for Use... -
Page 147: Chapter 9: Shutting Down
Shutting Down At the end of the day, shut down the cytometer. BD FACSCanto Clinical Software Create a worklist. • Enter Clean as the Sample ID. • Choose a two-tube panel (such as 4 color TBNK) from the panel field menu. - Page 148 When prompted, install a tube with 3 mL of BD FACSClean solution or 10% bleach on the SIT. Firmly push up on the tube until it comes to a complete stop and is fully seated. Click After 5 minutes, click Do not click When prompted, unload the tube.
-
Page 149: Bd Facsdiva Software
Use the procedure, Running Cleaning Tubes on the Loader on page 146, when the Loader is installed. Install a tube with 3 mL of BD FACSClean solution or 10% bleach on the SIT. Firmly push up on the tube until it comes to a complete stop. - Page 150 Choose Cytometer > Fluidics Shutdown, and then follow all prompts. Turn off cytometer power. BD Biosciences recommends turning off the cytometer when not in use to preserve laser life. NOTICE After every 4 hours of operation, and during cytometer shutdown, you will hear a hiss as condensed water discharges from the fluidics cart pumps into the condensation trap.
- Page 151 Use a dry lint-free cloth to remove residual moisture. Place an empty tube on the SIT to catch any BD shutdown solution that might drip from the SIT. Empty the condensation trap located underneath the fluidics cart power panel.
- Page 152 BD FACSCanto II Instructions for Use...
-
Page 153: Chapter 10: Maintenance
Maintenance • Scheduled Maintenance on page 154 • Unscheduled Maintenance on page 164... -
Page 154: Scheduled Maintenance
13 on page 151. Purge fluid filters Removes air from fluid filters, Weekly ensuring they will not dry out See Purging the Fluidics Filters on page 158. Change waste container See step 6 on page 158. Monthly BD FACSCanto II Instructions for Use... - Page 155 Decontaminate fluidics Decontaminates the internal Monthly and before (Long Clean) sheath path with service calls BD FACSClean solution, then rinses with BD FACS shutdown solution See page 160. Replace air filter Ensures proper cytometer Every 6 months performance See Replacing the Air Filter on page 161.
-
Page 156: Emptying The Waste Container
Detach the waste container’s sensor line and fluid line from the fluidics cart waste port (Figure 10-2 on page 157). • Pull the sensor straight out. • Press the metal clip on the fluid line. BD FACSCanto II Instructions for Use... - Page 157 Figure 10-2 Closeup of waste port waste fluid line sensor with metal clip The waste container can become pressurized when the cytometer is running. Always disconnect the container from the fluidics cart before you empty it. Wait at least 30 seconds for pressure to dissipate before you remove the waste cap or level sensor cap.
-
Page 158: Purging The Fluidics Filters
Run the Prime After Tank Refill for all fluids to ensure all fluid lines are primed. See Priming Fluidics Lines on page 169. Place a few paper towels beneath the filter to be purged. BD FACSCanto II Instructions for Use... - Page 159 Loosen the bleeder valve near the top of the filter by turning it counterclockwise. NOTICE Do not loosen the bottom bleeder valve. Ensure it is tightened. Do not completely unscrew the valve. If you do, it will come off. loosen this bleeder valve DO NOT loosen this bleeder valve...
-
Page 160: Decontaminating The Fluidics System (Long Clean)
Check all fluid levels. Empty the waste if needed. The Cytometer menu in BD FACSCanto clinical software differs slightly from the BD FACSDiva Cytometer menu. Instructions in this and the following sections list the BD FACSCanto menu first, followed by the BD FACSDiva menu, in parentheses. -
Page 161: Replacing The Air Filter
Replacing the Air Filter Turn off the cytometer power. On the cytometer, open the right side door by pressing the black button, and then twisting and pulling the handle that pops out. On the door’s interior, turn the tabs located along the upper edge of the filter to release the old filter. -
Page 162: Replacing Fluidics Filters
Change the fluid filters when you see increased debris in FSC vs SSC plots, or every 6 months. Place a few paper towels beneath the filter. Remove the filter by pressing the metal tabs on each quick-disconnect coupling. See Figure 10-3 on page 163. BD FACSCanto II Instructions for Use... - Page 163 Figure 10-3 Removing the filter metal tab loosen this bleeder valve FLOW quick-disconnect coupling metal tab Position the new filter and connect the couplings. Write today’s date on the filter so you will know when to replace it. Loosen the top bleeder valve by turning it counterclockwise. NOTICE Do not loosen the bottom bleeder valve.
-
Page 164: Unscheduled Maintenance
See Cleaning the Flow Cell on needed page 173. Bubble Filter Purge Removes air from the bubble If fluidics run dry, or filter when CVs are poor See Purging the Bubble Filter on page 174. BD FACSCanto II Instructions for Use... - Page 165 Decontaminate the Cleans out the fluidics lines with Before long-term storage fluidics system for BD FACSClean solution, then storage fills them with BD FACS shutdown solution See Decontaminating the Fluidics System for Storage on page 175. Replace the Bal seal...
-
Page 166: Changing A Cubitainer
BD FACSClean solution waste container BD FACSFlow solution Each cubitainer and the waste container has its own color-coded port. Ensure the cytometer is not acquiring events. Detach the sensor and fluid line from the cart. BD FACSCanto II Instructions for Use... - Page 167 • Pull the sensor straight out. sensor • Press the metal clip on the fluid line. metal clip You could damage the sensor line if you leave it connected while changing a cubitainer. Unscrew the cap on the cubitainer. Chapter 10: Maintenance...
- Page 168 To ensure that the appropriate solutions are dispensed, match the label on the container to the port on the fluidics cart. Prime the fluidics. Important: Continue with the procedure in Priming Fluidics Lines on page 169. BD FACSCanto II Instructions for Use...
- Page 169 Priming Fluidics Lines Choose Cytometer > Cleaning Modes > Prime After Tank Refill. Select the checkboxes for the cubitainers you changed; click OK. Click OK when the completion message displays. If the fluidics are not functioning properly, perform Removing an NOTICE Air Lock.
- Page 170 Select the checkbox that corresponds to the filter you have bypassed. Click OK. BD FACSDiva software BD FACSCanto clinical software Ensure fluid is moving through the bypass tubing. When the prime finishes, remove the bypass tubing. Reattach the filter to the fluidics cart. BD FACSCanto II Instructions for Use...
-
Page 171: Cleaning External Surfaces
Figure 10-6 on page 175 and steps 3, 4, 9, and 10 of the Replacing the Bal Seal procedure that starts on page 175. NOTICE Do not use BD FACSClean solution or bleach to clean or disinfect the barcode reader. See Cleaning the Barcode Reader on page 42. Chapter 10: Maintenance... -
Page 172: Removing Bubbles From The Flow Cell
To avoid potential shock, always switch off the power and unplug the AC power cord before you begin cleaning. Wipe all accessible surfaces with BD FACSClean solution. Wet a fresh cloth with DI water and wipe all bleach-exposed surfaces to prevent corrosion. -
Page 173: Cleaning The Flow Cell
BD FACSDiva software A progress message is displayed during the cleaning. After the completion message displays, wait 5 minutes. Waiting allows BD FACSClean solution to dissolve deposits in the flow cell cuvette. Click OK. Remove the tube from the SIT. -
Page 174: Purging The Bubble Filter
Click OK when the completion message displays. Repeat steps 1 through 3 until bubble-free liquid enters the flow cell from the bubble filter. If you are using BD FACSCanto clinical software, choose Cytometer > Cleaning Modes > De-gas Flow Cell. BD FACSCanto II Instructions for Use... -
Page 175: Decontaminating The Fluidics System For Storage
Decontaminating the Fluidics System for Storage Perform steps 1 through 4 in Decontaminating the Fluidics System (Long Clean) on page 160. Shut down the software and turn off the power to the cytometer. Wipe down the SIT and the aspirator arm with DI water. See Shutting Down on page 147 for more information. - Page 176 Pull out the drawer. • If needed, remove the carousel. • Move the tube guide to manual position. See step 2 on page 51. Unscrew the retainer by turning it in the direction shown. BD FACSCanto II Instructions for Use...
- Page 177 Lower the retainer down the SIT and let it rest on the aspirator arm. Access the Bal seal at the notch on the right side of the SIT assembly. Unseat the Bal seal by using the Bal seal removal tool (Figure 10-7 on page 178) to gently pull it downward.
- Page 178 Center the Bal seal on the retainer. With one hand, support the retainer and Bal seal and with the other hand, move the aspirator arm to the left. Lower the retainer and Bal seal from the SIT. See Figure 10-8 on page 179. BD FACSCanto II Instructions for Use...
- Page 179 Figure 10-8 Removing the Bal seal and retainer from the SIT Hold the new Bal seal spring-side up (see figure), and slide it up the SIT. Use both hands to gently push it into its seated position. If the Bal seal is not quite in its seated position, replacing the retainer will seat it correctly.
- Page 180 Test the installation by manually loading a tube onto the SIT and running fluid. If you are using a Loader, ensure that the system is ready for automatic loading. See Figure 8-3 on page 136. BD FACSCanto II Instructions for Use...
-
Page 181: Reconnecting The Fluidics Cart Tubing
Reconnecting the Fluidics Cart Tubing The ports and connectors are color coded. Figure 10-9 Cytometer and fluidics cart ports cytometer ports fluidics cart ports Cytometer ports and their corresponding fluidics cart ports are listed in Table 10-1 on page 182. See Table 10-2 for port functions. Chapter 10: Maintenance... - Page 182 Waste out (aspirated) e. Communications Data port f. Sheath (B) BD FACSFlow solution port g. Waste (A) Waste out (non-aspirated) h. On/Off Auxiliary air supply switch. Keep in off position unless connected to house air. BD FACSCanto II Instructions for Use...
-
Page 183: Replacing The Fluidics Level Sensors
Table 10-2 Function of ports, buttons, and switches (continued) Port or Switch Additional Information i. Fluid Out BD FACSFlow solution port j. Communication Data port k. Power In Connects to cytometer. Do not connect to wall outlet l. Auxiliary Air In There will be no tubing on this port unless connected to house air. - Page 184 Ensure that the cytometer is not acquiring events. Detach the sensor and fluid line from the cart. Unscrew the cap on the cubitainer. Remove the level sensor assembly and discard into a suitable receptacle. BD FACSCanto II Instructions for Use...
- Page 185 Put a new level sensor assembly on the cubitainer or waste container. Hand-tighten the cap until it is fully closed. Figure 10-10 Level sensor assemblies waste level sensor BD FACSFlow level sensor BD FACSClean solution and (red connector) (blue connector)
-
Page 186: Replacing The Fluidics Cart Fuses
Removing the plug allows easier access to the fuse door. Insert a small screwdriver into the slot and gently pry the fuse door open. slot for screwdriver fuse door circuit breaker empty socket, plug removed BD FACSCanto II Instructions for Use... - Page 187 Gently pry out the fuse drawer until you can grip it. fuse drawer fuse door Remove the fuse drawer, and remove and dispose of the old fuses. Note the positions of the old fuses before you remove them. Duplicate these positions with the new fuses. Chapter 10: Maintenance...
- Page 188 Slide the drawer back into the cytometer until it snaps into place. Close the fuse access door. Reconnect the power cord to the fluidics cart. Plug the cytometer power cord into the wall outlet and switch on the power. BD FACSCanto II Instructions for Use...
-
Page 189: Chapter 11: Troubleshooting
For cytometer support from within the US, call (877) 232-8995. For support from within Canada, call (888) 259-0187. Customers outside the US and Canada, contact your local BD representative or distributor. Refer to our website, bdbiosciences.com, for up-to-date contact information. -
Page 190: Cytometer Troubleshooting
See Reconnecting the Fluidics Cart Tubing on page 181. Check tubing for kinks. BD FACSFlow cubitainer Replace the BD FACSFlow empty cubitainer. See Changing a Cubitainer on page 166. BD FACSCanto II Instructions for Use... - Page 191 Cytometer Troubleshooting (continued) Observation Possible Causes Recommended Solutions Flow cell will not fill Air in BD FACSFlow filter Purge air from the filter. See (continued) (fluidics cart) Priming Fluidics Lines on page 169. Air lock in BD FACSFlow See Removing an Air Lock on filter (on fluidics cart) page 169.
- Page 192 • Call BD Biosciences. QC fails after Long Residual BD FACSClean Run Fluidics Startup to flush the Clean solution in lines system with sheath fluid. Repeat until QC passes. BD FACSCanto II Instructions for Use...
- Page 193 Use only uncapped 12 x 75-mm sample tube does not fit BD Falcon polystyrene test tubes, snugly on SIT BD Trucount tubes, and BD FACS 7-color setup beads tubes. See System Requirements on page 28. Defective or cracked tube • Transfer sample to new tube.
- Page 194 After replacing or emptying fluids, replacing sheath fluid or by software wait until software detects status emptying waste change before restarting acquisition. It can take up to 30 seconds for the software to detect a fluid level change. BD FACSCanto II Instructions for Use...
-
Page 195: Loader Troubleshooting
Tube lifter hitting carousel Ensure the carousel is properly during ascent engaged with the alignment guide pin. If the problem persists, contact BD Biosciences for assistance. Tube lifter failure Contact BD Biosciences. Tube does not unload Tube lifter failure... - Page 196 See step 2 on page 139. Bubble in flow cell diverts Degas flow cell. See Removing stream Bubbles from the Flow Cell on page 172. Communication error Restart the system. Perform fluidics startup. See step 5 on page 47. BD FACSCanto II Instructions for Use...
- Page 197 Loader is not part of your system. Dialogs reminding you to insert the Loader and other software notifications no longer appear. In BD FACSCanto clinical software, choose Tools > Options. Click Select the checkbox in the Run Options dialog:...
-
Page 198: Fluidics Cart Troubleshooting
Power cord from fluidics cart Connect both ends of the cord. to cytometer disconnected Fuse blown Replace the fluidics cart fuses. See Replacing the Fluidics Cart Fuses on page 186. BD FACSCanto II Instructions for Use... -
Page 199: Bd Facscanto Clinical Software Troubleshooting
BD FACSCanto Clinical Software Troubleshooting Acquisition Indicator Lights The acquisition indicator lights may provide important information when troubleshooting software related issues. Ensure that these lights are on (see Electronics Components on page 20). BD FACSCanto Software General Issues Observation or Error... - Page 200 Barcode reader error Dirty barcode reader Clean barcode reader window window with isopropyl or ethyl alcohol and try again. Blurred or damaged Try scanning with a duplicate barcode label label (if available), or enter data manually. BD FACSCanto II Instructions for Use...
- Page 201 BD FACSCanto Software General Issues (continued) Observation or Error Possible Causes Recommended Solutions Message Tube not present error Tube not seated on SIT Push tube all the way up onto the SIT. Cracked tube • Transfer sample to new tube.
- Page 202 • Ensure you are using appropriate tubes. See System Requirements on page 28. • Replace or reinstall Bal seal. Vacuum error Tubing to fluidics cart Reconnect or straighten the kinked or disconnected tubing. See page 181. BD FACSCanto II Instructions for Use...
-
Page 203: Bd Facscanto Software Setup Wizard Messages
BD FACSCanto Software Setup Wizard Messages Messages Possible Causes Recommended Solutions No acquisition events Communication problem Turn on the power. were received from between hardware and Connect the Ethernet cable to cytometer software the cytometer and computer. Shut down the software, computer, and cytometer, and restart them. - Page 204 There is a vacuum error Vacuum tubing to waste Reconnect waste tank or tubing, cart disconnected and remove kinks. Waste tank disconnected, waste tubing disconnected or pinched Clogged aspirator arm Call BD Biosciences. BD FACSCanto II Instructions for Use...
-
Page 205: Bd Facscanto Software Setup Report Failure Messages
BD FACSCanto Software Setup Wizard Messages Messages Possible Causes Recommended Solutions There is a float switch Sheath tank not attached Reconnect sheath cubitainer or error to fluidics cart tubing, and remove kinks. Sheath tubing from fluidics cart to cytometer not attached or pinched... - Page 206 Kinked or clogged sheath Remove any kinks in tubing to the line fluidics cart. Clogged or airlocked Check the sheath filter. Open the sheath filter bleeder valves. If no fluid leaks out, remove the air lock. BD FACSCanto II Instructions for Use...
-
Page 207: Bd Facscanto Software Levey-Jennings Errors And Messages
BD FACSCanto Software Levey-Jennings Errors and Messages Observation Possible Causes Recommended Solutions LJ plots empty, no data, BD FACS Setup Beads-7 • If the file was renamed, no error message appears colors LJ.csv file missing rename it with its original name, and click Refresh. - Page 208 Dead cells or debris in Examine the sample under a sample microscope. Stained sample too old Check the reagent package insert. FCS file not created PC hard disk full Delete unnecessary files. Run disk utilities regularly. BD FACSCanto II Instructions for Use...
- Page 209 BD FACSCanto Software Acquisition (continued) Observation Possible Causes Recommended Solutions Acquisition stops High event rate (>10,000 • Increase threshold. events/sec) with more • Decrease threshold channel than 8 compensated gain. parameters • Dilute sample. • Define only channels of interest in parameter list.
-
Page 210: Bd Facscanto Software Tbnk Analysis Qc Messages
Various Look at the dot plots in BD FACSCanto Software Four- and Six-Color TBNK on page 212. Re-run the sample. Sample not mixed Vortex prior to loading the properly sample onto the SIT. BD FACSCanto II Instructions for Use... - Page 211 BD FACSCanto Software TBNK Analysis QC Messages (continued) Message Recommended Solutions Possible Causes Insufficient beads Cell concentration too Dilute the sample, re-stain, and acquired (<500) high run it again. % T-sum failure Large number of double- Inspect the gates and include all positive or double- required events.
-
Page 212: Bd Facscanto Software Four- And Six-Color Tbnk
BD FACSCanto Software Four- and Six-Color TBNK The following examples provide some assistance in troubleshooting BD Multitest reagent plots. Observation Possible Causes Recommended Solutions Cell populations in Inadequate lysing of Prepare sample again, and CD45 vs SSC extend sample ensure complete lysis. - Page 213 BD FACSCanto Software Four- and Six-Color TBNK (continued) Observation Possible Causes Recommended Solutions Debris encroaching on • Excessive mixing Prepare sample again. populations in CD45 vs • Aged blood or stained SSC plot cells Vertically compressed Side scatter too low Reacquire sample.
- Page 214 BD FACSCanto Software Four- and Six-Color TBNK (continued) Observation Possible Causes Recommended Solutions Indistinct populations; Incorrect spectral overlap Re-run setup, optimizing for events sparse or missing application. Re-run sample. from one population; lack of separation between CD3– and CD3+ cluster...
-
Page 215: Bd Facsdiva Software Troubleshooting
Acquisition Indicator Lights The acquisition indicator lights may provide important information when trou- bleshooting software related issues. Ensure that these lights are on (see Electron- ics Components on page 20). BD FACSDiva Software General Issues Observation Possible Causes Recommended Solutions... - Page 216 Wait until cytometer action is from cytometer complete. If after 2 minutes no timeout is received, restart cytometer and software. After restarting software, to prevent carryover, perform a fluidics startup before acquiring data: Choose Cytometer > Fluidics Startup. BD FACSCanto II Instructions for Use...
- Page 217 BD FACSDiva Software General Issues (continued) Observation Possible Causes Recommended Solutions Software not Press Ctrl-Shift-Esc. Locate responding (continued) BD FACSCanto clinical software in the Windows Task Manager; click End Task. If acquisition is in progress, data will be lost. Restart software. To prevent...
- Page 218 Revert to the default DPI: setting Right-click on the desktop and select Properties. Click the Settings tab. Click the Advanced button. With the General tab selected, use the drop-down menu to set DPI to 96 (normal size). BD FACSCanto II Instructions for Use...
-
Page 219: Bd Facsdiva Software Cytometer Setup
BD FACSDiva Software Cytometer Setup Observation Possible Causes Recommended Solutions Error creating Naming conflict with Locate the tube or worksheet compensation tubes existing tube or named (ParameterName) worksheet Stained Control, and change the name. Create the compensation tubes again. Error calculating... -
Page 220: Bd Facsdiva Software Acquisition
Adjust the threshold. clicking Acquire; high acquisition indicator Threshold not set to Set the threshold to the correct lights, except for those correct parameter parameter for your application. corresponding to threshold parameters, are blinking as expected BD FACSCanto II Instructions for Use... - Page 221 BD FACSDiva Software Acquisition (continued) Observation Possible Causes Recommended Solutions No events in plots after Cracked tube • Transfer sample to new tube. clicking Acquire, • Make sure you are using NO acquisition indicator appropriate tubes. lights are blinking SIT clogged Clean the flow cell.
- Page 222 Dirty flow cell Clean flow cell. See page 173. High CVs Sample flow rate too Decrease the flow rate. high Window extension set Contact lab manager to set the incorrectly window extension to 7.0. BD FACSCanto II Instructions for Use...
- Page 223 BD FACSDiva Software Acquisition (continued) Observation Possible Causes Recommended Solutions Acquisition stops High event rate (>10,000 • Increase threshold. events/sec) with more • Decrease threshold channel than 8 compensated gain. parameters • Dilute sample. • Define only channels of interest in parameter list.
-
Page 224: Bd Facsdiva Software Analysis
• Export the original data as between exported and negative values set to FCS 3.0. imported file zero during FCS 2.0 • Export FCS 2.0 data with export compensation disabled. • If statistical differences are significant, re-record the file. BD FACSCanto II Instructions for Use... -
Page 225: Display Troubleshooting
Display Troubleshooting Observation Possible Causes Recommended Solutions Software screen appears • Display setting was Right-click the desktop and distorted (height is changed from 96 dpi to select Properties from the compressed; New Lot ID 120 dpi menu. button is missing from Click the Settings tab. - Page 226 BD FACSCanto II Instructions for Use...
-
Page 227: Appendix A: Supplies And Replacement Parts
Appendix A Supplies and Replacement Parts To order supplies and options, contact your local BD Biosciences representative. For updated information and part numbers, refer to our website, bdbiosciences.com. • Cytometer Supplies on page 228 • Consumables on page 230... -
Page 228: Cytometer Supplies
Fluidics cart fuses: 2.5-A 250V Slo-blo Type T 343565 Loader front door assembly (Loader option only) 34401007 Loader side door assembly (Loader option only) 34349207 Preventive maintenance kit 64106807 Plastic O-ring pick tool 331430 BD FACSCanto II Instructions for Use... -
Page 229: Other Replacement Parts
Other Replacement Parts Item Part No. Sheath sensor probe (2-level) 338979 Waste sensor probe (2-level) 338978 Auxiliary sensor probe (1-level) 343835 Air filter (side door) 336303 Bal seal retainer 640116 Carousel kit, carousels 1–4 332727 Carousel kit, carousels 5–8 332728 Carousel kit, carousels 9–12 332729 Carousel kit, carousels 13–16... -
Page 230: Consumables
334224 Monoclonal antibodies BD Biosciences BD FACS™ lysing solution BD Biosciences 349202 a. Refer to the BD Biosciences Immunocytometry Products Catalog or the BD Biosciences website (bdbiosciences.com). b. US Patent Nos. 4,654,312; 4,902,613; 5,098,849 BD FACSCanto II Instructions for Use... -
Page 231: Labware
Labware Item Supplier Catalog No. 5-mL polystyrene test tubes, BD Biosciences 12 x 75-mm (BD Falcon tubes) (877) 232-8995 • uncapped, 125 per bag • 352052 • capped, 125 per bag • 352054 • capped, 25 per bag • 352058 •... - Page 232 BD FACSCanto II Instructions for Use...
-
Page 233: Appendix B: Technical Specifications
Appendix B Technical Specifications • Cytometer Specifications on page 234 • Fluidics Cart Specifications on page 238 • BD FACS Loader Specifications on page 239 For barcode reader specifications, refer to the information supplied by the manufacturer. -
Page 234: Cytometer Specifications
146 kg (320 lb)—cytometer only, excluding Loader and computer Maximum 168 kg (370 lb)—including Loader Power requirements 100/115/230 VAC (50–60 Hz) Current: 5A at 115 VAC 2.5A at 230 VAC Power consumption 500 W BD FACSCanto II Instructions for Use... -
Page 235: Environment
Forward and side scatter sensitivity Platelets can be resolved from noise Forward scatter sensitivity 1 micron Side scatter sensitivity 0.5 micron Optics Laser Specifications The following Class IIIb (3B) lasers are mounted on the BD FACSCanto II cytometer. Wavelength Power Manufacturer Model (nm) (mW) - Page 236 These lasers are contained within the cytometer, therefore the BD FACSCanto II flow cytometer is a Class I (1) laser product. Excitation Optics Optical platform Fixed optical assembly Beam geometry (all lasers) 9 μm x 65 μm elliptical beam Emission Optics Collection lens Optical gel–coupled to flow cell...
-
Page 237: Fluidics
Sheath consumption 1.1 L/hr, normal operation <1.0 mL/hr, standby Sample flow rates Assay dependent, controlled automatically by BD FACSCanto clinical software. Nominal rates: Low = 10 μL/min Medium = 60 μL/min High = 120 μL/min Sample acquisition rate 10,000 events/sec with <10% abort rate... -
Page 238: Fluidics Cart Specifications
51 kg (112 lb)—fluidics cart only, excluding tanks 82 kg (180 lb)—with tanks full Facilities No air supply or vacuum required Capacity BD FACSFlow cubitainer 20 L BD FACSClean solution cubitainer BD FACS shutdown solution cubitainer Waste tank 10 L BD FACSCanto II Instructions for Use... -
Page 239: Bd Facs Loader Specifications
Accommodates up to 40 uncapped 12 x 75-mm tubes • BD Falcon polystyrene test tubes • BD Trucount tubes • BD FACS 7-color setup bead tubes • Thickness of accumulated labels 0.125 mm (5 mils) no more than 3 labels thick Tube sample volume (maximum) 1.07 mL... - Page 240 BD FACSCanto II Instructions for Use...
-
Page 241: Index
Index Symbols adjusting cytometer settings 71 % T-sum failure 211 detectors 71 gates 102 Numerics PMT voltages 83 setup settings 67 7-color setup beads 29 spectral overlap 73 label, reading barcodes 27 threshold 72, 83 air filter, replacing 161 alcohol, isopropyl 172 analysis aborts, electronic 223 immunophenotyping 116... - Page 242 157 coefficient of variation (CV), high 222 compensation calculating 87, 88 gating data 87 setup 88 tubes, creating 82 components BD FACSCanto system 14 fluidics cart 22 computer shutting down 148, 150 starting 46 BD FACSCanto II Instructions for Use...
- Page 243 205 cytometer 71 diode, forward scatter 17 export file 92 disabling Loader 197 process 92 display, troubleshooting 218 cubitainer, changing 166 Diva software See BD FACSDiva cytometer software. cleaning 171 doors components 15 access 15 controls 71...
- Page 244 198 gates, adjusting 102 SIT 193 gating levels 47 compensation tubes 87 not recommended 172 data 116 required 28 manually adjusting 102 reapplying auto-gates 104 granularity, particle 17 hazard symbol definitions xii BD FACSCanto II Instructions for Use...
- Page 245 leaks cytometer 194 ID, carousel 108 fluidics cart 198, 225 immunophenotyping SIT 193 analysis 116 level Experiment 116 fluid 47 importing sensor 183 worklists 107, 120 light, scattered and emitted 17 in vitro diagnostic device 13 Loader Inspector window 36 about 25 installation kit 228 disabling 197...
- Page 246 97, 111 parameters 97 printing automatically 141 troubleshooting 213 setup 69 populations, troubleshooting 223 requirements, system 28 power button 15 re-running preferences samples 141 mixing 136 tubes 104 user 126 results, unexpected 222 BD FACSCanto II Instructions for Use...
- Page 247 reviewing setup Lab Reports 101, 105 about 50 worklists 111 adjusting settings 67 running age 50 process control 92 beads 50 samples 93, 139 compensation 88 setup 51 errors 203 failure 59, 63 manual mode 56 reports, viewing 69 sample injection tube (SIT) running 51 problems 191, 193 troubleshooting 203...
- Page 248 223 Trucount tubes 92 tubes changing 98 compatible 26 compensation 82 loading 57 pressurization errors 202 removing 59, 68, 85, 98 re-running 104 sample volume 239 skipping 106 timeout during unloading 98 BD FACSCanto II Instructions for Use...
- Page 249 PMT 83 compensation and 87 fluidics cart fuses 188 waste container cap 157 emptying 156 window Acquisition Dashboard 35 BD FACSDiva software workspace 34 Browser 35 Canto software components 32 Cytometer 36 extension, troubleshooting 223 Inspector 36 Worksheet 37...
- Page 250 BD FACSCanto II Instructions for Use...
Need help?
Do you have a question about the FACSCanto II and is the answer not in the manual?
Questions and answers